background image

11

 Installation Procedure  

en-us

Electrical Installation

Electrical requirements

You can find the identification plate with the electrical 
specifications on the underside of the appliance. The 
junction box must be located within 3


feet of the cooktop 

connection. It should be easily accessible for service 
purposes.

Power supply

Connect Electrical Supply

9

CAUTION

Before installing, turn off power supply at the 
service panel. Lock service panel to prevent power 
from being turned on accidentally.

9

CAUTION

To reduce the risk of electric shock and fire, do not 
use a flexible power supply cord.

Refer to rating label for more information. See "Customer 
Service" for rating label location.

The maximum current rating of the branch-circuit breaker, 
the wire sizes and the connections must conform to the 
requirements of the National Electrical Code or Canadian 
Electrical Code and all local codes and ordinances.

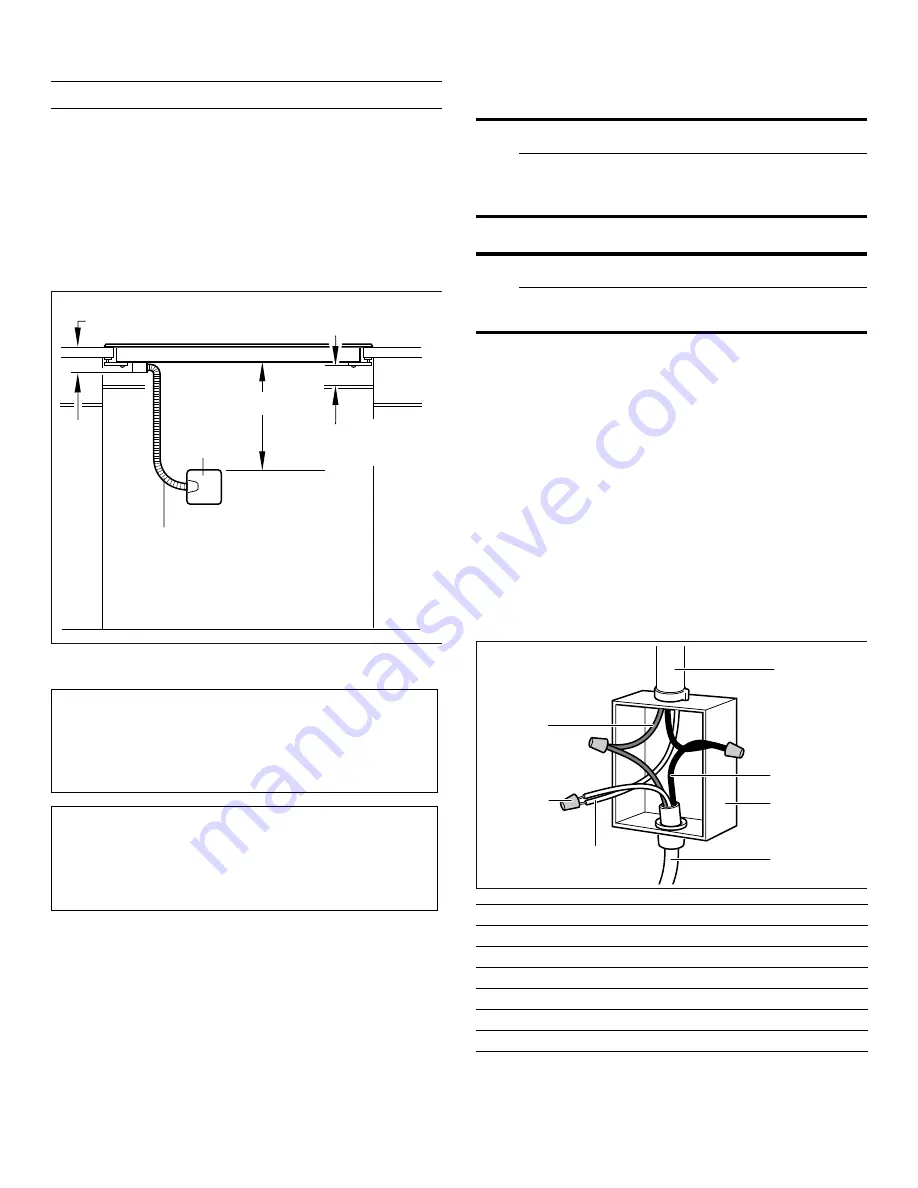
Attach flexible conduit to the junction box. Connect the 
lead wires to the junction box supply wires in proper 
phase:

black (L1) to black

red (L2) to red

green or bare to ground

If the cooktop is installed and connected as specified 
above, it will be grounded in compliance with the 
National Electrical Code.

DSSUR[PP

&RQQHFWLRQ

Å-´%R[

PD[PP)LWWLQJ&RQGXLWPP

&RQGXLWDSSUR[IWaPP

PLQPP

DLUFOHDUDQFH

&,PRGHOV

$PSFLUFXLWEUHDNHU

9ROWV:LUH+]
9ROWV:LUH+]

$OOZLWKPIOH[LEOHFRQGXLWLQFOXGHG

&,PRGHOV

$PSFLUFXLWEUHDNHU

9ROWV:LUH+]
9ROWV:LUH+]

$OOZLWKPIOH[LEOHFRQGXLWLQFOXGHG

1

House power supply cord

2

Black wire

3

Junction box

4

Cooktop power supply cord

5

Grounded green or bare cable

6

Certified UL connector

7

Red wire

Summary of Contents for CI 292 601

Page 1: ...DJJHQDX Installation instructions2 Notice de montage13 Instrucciones de instalaci n24 CI 292 601 CI 282 601 Cooktop Surface de cuisson Placa...

Page 2: ...nstalling the heat shield 9 Sealing tape for flush installation 10 Secure the cooktop to countertop 10 Electrical Installation 11 Electrical requirements 11 Connect Electrical Supply 11 Check the Inst...

Page 3: ...stroy the packaging after unpacking the appliance Never allow children to play with packaging material Hidden surfaces may have sharp edges Use caution when reaching behind or under appliance This app...

Page 4: ...d technician in accordance with these installation instructions The manufacturer is not responsible for any damage resulting from incorrect installation Never modify or alter the construction of the a...

Page 5: ...This product may contain a chemical known to the State of California which can cause cancer or reproductive harm Therefore the packaging of your product may bear the following label as required by Ca...

Page 6: ...35 mm flame retardant millboard covered with not less than no 28 gauge sheet metal 0 015 0 4 mm stainless steel 0 024 0 6 mm aluminum or 0 020 0 5 mm copper Verify that the cabinets above the cooktop...

Page 7: ...of 3 8 10 mm The worktop into which the cooktop is installed must be heat resistant up to 140 F 90 C The worktop must be reinforced if it is less than 13 16 inch 20 mm thick If the thickness of the w...

Page 8: ...pply of fresh air the cabinet must be designed accordingly The following is required for this A minimum clearance between the rear of the cabinet and the kitchen wall and between the surface of the wo...

Page 9: ...te The appliance is heavy It is advisable to install it with a second person Installing the heat shield 9 CAUTION Sharp edges Use protective gloves when installing the plate For safety reasons the hea...

Page 10: ...placing the cooktop into the cutout The appliance must be secured from below using the hold down brackets provided so it does not slip Note Protect delicate countertops by placing a wooden disk undern...

Page 11: ...ating of the branch circuit breaker the wire sizes and the connections must conform to the requirements of the National Electrical Code or Canadian Electrical Code and all local codes and ordinances A...

Page 12: ...he least amount of time possible When you call please indicate the product number E Nr and serial number FD Nr so that we can support you in a qualified manner You will find the data plate with these...

Reviews: