background image

Installation procedure

 en-us

9

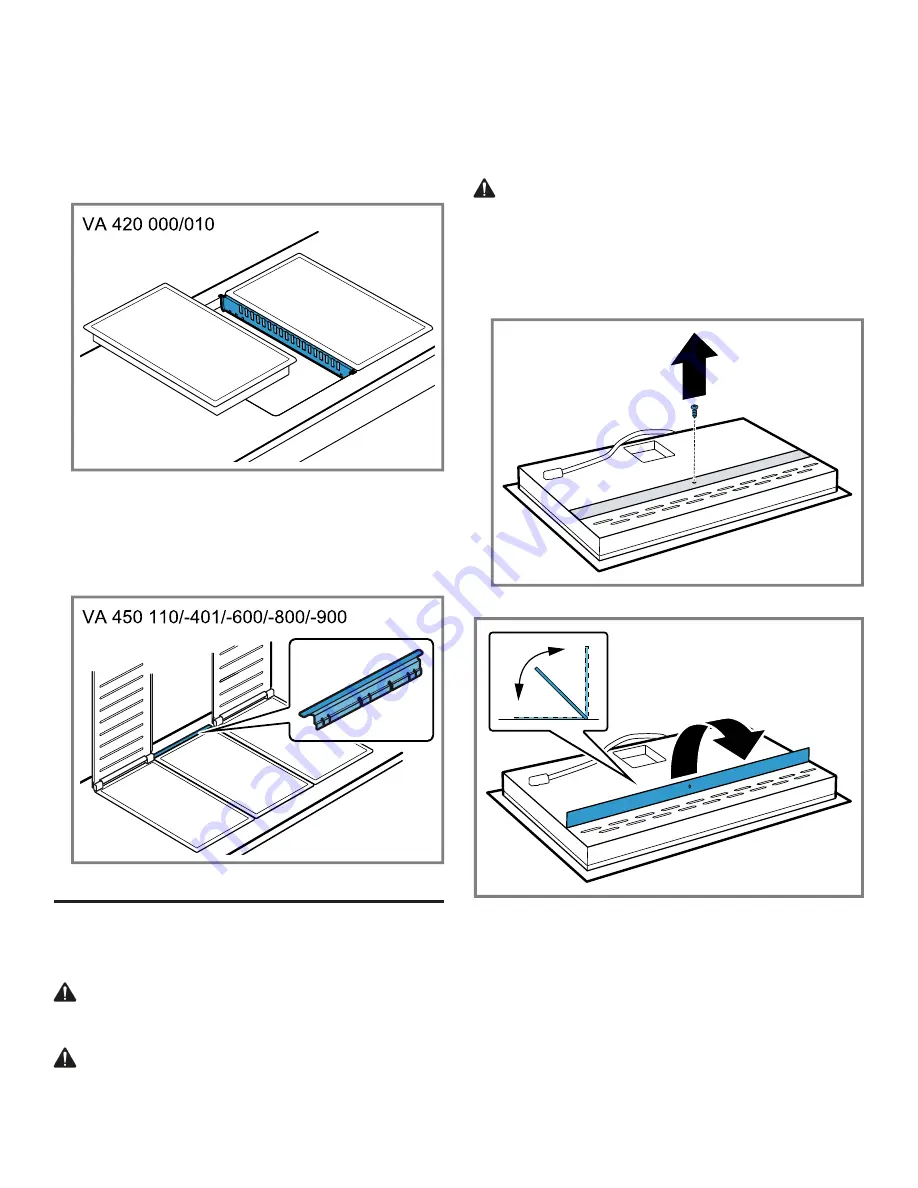
3.7 Combining several Vario appliances

1.

If you want to combine several Vario appliances, the

connecting strip VA 420 000/001/010/011 is required.

You can purchase it separately as a special accessory.

Consider additional space requirement for the connect-

ing strip between the appliances when making the

cutout. Refer to the Installation Instructions of

VA 420 000/001/010/011.

The appliances can also be installed in individual

cutouts. Ensure a minimum distance of 2" (51 mm) be-

tween the appliances.

2.

When combining appliances with appliance cover and

appliances without appliance cover, you can use the ap-

pliance extensions VA 450 110/401/600/800/900 to bal-

ance out dimension differences, if required.

Installation procedure

4 Installation procedure

Installation procedure

Follow these instructions to install the cooktop into the

countertop.

CAUTION

Sharp edges.

Use protective gloves when installing the appliance.

CAUTION

The appliance is heavy.

It is recommended that two people install this appliance.

4.1 Installing the heat shield

For safety reasons, the heat shield must be properly in-

stalled when closed cabinets are used. This prevents com-

ponents from overheating as a result of the recirculation of

hot air from the cooktop. The heat shield is the same width

as the cooktop.

CAUTION

Sharp edges.

Use protective gloves when installing the heat shield.

Requirement: You have unpacked the cooktop.

For shipping, the heat shield is screwed to the bottom of

the cooktop. Unscrew the fastening screw on heat

shield.

a

The heat shield will be able to rotate freely.

4.2 Securing the cooktop to the countertop

The cooktop must be secured from below using the hold-

down brackets provided, so it does not slip.

1.

Place the cooktop face down on a soft underground.

Summary of Contents for CX482611

Page 1: ...en us Installation Instructions 2 fr ca Instructions d installation 13 CX482611 CX492611 Full surface induction cooktop Surface de cuisson induction pleine surface Gaggenau...

Page 2: ...ush mounting 6 3 2 Cutout dimensions for 30 cooktops 6 3 3 Cutout dimensions for flush mounted 30 cook tops 6 3 4 Cutout dimensions for 36 cooktops 7 3 5 Cutout dimensions for flush mounted 36 cook to...

Page 3: ...less specifically recommended in the manuals Im proper installation service or maintenance can cause in jury or property damage Refer to this manual for guidance All other servicing should be done by...

Page 4: ...ate location Page 11 This appliance also incorporates an internal earth con nection for functional purposes only WARNING Before installing turn power OFF at the service panel Lock service panel to pre...

Page 5: ...nation Guide sup plied with these instructions for approved installation com binations Both products will have a label stating Approved Combination Guide Installing a range hood or a microwave hood ab...

Page 6: ...he cutout edges with a suitable cleaning agent follow the silicone manufacturer s pro cessing instructions Countertop material guide for flush mounting Refer to the following chart to see if flush mou...

Page 7: ...n us 7 3 4 Cutout dimensions for 36 cooktops Refer to these measurements for the models stated here CX 492 611 3 5 Cutout dimensions for flush mounted 36 cooktops Refer to these measurements for the m...

Page 8: ...lled Notes A minimum clearance between the rear of the cabinet and the kitchen wall and between the surface of the countertop and the upper area of the drawer An opening at the top to the rear of the...

Page 9: ...on procedure Follow these instructions to install the cooktop into the countertop CAUTION Sharp edges Use protective gloves when installing the appliance CAUTION The appliance is heavy It is recommend...

Page 10: ...cal specifi cations on the underside of the appliance Rating plate location Page 11 The junction box must be located within 3 feet of the cooktop connection It should be easily accessible for service...

Page 11: ...e repaired please contact our Customer Service With any warranty repair we will make sure your appli ance is repaired by an authorized service provider using genuine replacement parts We use only genu...

Page 12: ...en us Customer Service 12...

Page 13: ...imensions de la d coupe pour tables de cuisson de 30 po 17 3 3 Dimensions de la d coupe pour les tables de cuisson encastr es de 30 po 17 3 4 Dimensions de la d coupe pour tables de cuisson de 36 po 1...

Page 14: ...pas r parer remplacer ni retirer toute pi ce de l lectrom nager moins que cela ne soit sp cifiquement recommand par les manuels L installation les r parations ou l entretien inad quats pourraient caus...

Page 15: ...es p les Voir la fiche signal tique pour plus d information Emplacement de la plaque signal tique Page 22 Cet appareil int gre galement une prise de terre interne des fins fonctionnelles uniquement AV...

Page 16: ...icro ondes Seuls certains mod les peuvent tre install s au dessus d un four ou d un micro ondes V rifiez le guide de combinaison approuv fourni avec ces instructions pour les combinaisons d installati...

Page 17: ...proprement et pr cis ment Nettoyez et d graissez les bords d coup s avec un produit de nettoyage appropri suivez les instructions de traitement du fabricant de silicone Guide des mat riaux de comptoir...

Page 18: ...de la d coupe pour tables de cuisson de 36 po Reportez vous ces mesures pour les mod les indiqu s ici CX 492 611 3 5 Dimensions de la d coupe pour les tables de cuisson encastr es de 36 po Reportez v...

Page 19: ...ent tre remplies Remarques Un d gagement minimum entre l arri re de l armoire et le mur de la cuisine et entre la surface du comptoir et la partie sup rieure du tiroir Une ouverture en haut l arri re...

Page 20: ...re Proc dure d installation 4 Proc dure d installation Proc dure d installation Suivez ces instructions pour installer la table de cuisson dans le comptoir MISE EN GARDE Bords tranchants Utilisez des...

Page 21: ...g n rales suivantes sont remplies Vous pouvez trouver la plaque signal tique avec les sp cifications lectriques sur la face inf rieure de l appareil Emplacement de la plaque signal tique Page 22 La b...

Page 22: ...tre r par Lors de toute r paration r alis e dans le cadre de la garantie nous nous assurons que votre appareil est r par avec des pi ces de rechange d origine par un technicien d ment form et agr Nous...

Page 23: ...Service la client le fr ca 23...

Page 24: ...BSH Home Appliances Corporation 1901 Main Street Suite 600 Irvine CA 92614 USA www gaggenau com 1 877 442 4436 2021 BSH Home Appliances Corporation 9001444981 9001444981 en us fr ca 010616...

Reviews: