background image

en 

Environmental protection and saving energy

12

Zeolith drying 

The appliance features a Zeolith con-
tainer. Zeolith drying lets you save
energy.
Zeolite is a mineral that can store
moisture and heat energy and then
release them again.
During dishwashing heat energy is
used to heat up the washing water
and dry the mineral.
During the drying phase moisture
from the interior of the dishwasher is
stored in the mineral and heat energy
is released. The heat energy is blown
out into the interior of the dishwasher
with dry air. This speeds up and im-
proves drying.
Zeolith drying therefore saves a great
deal of energy.

Tip: 

To avoid impairing Zeolith drying

performance, do not position table-
ware parts directly in front of the in-
take opening or the blow opening of
the Zeolith container.
Do not position heat-sensitive table-
ware parts directly in front of the blow
opening of the Zeolith container. 
→ 

"Appliance", Page 15

AquaSensor

The AquaSensor is an optical meas-
uring device (light barrier) which
measures the turbidity of the rinsing
water. You can save water with the
AquaSensor.
Use of the AquaSensor depends on
the programme. If the soiling level is
high, the rinsing water is drained off
and replaced with fresh water. If the
soiling level is lower, the rinsing wa-
ter is used in the next wash cycle, so
reducing water consumption by 3-6
litres. In the automatic programmes
the temperature and run time are ad-
ditionally adjusted to the level of soil-
ing.

Sensors

The sensors adjust the programme
sequence and strength in the auto-
matic programmes depending on the
level and type of soiling.
The sensor has different sensitivity
settings that can be changed in the
basic settings. 
→ 

"Changing basic settings",

Page 42

Sensor setting

Description

Standard

Optimum setting for a
mixed load and heavily
soiled tableware. Saves
both energy and water.

Sensitive

Adjusts the programme
strength for effective re-
moval of food remnants
even with low soiling
levels. Energy and water
consumption are adjusted
accordingly.

Very sensitive

Adjusts the programme
strength for difficult condi-
tions of use, e.g. stubborn
dried-on food remnants.
Recommended setting
when using organic or eco-
logical detergents contain-
ing low levels of active
agents. Energy and water
consumption are adjusted
accordingly.

Summary of Contents for DF481100

Page 1: ...User manual DF481100 Dishwasher Gaggenau ...

Page 2: ...nformation for test institutes 21 Personalisation function 21 Additional functions 21 Features 22 Top basket 22 Bottom basket 24 Cutlery basket 25 Etagere 25 Folding prongs 25 Baking sheet spray head 26 Optional extra cleaning area 26 Stemware basket 27 Gastronorm container insert 29 Basket heights 29 Before using for the first time 29 Performing initial start up 29 Water softening system 30 Overv...

Page 3: ...and servicing 44 Cleaning the tub 44 Cleaning products 44 Tips on appliance care 44 Machine Care 45 Filter system 46 Cleaning spray arms 47 Troubleshooting 48 Appliance safety 48 Error code Fault display Sig nal 49 Washing results 51 Home Connect problem 57 Information on display panel 58 Malfunctions 58 Mechanical damage 59 Noise 60 Clean wastewater pump 61 Transportation storage and disposal 61 ...

Page 4: ...ppliance may be used by children aged 8 or over and by people who have reduced physical sensory or mental abilities or inadequate experience and or knowledge provided that they are supervised or have been instructed on how to use the appliance safely and have understood the resulting dangers Do not let children play with the appliance Cleaning and user maintenance must not be performed by chil dre...

Page 5: ...ord must be freely accessible If free access is not possible an all pole isolating switch must be installed in the permanent electrical installation according to the installation regulations When installing the appliance check that the power cable is not trapped or damaged Cutting through the supply hose or immersing the Aqua Stop valve in water is dangerous Never immerse the plastic housing in wa...

Page 6: ...ly with safety instructions and directions for use on packagings of detergent and rinse aid products may cause serious harm to health Follow the safety instructions and directions for use on the packagings of detergent and rinse aid products WARNING Risk of explosion Adding solvents to the interior of the appliance may cause ex plosions Never add solvents to the interior of the appliance Highly ca...

Page 7: ...ash out of the appliance Open the appliance door carefully if the programme is still running WARNING Risk of electric shock An ingress of moisture can cause an electric shock Only use the appliance in enclosed spaces Never expose the appliance to intense heat or humidity Do not use steam or high pressure cleaners to clean the appliance If the insulation of the power cord is damaged this is danger ...

Page 8: ... by trained specialist staff Only use genuine spare parts when repairing the appliance If the power cord of this appliance is damaged it must be replaced with a special connection cable which is available from the manufacturer or his Customer Service Risk to children WARNING Risk of suffocation Children may put packaging material over their heads or wrap themselves up in it and suffocate Keep pack...

Page 9: ...and closing the ap pliance door WARNING Risk of chemical burns Rinse aid and detergent may cause chemical burns to the mouth throat and eyes Keep children away from detergent and rinse aid products Keep children away from the appliance when open The wa ter in the interior of the dishwasher is not drinking water It may contain residues of detergents and rinse aid WARNING Risk of injury Children may...

Page 10: ...l damage and damage to the appliance Never kink crush modify or cut through water hoses Only use the water hoses sup plied with the appliance or genu ine spare hoses Never re use water hoses that have been used before If the water pressure is too high or too low the appliance may not be able to operate properly Make sure that the water pres sure in the water supply system is min 50 kPa 0 5 bar and...

Page 11: ...pliance door Opening appliance door Page 38 Environmental protection and saving energy Environmental protection and saving energy Environmental protection and saving energy Disposing of packaging The packaging materials are environ mentally compatible and can be re cycled Sort the individual components by type and dispose of them separ ately Saving energy If you follow these instructions your appl...

Page 12: ...r You can save water with the AquaSensor Use of the AquaSensor depends on the programme If the soiling level is high the rinsing water is drained off and replaced with fresh water If the soiling level is lower the rinsing wa ter is used in the next wash cycle so reducing water consumption by 3 6 litres In the automatic programmes the temperature and run time are ad ditionally adjusted to the level...

Page 13: ...alls If you subsequently install your dishwasher as a free standing appli ance you must stop it from tipping over e g by screwing it to the wall or installing it under a continuous work top that is securely connected to ad jacent cabinets 1 Follow the safety instructions Page 4 2 Follow the instructions for elec trical connection Page 14 3 Check the Scope of supply and the condition of the applian...

Page 14: ...ng water connection is not kinked crushed or twisted Electrical connection Connect your appliance to the power supply Connecting the appliance to the electricity supply Notes Please follow the Safety instruc tions Page 4 Connect the appliance to alternat ing current only in the range of 220 240 V and 50 Hz or 60 Hz Please note that the water safety system is only functional if there is a power sup...

Page 15: ...your appliance Familiarising yourself with your appliance Appliance You can find an overview of the parts of your appliance here 1 2 3 4 5 6 7 8 9 10 11 12 13 14 15 8 1 Rating plate Rating plate with E number and FD number Page 63 The data you need for Customer Service Page 62 1 Depending on the appliance specifications ...

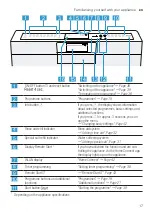
Page 16: ...ing of the appliance Overview of basic settings Page 40 9 Cutlery shelf1 Cutlery shelf Page 25 10 Upper spray arm The upper spray arm washes the tableware in the top basket If the tableware has not been washed properly clean the spray arms Cleaning spray arms Page 47 11 Intake opening of the Zeolith con tainer The intake opening is required for Zeolith drying Page 12 12 Blow opening of the Zeolith...

Page 17: ...ing basic settings Page 42 4 Rinse aid refill indicator Rinse aid system Adding rinse aid Page 32 5 Special salt refill indicator Water softening system Adding special salt Page 31 6 Display Remote Start 1 If you have activated the function and are con trolling the appliance via the Home Connect app the display lights up on the appliance 7 WLAN display Home Connect Page 42 8 Timer programming Sett...

Page 18: ... 38 15 Display1 The display shows information about pro grammes basic settings or additional functions You can change the basic settings via the display and the setting buttons Changing basic settings Page 42 16 Display The display shows information about pro grammes basic settings or additional functions You can change the basic settings via the display and the setting buttons Changing basic sett...

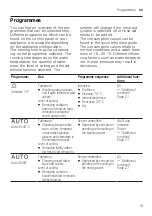
Page 19: ...pressure may result in deviations Programme Use Programme sequence Additional func tions Intensive 70 Tableware Washing pots and pans non fragile tableware and cutlery Level of soiling Removing stubborn burned or dried on food remnants containing starch and protein Intensive Pre Rinse Cleaning 70 C Intermediate rinse Final rinse 50 C Dry All Additional functions Page 21 Auto 35 45 C Tableware Clea...

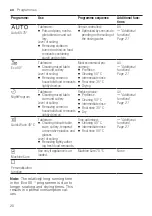
Page 20: ...ll Additional functions Page 21 NightProgram Tableware Cleaning mixed table ware and cutlery Level of soiling Removing common household food remnants lightly dried on Reduced noise Pre Rinse Cleaning 50 C Intermediate rinse Final rinse 35 C Dry All Additional functions Page 21 Quick Wash 45 C Tableware Cleaning delicate table ware cutlery temperat ure sensitive plastics and glasses Level of soilin...

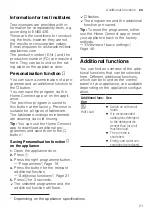
Page 21: ...he button 1 Saving Personalisation function on the appliance 1 Open the appliance door 2 Press 3 Press the right programme button Programmes Page 19 4 Press the button for the relevant additional function Additional functions Page 21 5 Press for 3 seconds a The selected programme and the additional function will flash a flashes a The programme and the additional function are saved Tip To reset the...

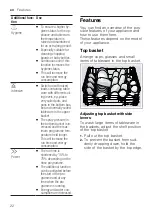
Page 22: ...gramme tem perature held longer This will increase the run time and energy consumption Power The run time is shortened by 15 to 75 depending on the rinse programme The additional function can be activated before the start of the pro gramme and at any time when the pro gramme is running Energy and water con sumption are increased Features Features Features You can find an overview of the pos sible ...

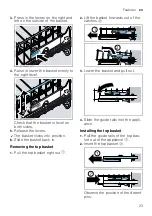
Page 23: ...levers a The basket clicks into position 6 Slide the basket back in Removing the top basket 1 Pull the top basket right out 2 Lift the basket forwards out of the catches 1 2 3 Lower the basket and pull out 4 Slide the guide rails into the appli ance Installing the top basket 1 Pull the guide rails of the top bas ket out of the appliance 2 Insert the top basket Observe the position of the detent pi...

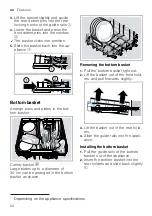
Page 24: ...utlery basket 1 Large plates up to a diameter of 34 cm can be arranged in the bottom basket as shown Removing the bottom basket 1 Pull the bottom basket right out 2 Lift the basket out of the front hold ers and pull forwards slightly 3 Lift the basket out of the rear hold ers 4 Slide the guide rails into the appli ance Installing the bottom basket 1 Pull the guide rails of the bottom basket out of...

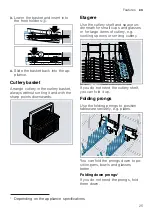
Page 25: ...utlery shelf and space un derneath for small cups and glasses or for large items of cutlery e g cooking spoons or serving cutlery If you do not need the cutlery shelf you can fold it up Folding prongs Use the folding prongs to position tableware securely e g plates You can fold the prongs down to po sition pans bowls and glasses better 1 Folding down prongs1 If you do not need the prongs fold them...

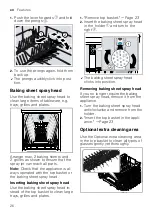
Page 26: ...ay head Inserting baking sheet spray head Use the baking sheet spray head in stead of the top basket to clean large trays grilles and plates 1 Remove top basket Page 23 2 Insert the baking sheet spray head in the holder and turn to the right a The baking sheet spray head clicks into position Removing baking sheet spray head If you no longer require the baking sheet spray head remove it from the ap...

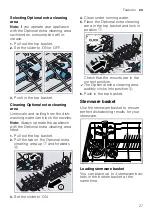
Page 27: ...he Optional extra cleaning area fitted 1 Pull out the top basket 2 Pull the tab on the Optional extra cleaning area up and forwards 3 Set the slider to ON 4 Clean under running water 5 Place the Optional extra cleaning area in the top basket and lock in position Check that the mounts are in the correct position a The Optional extra cleaning area audibly clicks into position 6 Push in the top baske...

Page 28: ...tem in the lower fix ing arm 4 Turn the rotating fixing arm clock wise and push down a The fixing arm clicks into position a The stemware is securely posi tioned in the stemware basket 5 Lift the stemware basket by the handle and place in the bottom basket To stop the stemware falling out make sure the stemware basket cannot tip over Arrange tableware Page 37 Unloading stemware basket Note Observe...

Page 29: ... to a mo bile device You can conveniently change all settings via the Home Connect app Home Connect quick start Page 42 Requirement The appliance has been installed and connected Page 13 1 Add special salt Page 31 2 Add rinse aid Page 32 3 Switch on the appliance a The display shows the settings for initial start up 4 Press repeatedly until the display shows the required setting Note If you select...

Page 30: ...e You can find out how hard your water is from your local water company or by using a water hardness tester Water hardness E Hardness range mmol l Setting value 0 8 Soft 0 1 1 0 8 9 10 Soft 1 2 1 4 9 10 11 12 Medium 1 5 1 8 11 12 13 15 Medium 1 9 2 1 13 15 16 20 Medium 2 2 2 9 16 20 21 26 Hard 3 0 3 7 21 26 27 38 Hard 3 8 5 4 27 38 39 62 Hard 5 5 8 9 39 62 Note Set the water hardness determ ined o...

Page 31: ... dispenser for special salt immediately before the pro gramme starts 1 Unscrew the lid of the dispenser for special salt and remove 2 On initial start up Fill the dispenser right up with water 3 Note Only use special salt for dishwashers Do not use salt tablets Do not use table salt Add the special salt to the dis penser a Funnel 1 Fill the dispenser right up with spe cial salt The water in the di...

Page 32: ...he run time and consumption values e g water and electricity Overview of consumption values with regeneration the water softening system Here you can find an overview of the maximum additional run time and consumption values during regenera tion of the water softening system Regeneration of the water softening system after x rinse cycles 6 Additional run time in minutes 7 Additional water consumpt...

Page 33: ...ting e g when using combined detergents with a rinse aid compon ent you can switch the rinse aid sys tem off Tip The function of rinse aid is lim ited with combined detergents You will generally get better results using rinse aid 1 Press 2 To open the basic settings press for approx 3 seconds 3 Press repeatedly until the display shows Rinse aid dispenser 4 Press or repeatedly until the display sho...

Page 34: ...th powder and liquid detergent the dosage can be individually adjusted to the level of soiling of the table ware For better washing and drying results and to avoid damage to the appli ance please additionally use Spe cial salt Page 31 and Rinse aid Page 32 Combined detergent Besides conventional separate deter gents a number of products are available with additional functions These products contai...

Page 35: ...hard ness of 17 E To prevent sticking only touch de tergents in a water soluble pouch with dry hands and only ever place them in a dry detergent dispenser Even if the rinse aid and special salt refill indicators light up wash ing programmes will run properly with combined detergents The function of rinse aid is limited with combined detergents You will generally get better results using rinse aid ...

Page 36: ...age to glass and table ware Only put glasses and china in the dishwasher if it is marked as dish washer safe by the manufacturer Avoid damage to glass and table ware Cause Recommendation The following table ware is not dish washer safe Items of cutlery and tableware made from wood Decorated glass ware antique and hand crafted table ware Plastic parts not resistant to heat Tableware made from coppe...

Page 37: ...specifications Page 63 For better washing and drying res ults position items with curves or recesses at an angle so water can run off 1 Remove large remnants of food from tableware To save resources do not pre rinse tableware under running wa ter 2 Observe the following when arran ging tableware Put heavily soiled tableware in the bottom basket e g pans The more powerful the spray jet the better t...

Page 38: ...y and ideal for normally soiled tableware It is the most efficient programme for the combination of energy wa ter consumption for this type of tableware and evidences conform ity with the EU Ecodesign Direct ive If you do not perform any actions on the appliance for 10 minutes the appliance will automatically switch off Setting a programme To adjust the wash cycle to the soil ing level of the tabl...

Page 39: ...ly ajar for a few minutes and then close it This will help prevent excess pressure building up in the appliance and stop the appliance door bursting open 1 Open the appliance door carefully 2 Press a The programme is saved and the appliance switches off 3 Press to resume the pro gramme Terminate programme To end a programme early or to switch from a programme that has already started you will need...

Page 40: ...dness 0 62 16 20 medium1 Set the water hardness Overview of water hardness settings Page 30 Rinse aid dispenser 0 6 51 Set or switch off the amount of rinse aid to be dis pensed Setting the amount of rinse aid Page 33 Sensor setting Standard1 Sensitive Very sensitive Set the water sensor for identifying soiling Sensors Page 12 Extra Dry on off1 Switch Extra Dry on or off for each operation The tem...

Page 41: ...ramme for when the appliance is switched on Programmes Page 19 Tone volume Scale with multiple levels Set the signal volume at the end of the pro gramme Level 0 switches the signal tones off Button volume Scale with multiple levels Set the button volume during operation Level 0 switches the button tones off Child proof lock on off1 Switch the Electric childproof lock Page 11 on or off WLAN on off ...

Page 42: ...ty of the Home Connect function depends on the availability of Home Connect services in your coun try You can find information about this at www home connect com To be able to use Home Connect you must first set up the connection to the WLAN home network Wi Fi1 and to the Home Connect app Connecting the appliance to WLAN home network Wi Fi Page 43 The Home Connect app guides you through the entire...

Page 43: ...ating Remote Start When you have selected Manual in the basic settings of this function ac tivate the function on your appliance Requirements The appliance is connected to your WLAN home network The appliance is connected to the Home Connect app Manual is selected in the Basic settings Page 41 of this func tion A programme is selected Press If you open the appliance door the function is automatica...

Page 44: ...nect app Information on data protection can be retrieved in the Home Connect app Cleaning and servicing Cleaning and servicing Cleaning and servicing To keep your appliance working effi ciently for a long time it is important to clean and maintain it carefully Cleaning the tub WARNING Risk of harm to health Using detergents containing chlorine may result in harm to health Never use detergents cont...

Page 45: ...osits Machine cleaner Detergent dispenser To ensure optimum cleaning perform ance the programme doses the de tergents independently of each an other during the relevant cleaning phase Correct placement of the de tergents is necessary here Run Machine Care without tableware if the indicator for Machine Care lights up on the control panel or if ad vised to do so by the display The in dicator will go...

Page 46: ... 5 Press 6 Press a Machine Care is run a Once the programme has ended the indicator for Machine Care goes out Filter system The filter system removes coarse soiling from the dishwashing cycle 1 2 3 1 Micro filter 2 Fine filter 3 Coarse filter Cleaning filters Soiling in the dishwashing water may block the filters 1 After each wash check the filters for residue 2 Turn the coarse filter anticlockwis...

Page 47: ...ockwise Make sure that the arrow mark ings match up Cleaning spray arms Limescale and soiling in the dish washing water may block the nozzles and bearings on the spray arms Clean the spray arms regularly 1 Unscrew the upper spray arm and pull down to remove 1 2 2 Pull up the lower spray arm to re move 3 Check the outlet nozzles on the spray arms for blockages under running water and remove any for...

Page 48: ...a special connection cable which is available from the manufacturer or his Customer Service Appliance safety Fault Cause Troubleshooting Appliance door opens acci dently Automatic door opening ac tivated accidently To prevent the appliance door opening accidentally activate the childproof lock Appliance door does not open Childproof lock is activated Press the top of the door in the middle twice i...

Page 49: ...l cified heating element 1 Descale the appliance 2 Operate the appliance with the wa ter softening system 1 E 3000 lights up Water protection system is activated 1 Turn off the water tap 2 Call Customer Service Page 62 E 3100 lights up Water protection system is activated 1 Turn off the water tap 2 Call Customer Service Page 62 E 3400 lights up Water is continuously run ning into the appliance 1 T...

Page 50: ...cked or kinked 1 Reposition the wastewater hose without kinks 2 Remove residues Siphon connection is still sealed Check the connection to the siphon and open if necessary Cover of the wastewater pump is loose Secure the cover of the Wastewa ter pump Page 61 so it clicks into position E 6102 lights up Wastewater pump is blocked Clean the wastewater pump Clean wastewater pump Page 61 Cover of the wa...

Page 51: ...he er ror code Washing results Fault Cause Troubleshooting Tableware is not dry No rinse aid used or dosage set too low 1 Add Rinse aid Page 32 2 Set the amount of rinse aid to be dispensed Setting the amount of rinse aid Page 33 Programme or programme option has no drying phase or the drying phase is too brief Select a programme with drying e g intensive strong or ECO pro gramme Page 19 Some opti...

Page 52: ...rm on the cutlery con tact points 1 Arrange cutlery individually where possible Page 37 2 Avoid points of contact Appliance interior still wet after wash cycle Not a fault The condensa tion drying principle causes water droplets in the tub they are indeed desirable here The moisture in the air condenses on the inside walls runs off and is pumped out No action required Remnants of food on table war...

Page 53: ...op baskets on the left and right to the same level Detergent residue in the ap pliance Lid of the detergent dis penser is blocked by items of tableware parts and will not open 1 Arrange tableware in the top basket tableware so the tab collecting tray is not obstructed by tableware Arrange tableware Page 37 Items of tableware are blocking the dispenser lid 2 Do not place tableware or fra grance dis...

Page 54: ...ing 2 Change your detergent if required Special salt dispenser is not screwed tight Screw the special salt dispenser tight Stubborn white coatings are present on tableware inside the appliance or the door Detergent substances are deposited there These coat ings cannot generally be re moved with chemicals Change your detergent Page 33 Clean the appliance mechanically The hardness range is set in co...

Page 55: ...hanical cleaning Page 44 or a machine cleaning product It may not always be possible to com pletely remove deposits but they are harmless to health The formation of films is due to metal components on sil ver or aluminium tableware Clean the appliance You can remove deposits with Mechanical cleaning Page 44 or a machine cleaning product It may not always be possible to com pletely remove deposits ...

Page 56: ...l not open fully 1 Arrange tableware in the top basket tableware so the tab collecting tray is not obstructed by tableware Arrange tableware Page 37 Items of tableware are blocking the dispenser lid 2 Do not place tableware or fra grance dispensers in the tablet col lecting tray Tableware has been pre cleaned too intensely The sensors chose a weaker pro gramme Stubborn soiling cannot be entirely r...

Page 57: ...ent to a detergent dispenser when dry Excessive formation of foam occurs Hand washing up liquid is present in dispenser for rinse aid Immediately add rinse aid to the dispenser Adding rinse aid Page 32 Rinse aid has been spilled Remove the rinse aid with a cloth Detergent or appliance care product used causes excess ive foaming Change the brand of detergent Home Connect problem Fault Cause Trouble...

Page 58: ...bleshooting Water is left in the appliance at the end of the pro gramme Filter system or area under the filters is blocked 1 Clean the Filters Page 46 2 Clean the Wastewater pump Page 61 Programme has not yet ended Wait until the programme ends or cancel the programme with Reset Terminate programme Page 39 Appliance cannot be switched on or operated Software update is taking place Wait until the s...

Page 59: ...rts project beyond the basket and prevent the appliance door from closing properly All LEDs lit up or flashing Electronics have detected a fault 1 Press the main switch button for ap prox 4 seconds Controls Page 16 The appliance is reset and restar ted 2 If the problem occurs again Switch off the appliance Pull out the mains plug or switch off the fuse in the fuse box Wait at least 2 minutes Switc...

Page 60: ...move detergent residue Noise Fault Cause Troubleshooting Filling valves making knock ing noises Caused by the domestic in stallation No appliance fault present Does not affect functioning of the appliance Can only be remedied in the do mestic installation Knocking or rattling noise Spray arm is striking table ware Arrange tableware so that the spray arms do not strike tableware With a small load t...

Page 61: ...d remove a You can now reach the impeller with your hand 7 Remove any remnants of food and foreign bodies in the area of the impeller 8 Insert the pump cover and press down 1 2 a The pump cover clicks into posi tion 9 Install the filter system 10 Insert the top and bottom basket Transportation storage and disposal Transportation storage and disposal Transportation storage and disposal You can find...

Page 62: ...y recycling WARNING Risk of harm to health Children can lock themselves in the appliance thereby putting their lives at risk With redundant appliances unplug the power cord Then cut through the cord and damage the lock on the appliance door beyond repair so that the appliance door will no longer close 1 Unplug the appliance from the mains 2 Cut through the power cord 3 Dispose of the appliance in ...

Page 63: ...r the purchase agree ment and in addition to our manufac turer s warranty we offer compensa tion under the following conditions If our Aqua Stop system is defect ive and causes water damage we will make good the damage for private users To ensure protection from water damage the appliance must be connected to the power supply The liability guarantee is valid for the service life of the appliance A...

Page 64: ... will be made avail able to you on request Please send your request to oss request bshg com or BSH Hausger äte GmbH Carl Wery Str 34 81739 Munich Germany Subject OSSREQUEST The cost of performing your request will be charged to you This offer is valid for three years from the date of purchase or at least as long as we offer support and spare parts for the respective appliance Declaration of Confor...

Page 65: ...Conformity en 65 BE BG CZ DK DE EE IE EL ES FR HR IT CY LI LV LT LU HU MT NL AT PL PT RO SI SK FI SE NO CH TR IS UK NI 5 GHz WLAN Wi Fi For indoor use only AL BA MD ME MK RS UK UA 5 GHz WLAN Wi Fi For indoor use only ...

Page 66: ......

Page 67: ......

Page 68: ...ße 34 81739 München GERMANY www gaggenau com 9001572303 9001572303 en 011112 Valid within Great Britain Imported to Great Britain by BSH Home Appliances Ltd Grand Union House Old Wolverton Road Wolverton Milton Keynes MK12 5PT United Kingdom ...

Reviews: