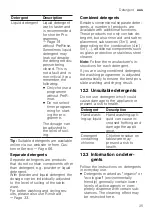
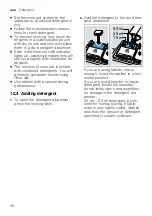
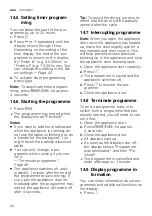
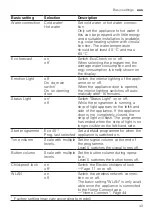
background image

operation

 aus

39

13.3 Removing tableware

WARNING

Risk of injury!

Hot tableware can cause burns to the
skin. When hot, tableware is sensitive
to shock, may crack and can result in
injury.

When the programme has ended,
do not empty the appliance until
the tableware has cooled down for
a while.

1.

To prevent water dripping on the
tableware, unload it starting at the
bottom and working up.

2.

Check the washing tank and ac-
cessories for soiling and clean if
necessary. 
→ 

"Cleaning and servicing",

Page 46

operation

14 Basic operation

operation

14.1 Opening appliance door

1.

If the electric childproof lock is not
activated, press on the upper
middle section of the appliance
door.

2.

If the electric childproof lock is ac-
tivated, press on the upper middle
section of the appliance door twice
with a short interval in between.

a

The appliance door will open auto-
matically.

14.2 Switching on the appli-

ance

Press  ⁠.
The standard program is set by
default.
If you do not perform any actions
on the appliance for 10 minutes,
the appliance will automatically
switch off.

14.3 Setting a programme

To adjust the wash cycle to the soil-
ing level of the tableware, select a
suitable programme.

Press the right programme button.

a

The programme is set and the pro-
gramme button flashes.

14.4 Setting additional func-

tions

You can set additional functions to
complete the washing programme
selected.

Note: 

The additional functions which

can be used depend on the pro-
gramme selected.

Press the button for the relevant
additional function. 
→ 

"Additional functions", Page 22

a

The additional function is set and
the additional function button
flashes.

Summary of Contents for DF481500F

Page 1: ...User manual DF481500F Dishwasher Gaggenau...

Page 2: ...n for test institute 22 7 2 Personalisation function 22 8 Additional functions 22 9 Features 23 9 1 Top basket 23 9 2 Bottom basket 25 9 3 Cutlery basket 26 9 4 Cutlery drawer 26 9 5 Etagere 28 9 6 Fo...

Page 3: ...leaning and servicing 46 17 1 Cleaning the tub 46 17 2 Cleaning products 47 17 3 Tips on appliance care 47 17 4 Machine Care 47 17 5 Filter system 48 17 6 Cleaning spray arms 49 18 Troubleshooting 51...

Page 4: ...is appliance may be used by children aged 8 or over and by people who have reduced physical sensory or mental abilities or inadequate experience and or knowledge provided that they are supervised or h...

Page 5: ...cord must be freely accessible If free access is not possible an all pole isolating switch must be installed in the permanent elec trical installation according to the installation regulations When in...

Page 6: ...ply with safety instructions and directions for use on packagings of detergent and rinse aid products may cause seri ous harm to health Follow the safety instructions and directions for use on the pac...

Page 7: ...ash out of the appliance Open the appliance door carefully if the programme is still run ning WARNING Risk of electric shock An ingress of moisture can cause an electric shock Only use the appliance i...

Page 8: ...y trained specialist staff Only use genuine spare parts when repairing the appliance If the power cord of this appliance is damaged it must be re placed with a special connection cable which is availa...

Page 9: ...closing the appli ance door WARNING Risk of chemical burns Rinse aid and detergent may cause chemical burns to the mouth throat and eyes Keep children away from detergent and rinse aid products Keep...

Page 10: ...ge to the appliance Never kink crush modify or cut through water hoses Only use the water hoses supplied with the appliance or genuine spare hoses Never re use water hoses that have been used before I...

Page 11: ...ly friendly Programmes Page 19 Change the sensor setting to the de fault a Consumption is reduced Sensors Page 12 Zeolith drying automatically helps to save energy a Zeolith drying Page 11 4 3 Zeolith...

Page 12: ...s the pro gramme strength for effective removal of food remnants even with low soiling levels Energy and water consumption are adjusted accord ingly Sensor set ting Description Very sensitive Adjusts...

Page 13: ...appliance to drainage connection so dirty water is dis charged via the wash cycle Installing the drainage connection 1 Consult the installation instructions supplied for the steps required here 2 Con...

Page 14: ...on heating appliance plug of the power cable into the appliance 2 Insert the mains plug of the appli ance into a nearby socket The connection data for the appli ance can be found on the rating plate 3...

Page 15: ...ur appliance 6 1 Appliance You can find an overview of the parts of your appliance here 1 2 3 4 5 6 8 9 10 11 12 13 14 7 7 15 1 Rating plate Rating plate with E number and FD num ber Page 66 The data...

Page 16: ...f1 Cutlery shelf Page 28 10 Tablet collecting tray During the wash cycle tablets automatic ally fall out of the detergent dispenser into the tablet collecting tray where they can fully dissolve 11 Int...

Page 17: ...ppliance Page 41 Terminating the programme Page 40 2 Programme buttons Programmes 3 Info button If you press the display shows in formation about selected pro grammes basic settings and addi tional fu...

Page 18: ...anging basic settings Page 44 12 Setting buttons Changing the basic settings Page 44 13 Door handle1 Open the appliance door Page 39 14 Display1 The display shows information about programmes basic se...

Page 19: ...if the rinse aid system is switched off or rinse aid needs to be added The programme data is based on val ues measured in the laboratory ac cording to AS NZS 2007 Different in fluencing factors such a...

Page 20: ...d by sensors de pending on the soiling level of the washing wa ter Auto 45 65 1 1 55 3 00 2 0 990 1 280 3 7 6 15 4 Tableware Mixed table ware and cut lery Level of soiling Common household food remnan...

Page 21: ...00 3 10 5 Tableware Mixed table ware and cut lery Level of soiling Common household food remnants lightly dried on Reduced noise Pre Rinse Cleaning 50 C Intermediate rinse Final rinse 35 C Dry Quick W...

Page 22: ...ownload additional pro grammes and save them to the button 1 Saving Personalisation function on the appliance 1 Open the appliance door 2 Press 3 Press the right programme button 4 Press the button fo...

Page 23: ...e bottom basket is in creased and the maximum pro gramme temperat ure held longer This will increase the run time and energy consump tion ExtraDry For a better drying result the final rinse temperatur...

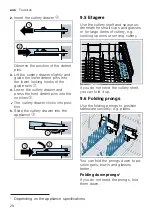
Page 24: ...the basket is level on both sides 5 Release the levers a The basket clicks into position 6 Slide the basket back in Removing the top basket 1 Pull the top basket right out 2 Lift the basket forwards o...

Page 25: ...ks into position 5 Slide the basket back into the ap pliance 9 2 Bottom basket Arrange pans and plates in the bot tom basket a Cutlery basket 1 Large plates up to a diameter of 34 cm can be arranged i...

Page 26: ...he ap pliance 9 3 Cutlery basket Arrange cutlery in the cutlery basket always without sorting it and with the sharp points downwards 9 4 Cutlery drawer Arrange cutlery in the cutlery drawer Arrange cu...

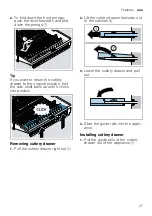
Page 27: ...l position fold the side shelf back up until it clicks into position Removing cutlery drawer 1 Pull the cutlery drawer right out 2 Lift the cutlery drawer forwards out of the catches 3 Lower the cutle...

Page 28: ...Slide the cutlery drawer into the appliance 9 5 Etagere Use the cutlery shelf and space un derneath for small cups and glasses or for large items of cutlery e g cooking spoons or serving cutlery If y...

Page 29: ...ay head Inserting baking sheet spray head Use the baking sheet spray head in stead of the top basket to clean large trays grilles and plates 1 Remove top basket Page 24 2 Insert the baking sheet spray...

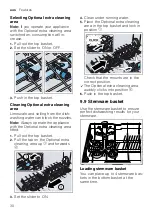
Page 30: ...Optional extra cleaning area fitted 1 Pull out the top basket 2 Pull the tab on the Optional extra cleaning area up and forwards 3 Set the slider to ON 4 Clean under running water 5 Place the Optional...

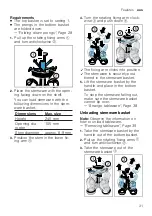
Page 31: ...tem in the lower fix ing arm 4 Turn the rotating fixing arm clock wise and push down a The fixing arm clicks into position a The stemware is securely posi tioned in the stemware basket 5 Lift the stem...

Page 32: ...cutlery drawer Level Top basket Bottom basket 1 max 18 cm 33 cm 34 cm Page 25 2 max 20 5 cm 30 5 cm 3 max 23 cm 28 cm first time 10 Before using for the first time first time 10 1 Making settings for...

Page 33: ...recommend you operate the appliance without tableware before using it for the first time 11 Rinse aid system 11 1 Rinse aid For optimum drying results use rinse aid Only use rinse aid for domestic dis...

Page 34: ...until the display shows 0 5 To save the settings press for approx 3 seconds a The rinse aid system is switched off and the rinse aid refill indicator is deactivated 12 Detergent 12 1 Suitable deterge...

Page 35: ...eparate deter gents a number of products are available with additional functions These products not only contain de tergent but also rinse aid and salt re placement substances 3in1 and depending on th...

Page 36: ...detergents You will generally get better results using rinse aid Use tablets with a special drying performance 12 4 Adding detergent 1 To open the detergent dispenser press the locking latch 2 Add th...

Page 37: ...rated glassware and parts made of aluminium or silver may fade or discolour with dishwashing Delicate types of glass may turn cloudy after a few washing cycles 13 1 Damage to glass and tableware Only...

Page 38: ...f how to load your appliance effi ciently free of charge To save energy and water load the machine with the number of place settings specified standard load with tableware and cutlery For better washi...

Page 39: ...ac tivated press on the upper middle section of the appliance door twice with a short interval in between a The appliance door will open auto matically 14 2 Switching on the appli ance Press The stand...

Page 40: ...en the appliance door im mediately after the programme has ended the appliance will switch off after 4 seconds Tip To assist the drying we recom mend that the door will be partially opened after the c...

Page 41: ...unction 14 10 Switching off appliance 1 Please note the information on Safe use Page 10 2 Press Tip If you press during the wash cycle the programme currently run ning will be interrupted When you swi...

Page 42: ...the programme has to run e g 3h 25min Finish at shows the time when the programme will end e g 15 20 hours Sprache Lan guage See selection on the appliance Select the menu language Rinse aid dis pense...

Page 43: ...1 off Switch Status Light on or off While the programme is running a strip of light appears on the left hand side of the appliance If the appliance door is not completely closed the strip of light wil...

Page 44: ...ing the time 1 To open the basic settings press for approx 3 seconds 2 Press repeatedly until the display shows Time setting 3 Press or repeatedly until the display shows the required time Holding dow...

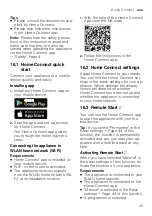
Page 45: ...on location 1 With the help of the Home Connect App scan the QR code 2 Follow the instructions in the Home Connect app 16 2 Home Connect settings Adapt Home Connect to your needs You can find the Home...

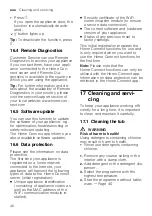
Page 46: ...ing types of data to the Home Connect server initial registration Unique appliance identification consisting of appliance codes as well as the MAC address of the Wi Fi communication module in stalled...

Page 47: ...s and machine cleaners is the right programme for the care of your appliance Note You can get our tested and ap proved Dishwasher Care and Ma chine Cleaner for Dishwashers online at https www gaggenau...

Page 48: ...clean ers Activate the Optional extra clean ing area Page 30 1 Remove any coarse soiling in the interior with a damp cloth 2 Clean the filters 3 Place the machine care product in the appliance interio...

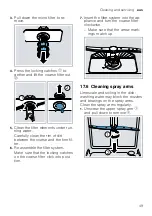
Page 49: ...l ter 6 Re assemble the filter system Make sure that the locking catches on the coarse filter click into posi tion 7 Insert the filter system into the ap pliance and turn the coarse filter clockwise M...

Page 50: ...ray arm to re move 3 Check the outlet nozzles on the spray arms for blockages under running water and remove any for eign bodies 4 Insert the lower spray arm a The spray arm clicks into position 5 Ins...

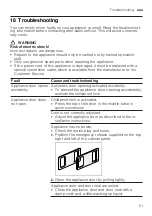
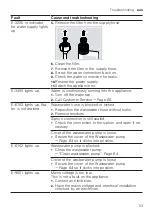
Page 51: ...his Customer Service Fault Cause and troubleshooting Appliance door opens accidently Automatic door opening activated accidently To prevent the appliance door opening accidentally activate the childpr...

Page 52: ...he appliance so the In take opening of the Zeolith container Page 15 is no longer obstructed E 3000 lights up Water protection system is activated 1 Turn off the water tap 2 Call Customer Service Page...

Page 53: ...tewater hose is blocked or kinked 1 Reposition the wastewater hose without kinks 2 Remove residues Siphon connection is still sealed Check the connection to the siphon and open if ne cessary Cover of...

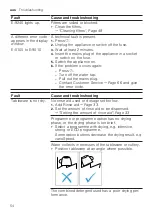
Page 54: ...he water tap Pull out the mains plug Contact Customer Service Page 66 and give the error code Fault Cause and troubleshooting Tableware is not dry No rinse aid used or dosage set too low 1 Add Rinse a...

Page 55: ...ry is not dry Cutlery not arranged properly in the cutlery basket or cutlery drawer Droplets can form on the cutlery contact points 1 Arrange cutlery individually where possible Page 38 2 Avoid points...

Page 56: ...corner areas are not rinsed adequately Do not position tall narrow receptacles at too great an angle or in corner areas Top baskets on right and left are not set to same height Set the top baskets on...

Page 57: ...ge your detergent Page 34 Clean the appliance mechanically Stubborn white coat ings are present on tableware inside the appliance or the door Detergent substances are deposited there These coatings ca...

Page 58: ...eaning product It may not always be possible to completely remove de posits but they are harmless to health Plastic parts inside the appliance are discol oured Plastic parts inside the appliance may b...

Page 59: ...ot dishwasher proof only suitable for dishwashers Use dishwasher proof glasses Glasses are usually only suitable for use in a dish washer i e long term wear or long term changes must be expected Avoid...

Page 60: ...nnect cannot be implemented cor rectly Home Connect set incorrectly Please consult the documents supplied for Home Connect Technical fault is present Please consult the information about support in th...

Page 61: ...the mains cable is properly inserted in the socket and on the rear of the appliance Appliance door is not closed properly Close the appliance door Programme starts automatically You did not wait unti...

Page 62: ...e door with greater force Door cannot be closed due to installation method Check whether the appliance has been installed properly When closed the appliance door its decor or at tached parts should no...

Page 63: ...king or rattling noise With a small load the water jets directly strike against the tub Distribute the tableware evenly Load the appliance with more tableware Light items of tableware move about durin...

Page 64: ...pump cover inwards at an angle and remove a You can now reach the impeller with your hand 7 Remove any remnants of food and foreign bodies in the area of the impeller 8 Insert the pump cover and press...

Page 65: ...tap 9 To empty the residual water out of the appliance detach the supply hose and let the water drain out 19 4 Disposing of old appli ance Valuable raw materials can be re used by recycling WARNING Ri...

Page 66: ...er Service tele phone number to find them again quickly 20 2 AQUA STOP guarantee In addition to warranty claims against the seller under the purchase agree ment and in addition to our manufac turer s...

Page 67: ...our appliance model and additional documents Alternat ively you can request the relevant in formation from oss request bshg com or BSH Hausger te GmbH Carl Wery Str 34 81739 Munich Germany The source...

Page 68: ...Max 100 mW 5 GHz band 5150 5350 MHz 5470 5725 MHz Max 100 mW BE BG CZ DK DE EE IE EL ES FR HR IT CY LI LV LT LU HU MT NL AT PL PT RO SI SK FI SE NO CH TR IS UK NI 5 GHz WLAN Wi Fi For indoor use only...

Page 69: ......

Page 70: ......

Page 71: ......

Page 72: ...BSH Hausger te GmbH Carl Wery Stra e 34 81739 M nchen GERMANY www gaggenau com 9001720255 9001720255 aus 020323...

Reviews: