


•
Never leave the cooktop unattended.
Boil-overs cause smoking and greasy spills that
may ignite.
•
Only certain types of glass, heatproof glass-
ceramic, ceramic, earthenware or other
glazed utensils are suitable for cooktop use.
This type of utensil may break with sudden
temperature changes. Use only on low or medium
heat settings according to the utensil
manufacturer’s directions.
•
Do not heat unopened food containers;
a
buildup of pressure may cause the container to
burst.
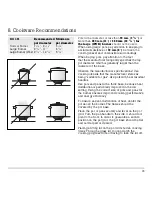
• During cooking,
set the burner control so that
the flame heats only the bottom of the pan
and does not extend beyond the bottom of the
pan.
•
Use caution to insure that drafts like those from
forced air vents or fans do not blow flammable
material toward the flames or push the flames so
that they extend beyond the edges of the pot.
•
Always use utensils that have flat bottoms,
large enough to cover the burner.
The use of
undersized utensils can expose a portion of the
flame and may result in ignition of clothing.
• To minimize burns, ignition of flammable materials
and unintentional spills,
position handles of
utensils inward
so they do not extend over
adjacent work areas, cooking areas or the edge of
the cooktop.
•
Hold the handle of the pan
to prevent
movement of the utensil when stirring or turning
food.
•
GREASE IS FLAMMABLE.
Let hot grease cool
before attempting to handle it. Avoid letting
grease deposits collect. Clean after each use.
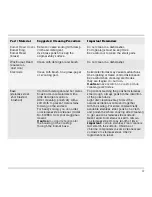
• For proper lighting and performance of the
burners,
keep the ports clean.
It is necessary to
clean these when there is a boil over or when the
burner does not light even though the electronic
igniters click. See care and maintenance section.
•
Clean the cooktop with caution.
A
void steam
burns; do not use a wet sponge or cloth to clean
the cooktop while it is hot. Some cleaners
produce noxious fumes if applied to a hot surface.
Follow directions provided by the cleaner
manufacturer.
•
Be sure all cooktop controls are turned off
and the cooktop is cool
before using any type of
aerosol cleaner on or around the cooktop. The
chemicals that produce the spraying action can, in
the presence of heat, ignite or cause metal parts
to corrode. Service should only be done by
authorized technicians. Technicians must
disconnect the power supply before servicing this
unit.
•
T
o avoid fire hazard, clean the ventilator
hood and filters above the cooktop frequently
so grease from cooking vapors does not
accumulate on them.
•
Install a smoke detector
in or near the kitchen.
•
No warranty claims
can be lodged for any
damage resulting from failure to observe these
instructions. Technical modifications reserved.
•
California Proposition 65 W
arning:
The
burning of gas cooking fuel generates some by-
products which are on the list of substances which
are known by the State of California to cause
cancer or reproductive harm. California law
requires businesses to warn customers of
potential exposure to such substances. To
minimize exposure to these substances, always
operate this unit according to the instructions
contained in this booklet and provide good
ventilation to the room when cooking with gas.
SA
VE THESE INSTRUCTIONS
5
Summary of Contents for KG491110CA
Page 1: ...Operation Maintenance and Installation Manual KG 491 CA Gas Cooktop...
Page 2: ......
Page 31: ...29...
Page 35: ......


