


13
Operating the appliance
en
1
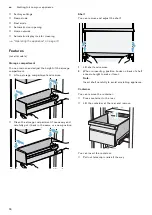
Operating the appliance
Operating the appliance
Switching on the appliance
1
Press the
main On/Off switch
.
The appliance starts refrigerating, and the light
switches on when the door is open.
2
Set the required temperature.
"Setting the temperature" on page 13
Operating tips
▯
After the appliance has been switched on, it may
take several hours until the set temperatures have
been reached. Do not put in any food until the
selected temperature has been reached.
▯
The fully automatic NoFrost system ensures that
the freezer compartment remains free of ice.
Defrosting is not required.
▯
The sides of the housing are heated slightly in
certain areas. This prevents condensation
in the area of the door seal.
▯
If the freezer compartment door cannot be
immediately re-opened after it has been closed,
wait until the resulting low pressure has equalised.
Switching off and disconnecting the
appliance
Switching off the appliance
▯
Press the
main On/Off switch
.
The appliance will stop refrigerating.
Disconnecting the appliance
Caution!
Deterioration in water quality
The water supply must be turned off 3 hours before
disconnecting. This prevents mould forming due to
unused water.
If you are not going to use the appliance for a long
period:
1
Turn off the water supply to the appliance and wait
3 hours.
2
Remove the food.
3
Press the
main On/Off switch
.
4
Pull out the mains plug or switch off the fuse.
The appliance will stop refrigerating.
5
Empty the ice cube container and clean the
appliance.
6
Leave the appliance open.
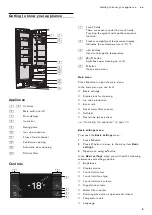
Setting the temperature
Recommended temperature
Freezer compartment
▯
Keep pressing the button
A
/
@
until the display
indicates the required temperature.
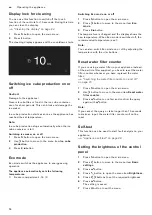
Fast freezing
Fast freezing cools the freezer compartment as cold as
possible.
Switch on fast freezing e.g.:
▯
to freeze food solid as quickly as possible
▯
4 ... 6 hours before freezing food weighing 2 kg or
more
▯
to use the max. freezing capacity
Note:
When fast freezing is switched on, increased operating
noise may occur.
After approx. 2
^
days, the appliance switches to
normal operation.
Switching fast freezing on or off
▯
Press
h
/
â
button.
Freezer compartment:
–18 °C