
7
Installation and connection
en
Installing the appliance
Installation location
The more refrigerant an appliance contains, the larger
the room must be in which the appliance is situated.
Leaking refrigerant can form a flammable gas-air mixture
in rooms which are too small.
The room must be at least 1 m³ per 8 g of refrigerant.
The amount of refrigerant in your appliance is indicated
on the rating plate inside the appliance.
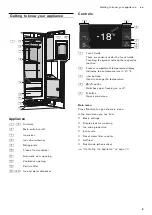
"Getting to know your appliance" on page 9
The weight of the appliance may be up to 460 kg
depending on the model. The base must be sufficiently
stable and should not give. If necessary, reinforce the
floor.
Permitted room temperature
The permitted room temperature depends on the
climatic class of the appliance.
Information on the climatic class can be found on the
rating plate.
"Getting to know your appliance" on page 9
The appliance is fully functional within the permitted
room temperature.
If an appliance of climatic class SN is operated at
colder room temperatures, the appliance will not be
damaged up to a room temperature of +5 °C.
Built-in cut-out
The cut-out must fulfil these criteria:
▯
Anti-tilt bracket must be fitted
▯
Cut-out depth min. 610 mm, for flush installation
635 mm
▯
rectangular
▯
stable – the side panels and the top must be min.
16 mm thick and securely attached to the bottom or
wall
▯
Depth of shortest side panels min.100 mm
Side-by-side installation
Observe the specifications in the installation
instructions for a side-by-side installation.
If a partition wall is required between the appliances, it
must be at least 16 mm wide.
Tips for saving energy
If you follow the instructions below, your appliance will use less power.
Note:
The arrangement of the features does not affect the energy consumption of the appliance.
Climatic
category
Permitted room tempera-
ture
SN
+10 °C ... 32 °C
N
+16 °C ... 32 °C
ST
+16 °C ... 38 °C
T
+16 °C ... 43 °C
Installing the appliance
Keep the appliance out of direct sunlight.
The appliance needs to cool less frequently at low ambient
temperatures and therefore consumes less power.
Install the appliance as far away as possible from heating ele-
ments, cooker and other heat sources:
At least 1¼" (3 cm) from electric or gas cookers.
At least 11¾" (30 cm) from oil or solid-fuel cookers.
Note:
If this is not possible, attach an insulating plate between the
appliance and heat source.
Select an installation location with a room temperature of
approx. 20 °C.
Do not cover or block the ventilation openings.
If the warm air can escape, the appliance needs to cool less
frequently and therefore consumes less power.
Ventilate the room daily.