background image

en 

Defrosting

22

Defrosting

14 Defrosting

Defrosting

14.1 Defrosting in the refri-

gerator compartment

The refrigerator compartment in your
appliance defrosts automatically.

14.2 Defrosting in the cool-

fresh compartment

The cool-fresh compartment in your
appliance defrosts automatically.

14.3 Defrosting in the freezer

compartment

The freezer compartment does not
defrost automatically. A layer of hoar-
frost in the freezer compartment im-
pairs refrigeration of the frozen food
and increases power consumption.

Defrosting the freezer
compartment

Regularly defrost the freezer com-
partment.

1.

Switch on the Fast function approx.
four hours before defrosting. 
→ 

"Switching on Fast function",

Page 16

This means that the food reaches
very low temperatures and it can
be stored for longer at room tem-
perature.

2.

Remove the frozen food and tem-
porarily place it in a cool location.
Wrap the frozen food with ice
packs, if available, in coverings or
newspaper.

3.

Switch off the appliance.
→ 

Page 16

4.

Disconnect the appliance from the
power supply.

Unplug the appliance from the
mains or switch off the circuit
breaker in the fuse box.

5.

To accelerate the defrosting pro-
cess, place a pan of hot water on
a trivet in the freezer compartment.

6.

Wipe up the condensation water
with a soft cloth or sponge.

7.

Rub the freezer compartment dry
with a soft, dry cloth.

8.

Electrically connect the appliance.

9.

Switch on the appliance.
→ 

Page 15

10.

Put the frozen food in the appli-
ance. → 

Page 20

Cleaning and servicing

15 Cleaning and servi-

cing

Cleaning and servicing

To keep your appliance working effi-
ciently for a long time, it is important
to clean and maintain it carefully.
Customer Service must clean inac-
cessible points. Cleaning by cus-
tomer service can give rise to costs.

15.1 Preparing the appliance

for cleaning

1.

Switch off the appliance.
→ 

Page 16

2.

Disconnect the appliance from the
power supply.
Unplug the appliance from the
mains or switch off the circuit
breaker in the fuse box.

3.

Take out all of the food and store it
in a cool place.
Place ice packs (if available) onto
the food.

4.

If there is a layer of hoarfrost, allow
this to defrost.

5.

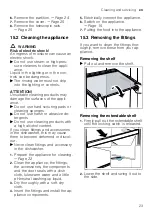
Remove all fittings and accessor-
ies from the appliance.
→ 

Page 23

Summary of Contents for RT282306

Page 1: ...User manual RT 282 Fridge freezer Gaggenau...

Page 2: ...ese compart ment 15 6 7 Door rack 15 6 8 Accessories 15 7 Basic operation 15 7 1 Switching on the appliance 15 7 2 Operating tips 15 7 3 Switching off the appliance 16 7 4 Setting the temperature 16 8...

Page 3: ...aning the appliance 23 15 3 Removing the fittings 23 15 4 Removing appliance com ponents 24 16 Troubleshooting 27 16 1 Power failure 29 16 2 Conducting an appliance self test 29 17 Storage and disposa...

Page 4: ...00 m above sea level 1 3 Restriction on user group This appliance may be used by children aged 8 or over and by people who have reduced physical sensory or mental abilities or inadequate experience an...

Page 5: ...tallation regulations When installing the appliance check that the power cable is not trapped or damaged If the insulation of the power cord is damaged this is dangerous Never let the power cord come...

Page 6: ...children Do not let children play with small parts WARNING Risk of explosion If the cooling circuit is damaged flammable refrigerant may es cape and explode To accelerate the defrosting process do not...

Page 7: ...the freezer compartment CAUTION Risk of harm to health To prevent food from being contaminated you must observe the following instructions If the door is open for an extended period of time this may l...

Page 8: ...e appliance should only be carried out by trained specialist staff Only use genuine spare parts when repairing the appliance If the power cord of this appliance is damaged it must be re placed by the...

Page 9: ...all the appliance as far away as possible from heating elements cookers and other heat sources Maintain a 30 mm clearance to electric or gas cookers Maintain a 300 mm clearance to oil or solid fuel co...

Page 10: ...ate class The climate class can be found on the rating plate Appliance Fig 1 7 Page 13 Climate class Permitted room tem perature SN 10 C to 32 C N 16 C to 32 C ST 16 C to 38 C T 16 C to 43 C The appli...

Page 11: ...iance for the first time Page 23 4 5 Connecting the appliance to the electricity supply 1 Insert the mains plug of the appli ance s power cable in a socket nearby The connection data of the appli ance...

Page 12: ...arising yourself with your appliance Familiarising yourself with your appliance 5 1 Appliance You can find an overview of the parts of your appliance here 1 2 3 4 5 6 7 8 A B C 1 A Freezer compartment...

Page 13: ...en your appli ance and the diagrams may differ with regard to their features and size 5 2 Control panel You can use the control panel to configure all functions of your appliance and to obtain informa...

Page 14: ...container via the humidity controller on the partition and a special seal The air humidity in the fruit and vegetable container can be set according to the type and amount of food to be stored by turn...

Page 15: ...falling over when the appliance door is opened and closed Press the metal bracket together and slide the bottle tray as close to the bottle as possible Ice cube tray Use the ice cube tray to make ice...

Page 16: ...or compartment and the freezer compartment Tip If frost forms on the food items in the cool fresh compartment set a higher cool fresh compartment tem perature 1 Press and hold until the temper ature d...

Page 17: ...the WLAN home network Wi Fi1 and to the Home Connect app After switching on the appliance wait at least 2 minutes until internal device initialisation is complete Only then should you set up Home Con...

Page 18: ...i Fi you can reset the Home Connect settings 1 Press a The temperature display shows 2 Press repeatedly until the tem perature display shows 3 Press a The temperature display shows an animation for 15...

Page 19: ...large bottles Tip Store highly perishable food such as fish sausages and meat in the cool fresh compartment Cool fresh compartment Page 19 Warmest zone The warmest zone is at the very top of the door...

Page 20: ...the handle on the freezer compartment door indicates whether or not the freezer compart ment is correctly closed Note When you close the freezer compartment door you can hear it engaging 13 2 Freezin...

Page 21: ...ct quality and prevent freezer burn 1 Place the food in the packaging 2 Squeeze out the air 3 Pack food airtight to prevent it from losing flavour and drying out 4 Label the packaging with the con ten...

Page 22: ...t the appliance from the power supply Unplug the appliance from the mains or switch off the circuit breaker in the fuse box 5 To accelerate the defrosting pro cess place a pan of hot water on a trivet...

Page 23: ...ittings and accessories in the dishwasher this may cause them to become deformed or discol our Never clean fittings and accessory in the dishwasher 1 Prepare the appliance for cleaning Page 22 2 Clean...

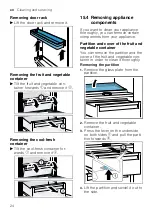
Page 24: ...you want to clean your appliance thoroughly you can remove certain components from your appliance Partition and cover of the fruit and vegetable container You can remove the partition and the cover o...

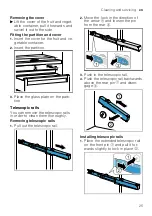
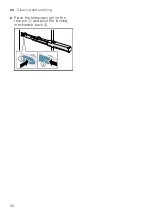
Page 25: ...plate on the parti tion Telescopic rails You can remove the telescopic rails in order to clean them thoroughly Removing telescopic rails 1 Pull out the telescopic rail 2 Move the lock in the directio...

Page 26: ...en Cleaning and servicing 26 2 Place the telescopic rail on the rear pin and push the locking mechanism back...

Page 27: ...he displays and lighting light up Showroom mode is switched on Carry out the appliance self test Page 29 a Once the appliance self test has ended the appli ance switches to normal operation The LED li...

Page 28: ...too cold check the temper ature again on the following day The appliance hums bubbles buzzes gargles or clicks Not a fault A motor is running e g refrigerating unit fan Refrigerant flows through the p...

Page 29: ...liance self test two audible signals sound and the temperature display indic ates the set temperature your ap pliance is OK The appliance switches to normal operation a If at the end of the appliance...

Page 30: ...ance was placed on the market within the European Eco nomic Area Note Under the terms of the manu facturer s warranty applicable to the location the use of Customer Service is free of charge The minim...

Page 31: ...EPREL product database Please then follow the instructions on searching for models The model identifier is made up of the charac ters before the slash in the product number E Nr on the rating plate A...

Page 32: ...e 34 81739 M nchen GERMANY www gaggenau com 9001610891 9001610891 en 010629 Valid within Great Britain Imported to Great Britain by BSH Home Appliances Ltd Grand Union House Old Wolverton Road Wolvert...

Reviews: