background image

14

Switching off and disconnecting the 
appliance

Switching the appliance off

Press the On/Off button 

ÿ

.

Refrigeration unit and light switch off.

Disconnecting the appliance

If you do not use the appliance for a prolonged 
period:

1.

Switch off the appliance.

2.

Pull out mains plug or switch off fuse.

3.

Clean the appliance.

4.

Leave the appliance door open.

Defrosting

Defrosting is actuated automatically.

Cleaning the appliance

m

Caution

Do not use abrasive, chloride or acidic cleaning 
agents or solvents.

Do not use scouring or abrasive sponges. 
The metallic surfaces could corrode.

Never clean shelves and containers 
in the dishwasher. The parts may become 
deformed!

Proceed as follows:

1.

Before cleaning: Switch off the appliance.

2.

Pull out mains plug or switch off fuse.

3.

Clean the appliance with a soft cloth, lukewarm 
water and a little pH neutral washing-up liquid. 
The rinsing water must not run into the light.

4.

Wipe the door seal with clear water only and then 
wipe dry thoroughly.

5.

After cleaning reconnect and switch 
the appliance back on.

Interior fittings

All variable parts of the appliance can be taken out 
for cleaning (see chapter “Interior fittings”).

Odours

If you experience unpleasant odours:

1.

Switch the appliance off.

2.

Take all food out of the appliance.

3.

Clean interior (see chapter “Cleaning 
the appliance”).

4.

Clean all packages.

5.

Switch the appliance on again.

6.

Check whether the formation of odours is still 
occuring after 24 hours.

7.

Change odour filter (see chapter “Changing 
activated-carbon filter”).

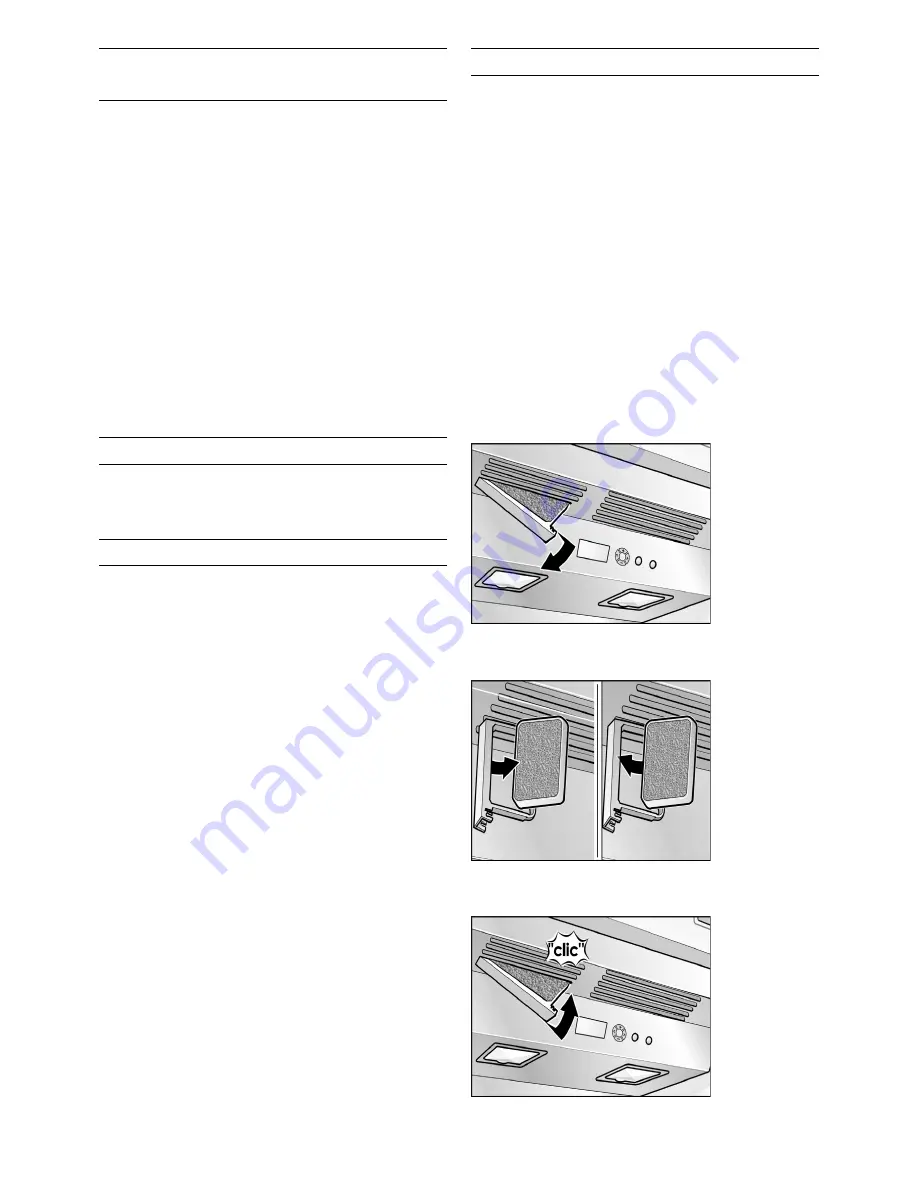
Changing activated-carbon filter

Spare filters are available from your dealer.

1.

Open the filter holder.

2.

Take out used filter and replace with new one.

3.

Close the filter holder.

Summary of Contents for RW 464

Page 1: ...Gaggenau en Instruction for Use RW 414 RW 464 RW 464AU Wine storage compartment...

Page 2: ...ge 9 Setting the temperature unit 9 Setting the temperature 9 Setting up the brightness of the display 9 Special functions 10 Alarm function 11 Usable capacity 11 Placing bottles in the refrigerator 1...

Page 3: ...manufacturer customer service or a similarly qualified person Improper installations and repairs may put the user at considerable risk Repairs may be performed by the manufacturer customer service or...

Page 4: ...children to play with the appliance Children in the household Keep children away from packaging and its parts Danger of suffocation from folding cartons and plastic film Do not allow children to play...

Page 5: ...parts Built in appliance Interior fittings depending on model Bag containing installation materials Operating instructions Installation manual Customer service booklet Warranty enclosure Information o...

Page 6: ...ystem Before switching on the appliance for the first time clean the interior of the appliance see chapter Cleaning the appliance Electrical connection The socket must be near the appliance and also f...

Page 7: ...iagrams may differ Not all models A Upper climatic zone B Lower climatic zone 1 Light switch 2 Controls 3 Light LED with switches for presentation lights 4 Shelf for wine bottles 5 Partition 6 Light p...

Page 8: ...ee chapter Setting the temperature For selecting a menu in the setup mode see chapter Special functions E Setting buttons The temperature can be changed using the setting buttons see chapter Setting t...

Page 9: ...layed in degrees Celsius C or degrees Fahrenheit F 1 Press setup button The first menu temperature unit is displayed 2 Press the or A setting button in order to switch between degrees Fahrenheit F and...

Page 10: ...in 20 seconds the setup mode ends automatically All of the changed settings are stored The set temperature is displayed again in the fascia Menus in the setup mode The following settings can be made x...

Page 11: ...values are once again activated Humidity function Independent from one another the air humidity in the two climatic zones can be increased Switching on 1 Press setup button 2 Press selection button u...

Page 12: ...rinking temperature Sparkling wine and Champagne should be cooled in the refrigerator shortly before drinking Remember that wine should always be cooled slightly lower than the ideal serving temperatu...

Page 13: ...helves from the lower climatic zone 2 Insert the extendable shelf optional accessory into the bottom rails Presentation attachment Not all models You can take out or vary the attachment as required Do...

Page 14: ...or switch off fuse 3 Clean the appliance with a soft cloth lukewarm water and a little pH neutral washing up liquid The rinsing water must not run into the light 4 Wipe the door seal with clear water...

Page 15: ...plate Do not block the ventilation openings in the appliance Allow warm drinks to cool down before placing in the appliance Open the appliance as briefly as possible The arrangement of the fittings do...

Page 16: ...ching on more frequently and for longer Appliance opened frequently Do not open the appliance unnecessarily The ventilation openings have been covered Remove obstacles The light LED does not work The...

Page 17: ...be found on the rating plate To prevent unnecessary call outs please assist customer service by quoting the product and production numbers This will save you additional costs Repair order and advice...

Page 18: ...Gaggenau Hausger te GmbH Carl Wery Stra e 34 D 81739 M nchen www gaggenau com en 9705 8001049902 8001049902...

Reviews: