ENGLISH
• 30 •
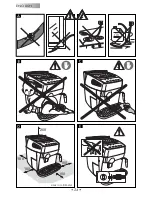
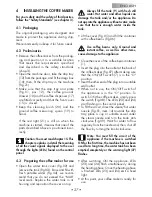
hot water nozzle (Fig.15).
• Turn the knob anticlockwise as shown in
Fig.15.
• When you have obtained the desired quan-
tity of hot water, turn the knob clockwise to
shut off the fl ow. The appliance resets itself
so that it is ready for normal operation.
9 MAKING STEAM / PREPARING
CAPPUCCINO
Steam can be used to froth the milk for
cappuccinos but also to heat bevera-
ges.
Scalding hazard!
Splashing may occur at the start – scald-
ing hazard! The hot water nozzle and pipe
can reach high temperatures: avoid touching
directly with your hands.
When the appliance is ready to dispense cof-
fee, press the button (25), the LEDs (23) and
(24) switch off. The appliance goes through
a preheating period; during this phase, the
LED (25) fl ashes.
• Before dispensing steam, wait for the green
temperature-ready LED (25) to light up in
a fi xed way; this indicates that the correct
operative temperature has been reached.
• Direct the steam nozzle (14) towards the
drip tray and turn the “hot water/steam”
knob (16) for a few seconds so that any re-
sidual water comes out of the steam nozzle.
Continue until only steam is dispensed.
• Turn the knob (16) to OFF.
• Fill 1/3 of the vessel that you wish to use to
make cappuccino with cold milk.
For best results when making cappuc-
cinos, the milk and the used cup should
be cold.
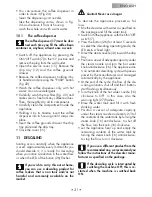
• Immerse the steam nozzle into the milk to
be frothed and turn the knob (16); turn the
container slowly with up-down movements
to make uniform frothing (Fig.16).
• After using the steam for the desired time,
shut off the steam (16).
• The same system can be used to heat other
beverages.
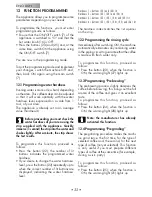
• Clean the steam nozzle with a damp cloth
(Fig.17)
9.1 Making coffee after using the steam
function
• If you want to make more coffee immediately
after steaming milk, you must press the but-
ton again (25).
• During the transition period, the LEDs (23),
(24) and (25) fl ash at the same time indicat-
ing that the appliance is superheated and
cannot make coffee.
• To make coffee, you must drain the water
by turning the steam knob (16) until only
the temperature-ready LEDs (23) and (24)
remain lit in a fi xed way.
10 C L E A N I N G A N D M A I N T E -
NANCE
General Cleaning
• Maintenance and cleaning should only be
carried out when the appliance is cold and
disconnected from the power supply.
• Do not immerse the appliance in water and
do not wash the parts in the dishwasher.
• Do not use abrasives or aggressive chemi-
cals (solvents) for cleaning.
• Do not dry the machine and/or any of its
parts using a microwave and/or conven-
tional oven.
• We recommend you clean the water tank
and change the water daily.
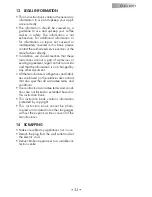
• Clean the ground coffee doser daily.
- Use the supplied brush to clean the doser
(Fig.18).
• To clean the appliance, use a soft cloth
dampened with water (Fig.19).
• Clean the service area and the coffee dis-
penser.
• We recommend you empty and clean
the drip tray (12) and the coffee grounds
drawer (10) daily; to carry out this operation
you must open the front cover (Fig.20) and
remove the drip tray (Fig.21); then, you can
empty and clean all the components.

