background image

This document contains general information only and is in no way to  
be regarded as a complete and comprehensive guide. Gainsborough 
Hardware Industries Limited ACN 004 792 269 (“Gainsborough 
Hardware”) makes no representation about the content and suitability of 
this information for any purpose. You should exercise your own 
independent skill and judgement before you rely on this document and 
obtain appropriate advice relevant to your particular circumstances. 


The information is provided “as is” and without express or implied 
warranty. Gainsborough Hardware disclaims all warranties, including all 
implied warranties as to merchantability or fitness. In no event shall the 
Gainsborough Hardware be liable for any direct, special, indirect 


or consequential damages or any damages whatsoever resulting from 
loss of income or profits, whether in an action of contract, negligence  
or other tortuous action, arising in connection with the use or 
performance of the information in this document. The availability 


of products set out in this document is not guaranteed and Gainsborough 
Hardware reserves the right to alter, amend or delete any part of this 
document without prior notice. This disclaimer is subject to any contrary 
legislative provisions. 

taKE CarE!


electricity kills.

 Switches, power 

outlets and other fixed wire products must be installed by a licensed 
electrical contractor or similarly qualified person.

Summary of Contents for G+ KEY

Page 1: ...G KEY User Guide...

Page 2: ......

Page 3: ...WELCOME TO THE EASIER WAY TO ACCESS YOUR HOME...

Page 4: ...intended for use by persons including children with reduced physical sensory or mental capabilities or lack of experience and knowledge unless they have been given supervision or instruction concernin...

Page 5: ...s 6 Feedback lights 8 SECTION 2 Getting Started 12 Installing the batteries 12 Using the shift button 14 Setting and using the unlock button 14 Teaching a G Key to a G Device Removing a G Key from a G...

Page 6: ......

Page 7: ...1 OVERVIEW LAYOUT FUNCTIONS FEEDBACK LIGHTS...

Page 8: ...G Devices G Devices the Premium G Key can control include Electric G Lockset Battery G Lockset G Smart Box G Enabled Gliderol Garage Doors Feedback The Premium G Key can receive feedback from up to 10...

Page 9: ...ntrolled independently Unlock button The front buttons can be locked to prevent accidental activation This feature can be turned on and off via a switch located within the battery compartment Batterie...

Page 10: ...4 Section 1 Layout Layout Shift button Unlock button Battery cover Key ring attachment point Lock switch enable shown disabled Activation buttons...

Page 11: ...5 Section 1 Layout Activation buttons Shift button Unlock button Activation button Battery cover Key ring attachment point Lock switch enable shown disabled...

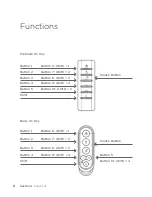
Page 12: ...on 6 shift 1 Button 6 shift 1 Button 2 Button 2 Button 7 shift 2 Button 7 shift 2 Button 3 Button 3 Button 8 shift 3 Button 8 shift 3 Button 4 Button 4 Button 5 Unlock Button Unlock Button Shift Butto...

Page 13: ...assage Activate for a G Smart Box G Enabled Gliderol Garage Door G Lockset Privacy Activate for a G Smart Box G Enabled Gliderol Garage Door Activate for a G Smart Box G Enabled Gliderol Garage Door A...

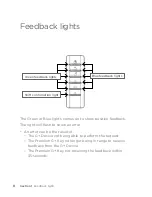
Page 14: ...l flash to show an error An error can be the result of The G Device not being able to perform the request The Premium G Key no longer being in range to receive feedback from the G Device The Premium G...

Page 15: ...of the Privacy button will illuminate If there is a problem with the lock or the Premium G Key does not receive any feedback the green light to the left of the Privacy button will flash If the Passag...

Page 16: ......

Page 17: ...2 GETTING STARTED...

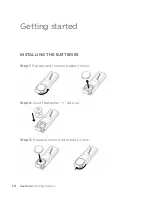
Page 18: ...12 Section 2 Getting Started Getting started INSTALLING THE BATTERIES Step 1 Rotate and remove battery cover Step 2 Insert batteries side up Step 3 Replace cover and rotate to lock...

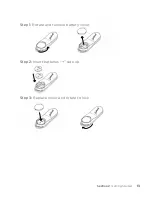
Page 19: ...13 Section 2 Getting Started Step 1 Rotate and remove battery cover Step 2 Insert batteries side up Step 3 Replace cover and rotate to lock...

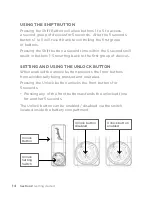
Page 20: ...buttons 1 5 reverting back to the first group of devices Setting and Using the Unlock Button When enabled the unlock button prevents the front buttons from accidentally being pressed and operated Pre...

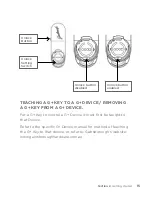
Page 21: ...n enabled Teaching a G Key to a G Device Removing a G Key from a G Device For a G Key to control a G Device it must first be taught to that Device Refer to the specific G Device manual for method of t...

Page 22: ......

Page 23: ...3 GENERAL SPECIFICATIONS...

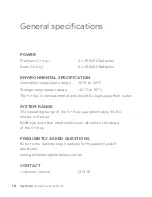
Page 24: ...temperature range 40 C to 85 C The G Key is not waterproof and should be kept away from water System Range The operating range of the G Key is approximately 30 50 metres in free air Buildings and othe...

Page 25: ...notes...

Page 26: ...d warranties as to merchantability or fitness In no event shall the Gainsborough Hardware be liable for any direct special indirect or consequential damages or any damages whatsoever resulting from lo...

Page 27: ......

Page 28: ...55 F 03 9894 1599 TAS PO Box 330 Blackburn VIC 3130 T 03 9877 1555 F 03 9894 1599 NTH QLD Unit 1 17 Camuglia St Mt Louisa QLD 4814 T 07 4774 5124 F 07 4774 5292 NZ Unit 5E 269A Mt Smart Rd Penrose Auc...

Reviews: