background image


Single Site Programmer User Guide 


1


GS-SNG-SITE-PRG-UG-001240


Page 19 of 30 

Release 1.0 


Figure 6: GS1011MxxS Single Site Programmer Hardware Setup 


NOTE: 

The board requires a 3.3V DC power supply to power the site. The PROGRAM/RUN switch 

should be set to PROGRAM mode at all times. 


Summary of Contents for GS1011MEx

Page 1: ...Single Site Flash Programmer User Guide Supports GS1011MIE GS1011MEx GS1011MIP GS1011MxxS and GS1500M Modules Publication No GS SNG SITE PRG UG 001240 Version 1 0 Date August 8 2014 ...

Page 2: ... before placing orders for products and services Programming boards are only intended for programming modules and not for production purposes Programming boards are supplied as is and without warranties of any kind express implied or statutory including but not limited to any implied warranty of merchantability or fitness for a particular purpose No license is granted by implication or otherwise u...

Page 3: ...Single Site Programmer User Guide 1 GS SNG SITE PRG UG 001240 Page 3 of 30 Release 1 0 Release History Revision Description 1 0 Initial Release ...

Page 4: ...RAMMER BOARD 14 HARDWARE SETUP FOR THE GS1011MEX AND GS1500M 14 HARDWARE SETUP FOR THE GS1011MIX 16 HARDWARE SETUP FOR THE GS1011MXXS 18 POPULATING THE MODULE SITE 20 FOR THE GS1011MEX AND GS1500M 20 FOR THE GS1011MIX 22 FOR THE GS1011MXXS 23 SOFTWARE TEST SETUP 24 INSTALLING THE SINGLE SITE PROGRAMMER SOFTWARE 24 STARTING THE GAINSPAN SINGLE SITE PROGRAMMER SOFTWARE 25 USING THE CONFIGURATION FIL...

Page 5: ... GS1500M modules Follow all hardware and software instructions throughout this document to ensure loading and programming the Flash on the modules The following sections are outlined in this guide to help setup install and run the Single Site Programmer How the Single Site Programmer Works Single Site Programmer Setup Preparing the Single Site Programming Board Populating the Module Site Software ...

Page 6: ...w the Single Site Programmer Works The GainSpan Single Site Programmer is a tool used to program the GS1011MIx GS1011MEx GS1011MxxS and GS1500M module one at a time Follow all hardware and software instructions throughout this guide to ensure loading and programming the Flash on the modules ...

Page 7: ... avoid performance degradation or loss of functionality Contents The GainSpan Single Site Programmer tool includes the following GS1011MIx GS1011MEx GS1011MxxS or GS1500M modules PC or Laptop running Windows XP SP2 SP3 or Windows 7 Single Site Programmer Hardware holds one module to be programmed o For the GS1011MEx and GS1500M modules see Figure 1 Bar Code Scanner optional DB9 Null Module cable s...

Page 8: ...Single Site Programmer User Guide 1 GS SNG SITE PRG UG 001240 Page 8 of 30 Release 1 0 Figure 1 GS1011MEx GS1500M Single Site Programmer Board Components ...

Page 9: ...d be pressed over the cover to ensure proper pin contact on the modules 2 DB9 UART Connector To connect a DB9 Null Modem cable to the PC 3 Program Run Switch To be set to Program mode always 4 Site A single pogo pin fixture to hold the module 5 Single Site Programmer board Used to program a single GS1011MEx or GS1500M based module 6 ON OFF Switch To turn the power ON or OFF to the board 7 DC Power...

Page 10: ...Single Site Programmer User Guide 1 GS SNG SITE PRG UG 001240 Page 10 of 30 Release 1 0 Figure 2 GS1011MIx Single Site Programmer Board Components ...

Page 11: ...ash Programmer board Used to program a single GS1011MIx based module 2 Module GS1011MIx based module 3 Mini USB Connector Used to access each individual module to program 4 PROGRAM RUN Switch Should be set to PROGRAM mode 5 DC Power Jack Provides 3 3V DC power to the board 6 ON OFF Switch To turn the power ON or OFF to the board 7 Single Module Site Individual site that holds a single GS1011MIx ba...

Page 12: ...r Guide 1 GS SNG SITE PRG UG 001240 Page 12 of 30 Release 1 0 Figure 3 GS1011MxxS Single Site Programmer Board Components ALERT DO NOT reset DIP switches on the GS1011MxxS Single Site Programmer Board They are set at the Factory ...

Page 13: ...single GS1011MxxS based module 2 Module GS1011MxxS based module 3 Mini USB Connector Used to access each individual module to program 4 PROGRAM RUN Switch Should be set to PROGRAM mode 5 DC Power Jack Provides 3 3V DC power to the board 6 ON OFF Switch To turn the power ON or OFF to the board 7 Single Module Site with cover Individual site that holds a single GS1011MxxS based module Cover should b...

Page 14: ...e for the GS1011MEx and GS1500M module see Figure 4 1 Remove the contents of your Single Site Programmer Kit 2 Setting up the Single Site Programmer board a Plug DB9 cable into the DB9 serial connector on the Single Site board Plug the other end of the DB9 cable into a DB9 serial port on your computer or laptop b Plug the 3 3V DC power cable into the 3 3V DC power connector on the Single Site Prog...

Page 15: ... Page 15 of 30 Release 1 0 Figure 4 GS1011MEx GS1500M Single Site Programmer Hardware Setup To 3 3V Power supply To PC DB9 connector NOTE The board requires a 3 3V DC power supply to power the site The PROGRAM RUN switch should be set to PROGRAM mode at all times ...

Page 16: ...Ix module see Figure 5 1 Remove the contents of your Single Site Programmer Kit 2 Setting up the Single Site Programmer board a Plug the mini USB cable into the USB port on the Single Site board Plug the other end of the USB cable into a USB port on your computer or laptop b Plug the 3 3V DC power cable into the 3 3V DC power connector on the Single Site Programmer board and plug the other end int...

Page 17: ...S SNG SITE PRG UG 001240 Page 17 of 30 Release 1 0 Figure 5 GS1011MIx Single Site Programmer Hardware Setup NOTE The board requires a 3 3V DC power supply to power the site The PROGRAM RUN switch should be set to PROGRAM mode at all times ...

Page 18: ...MxxS module see Figure 5 1 Remove the contents of your Single Site Programmer Kit 2 Setting up the Single Site Programmer board a Plug the mini USB cable into the USB port on the Single Site board Plug the other end of the USB cable into a USB port on your computer or laptop b Plug the 3 3V DC power cable into the 3 3V DC power connector on the Single Site Programmer board and plug the other end i...

Page 19: ...S SNG SITE PRG UG 001240 Page 19 of 30 Release 1 0 Figure 6 GS1011MxxS Single Site Programmer Hardware Setup NOTE The board requires a 3 3V DC power supply to power the site The PROGRAM RUN switch should be set to PROGRAM mode at all times ...

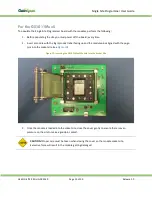
Page 20: ...fore proper ESD precautions should be taken to avoid performance degradation or loss of functionality ALERT Before populating the site you must power OFF the board every time For the GS1011MEx and GS1500M To populate the Single Site Programmer board with the modules perform the following 1 Before populating the site you must power off the board every time 2 Insert a module with the logo product la...

Page 21: ... into the socket site close the cover gently to ensure there is even pressure on the site to make a good pin contact see Figure 8 Figure 8 Close Cover with Toggle Clamp Engaged CAUTION Proper care must be taken when closing the cover on the module socket site Excessive force will result in the module getting damaged ...

Page 22: ...module with the logo product label facing up and the module pins aligned with the pogo pins into the socket site see Figure 9 Figure 9 Inserting the GS1011MIx Module into the Socket Site 6 Once the module is loaded into the socket site close the cover gently to ensure there is even pressure on the site to make a good pin contact CAUTION Proper care must be taken when closing the cover on the modul...

Page 23: ...odule with the logo product label facing up and the module pins aligned with the pogo pins into the socket site see Figure 10 Figure 10 Inserting the GS1011MxxS Module into the Socket Site 3 Once the module is loaded into the socket site close the cover gently to ensure there is even pressure on the site to make a good pin contact CAUTION Proper care must be taken when closing the cover on the mod...

Page 24: ...ite Programmer perform the following 1 From the GainSpan Single Site Programmer Volume folder run setup exe 2 Follow the prompts to install the software 3 Restart the PC if required 4 Upon successful installation you should discover the Single Site Programmer 1p0 under Start Single Site Programmer 5 Launch the application from here or from installation path Single Site Programmer folder ...

Page 25: ... 0 Starting the GainSpan Single Site Programmer Software To start the Single Site Programmer software double click the Single Site Programmer 1p0 exe GUI The GainSpan Single Site Flash Programmer main screen will display see Figure 11 Figure 11 GainSpan Single Site Flash Programmer GUI ...

Page 26: ...which the Single Site Programmer is hooked up to 2 Status Shows the current status of the program and intimates user 3 WLAN The WLAN firmware currently being loaded 4 APP0 The APP0 firmware currently being loaded 5 APP1 The APP1 firmware currently being loaded 6 MAC ID MAC ID of the module 7 Progress Displays each step of the programming QA process 8 MAC ID OK Green if MAC ID is valid Red otherwis...

Page 27: ... Site Progrmmer ini file using Notepad see Figure 12 Table 6 lists the fields and options Figure 12 Single Site Programmer Configuration File Table 5 Configuration File Settings Item Name Description Options 1 COM Port COM port to which the Single Site Programmer is hooked up to 2 WLAN FW File name of WLAN Firmware 3 APP0 The APP0 firmware currently being loaded 4 APP1 The APP1 firmware currently ...

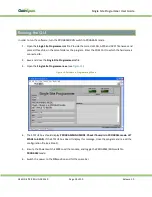
Page 28: ...o which the hardware is connected to 2 Save and close the Single Site Programmer ini file 3 Open the Single Site Programmer exe see Figure 13 Figure 13 Software in Programming Mode 4 The STATUS box should display PROGRAMMING MODE Check if board is in PROGRAM mode HIT SPACE to BEGIN If the STATUS box doesn t display this message close the program and re edit the configuration file see Step 1 5 Ensu...

Page 29: ...ing the firmware see Figure 14 Figure 14 Loading Firmware 8 If the loading was successful the MAC ID OK and Code Loaded Indicators will illuminate GREEN see Figure 15 If the loading was unsuccessful toggle the power switch and repeat Step 5 Figure 15 Firmware Loading Successful 9 Load another module and repeat Step 6 ...

Page 30: ...Software Troubleshooting 1 If the progress dialog does not update or if the program stops responding for any reason close the Single Site Programmer 1p0 exe and re launch 2 Ensure correct settings in Single Site Programmer ini file Incorrect settings will result in program to hang or crash ...

Reviews: