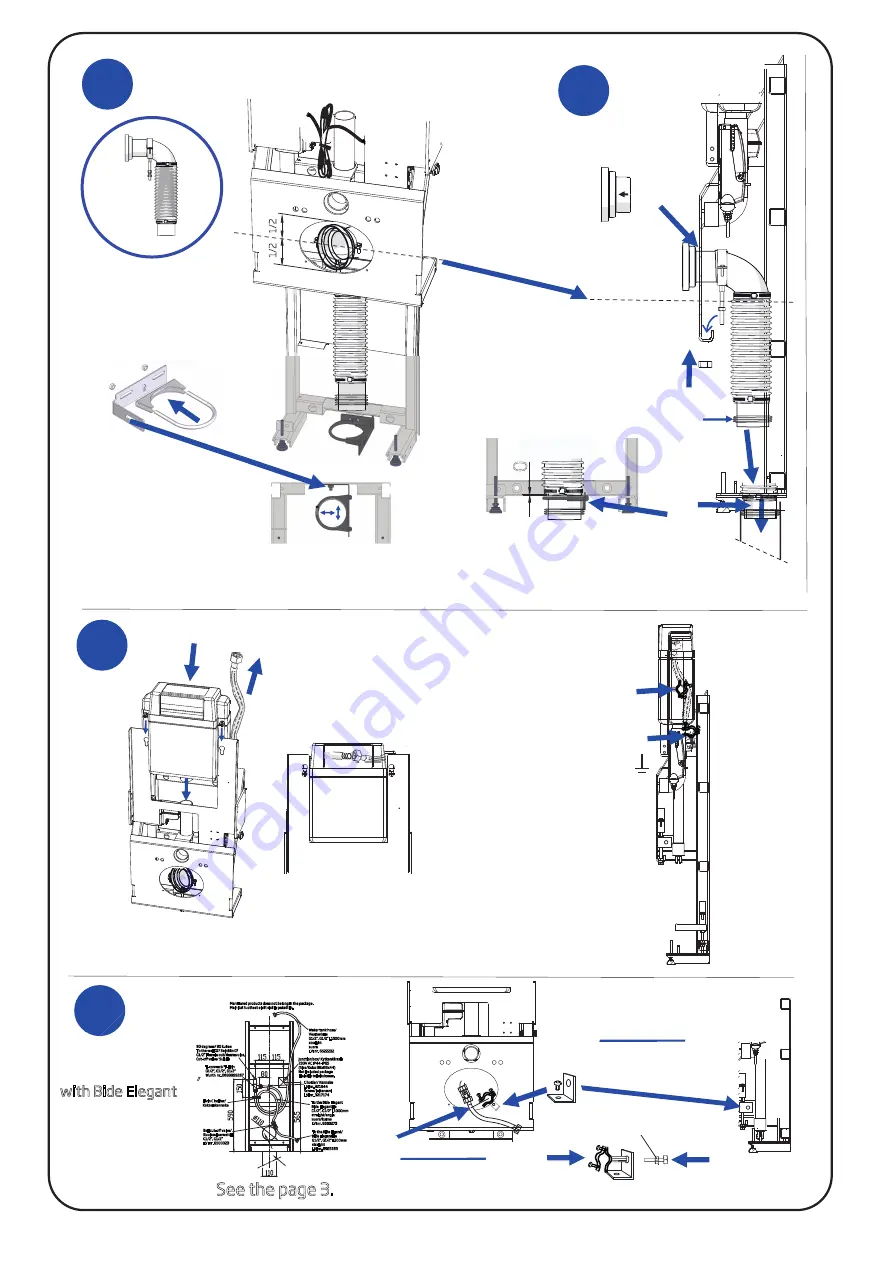
background image

D


 6

1. Wrap motor cable

2. Add water pipe

1.

2.

E


F

1. Pull out water hose, from right

2. Add water tank

3. Notice water pipe

4. Press water tank on it´s place

5. Connect hose to waters tank

2.

3.

1.

4.

4.

F3

F2

1a

1b

2a

2b. Clamp

2a


F1

(A)

Locking

(B)

Add water hose holder
with 

Bide Elegant 

wc-bowl only!

Gaius DUO

with Bide Elegant

17788

Mentioned products does not belong in the package.

Mainitut tuotteet eivät sisälly pakettiin.

Wall drain

Seinäviemäri

Floor drain

Lattiaviemäri

To the Bide Elegant

Bide Elegantille

G1/2”, G1/2” L1000mm

straight/angle

suora/kulma

LVI nr. 6583273

Water tank hose/

Vesitankille

G1/2”, G1/2” L1500mm

straight

suora

LVI nr. 6522232

C holder/ Kannake

LVI nr. 321944

Screw/ Jalkaruuvi

LVI nr. 3217174

Junction box/ Kytkentärasia

230V AC IP44-IP65

(Size/Koko 88x88x44)

Not included package

Ei sisälly toimitukseen.

90 degrees/ 90 kulma

To the wall G?/ Seinään G?

G1/2” Female out/Naaras ulos,

Cut-off valve/ Sululla 

T-connect/ T-liitin

G1/2”, G1/2”, G1/2”

Wurth  nr. 0699999267

Ball cut-off valve/

Kuulasulkuventtiili

G1/2”, G1/2” 

LVI nr. 6500023

To the Bide Elgant/

Bide Elegantille

G1/2”, G1/2” L300mm

straight

LVI nr. 6583263

Twin C holder/ 

Kaksoiskannake

See the page 3.

Install 

Bide Elegant

 hose to

holder

(C)

Mark Up!

Seal 90/110

4.

4.

5.

7. Tie on water hose 

to clamp

with ground wire

6. Tie on water hose 

to clamp

1/2

1/2

0

Summary of Contents for DUO 17788

Page 1: ...4 20127 20118 20128 Gaius DUO installation instructions 17788 electrical high adjusting floor drain 17788 17788 6219 Z x8 x8 x8 x1 x1 x1 4pcs 2pcs 1 1pc L1500mm Save this installation instruction for after use Säästä tämä asennusohje myöhempää käyttöä varten ...

Page 2: ...t points 8 pcs 17788 Gaius DUO Water and electric 17788 2 90 degrees down G1 2 Cut off valve C holder Reinforce 36mm or more plywood or 45mm or more solid wood 430 115 700 230 110 330 10 260 70 1010 30 110 30 1105 310 370 ...

Page 3: ...raight angle Water tank hose G1 2 G1 2 L1500mm straight C holder Junction box 230V AC IP44 IP65 Size 88x88x44 90 degrees down G1 2 Cut off valve T connect G1 2 G1 2 G1 2 Wurth nr 0699999267 Ball cut off valve G1 2 G1 2 To the Bide Elgant G1 2 G1 2 L300mm straight Twin C holder Gaius DUO with Bide Elegant with 2 part wall plug 17788 110 30 110 30 ...

Page 4: ...A qualified electrician must perform the connection The water connection must be positioned to the left of the mid line as shown in the drawing 1 Mid line 2 Wall 3 Electrical connection 4 Water connection Water supply with a shut off valve equipped with a G1 2 external thread Thread downwards 5 Wall mounting fixtures 6 Finished floor 7 Wastewater connection on the floor Ø110 mm 8 Reinforce area plywood...

Page 5: ... up and down to help installation If frame don t go down by motor press moving frame down by hand L470mm box connection lenght A 10mm 8x 2 Install hose 1500mm thread downwards 1 Add hose holder Connect hose 5 A1 A2 Must not exeed 50mm from the wall Wrap cable 230 V Authorised personnel only 2 1 x4 3 ...

Page 6: ... LVI nr 6583273 Water tank hose Vesitankille G1 2 G1 2 L1500mm straight suora LVI nr 6522232 C holder Kannake LVI nr 321944 Screw Jalkaruuvi LVI nr 3217174 Junction box Kytkentärasia 230V AC IP44 IP65 Size Koko 88x88x44 Not included package Ei sisälly toimitukseen 90 degrees 90 kulma To the wall G Seinään G G1 2 Female out Naaras ulos Cut off valve Sululla T connect T liitin G1 2 G1 2 G1 2 Wurth nr...

Page 7: ... side to install hand control 3 Pop up three pieces from cover A 4 Install plug on cover A Testing up down Mind the water pipes and cables 2 2 1 3 4 A J I A 2 4 3 3 x4 1a 2a Add Lock ring inside 1a 3 m ax inside 20m m m ax inside 20m m 1 L ...

Page 8: ... Measure the pipe A D B C 8 ...

Page 9: ...Mount the cover seat and support rails D 9 CLICK CLICK Mount the toilet roll holder remote control holder and covers L x8 x8 A C x8 B x8 x8 2 1 2 x8 ...

Page 10: ...10 0mm 90 2 A CLICK B C E D 2 3 1 1 2 E1 F G ...

Page 11: ...ay damage the flexible pipe Always perform unclogging by moving the implement in the direction of the building s drain pipes 11 In a case of checking or clogging 1 Lift Duo as up you can 2 Remove screws 4 pcs 3 Remove under cover 4 Squeeze black drain pipe 4 1 x4 3 2 ...

Reviews: