background image

ELEMENT AND CONTROL SETTING

ELEMENT AND CONTROL SETTING

10

CONTROL KNOBS 

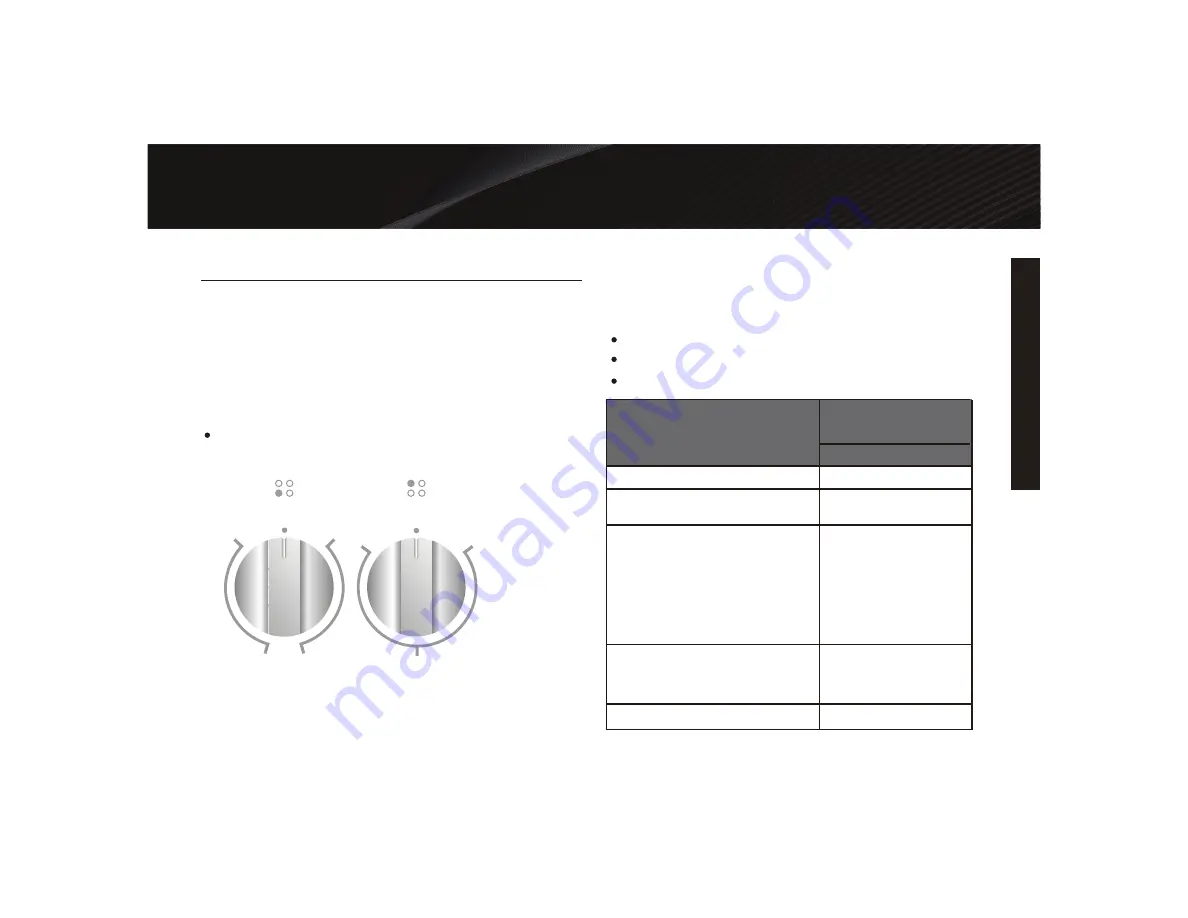
The Control knobs turn in either direction and from any position to 
the desired temperature setting or to OFF.

NOTE:Once the element is turned Off, the Hot Surface 
indicator light will remain 

illuminated until the surface 

temperature of the element has cooled. 
The placement of each knob corresponds to the placement of 
the heating element that it controls. 

To Turn On Any Heating Element:

      PUSH DOWN on the knob and TURN in either direction to 
      desired heat setting.

OFF

HI

LO

MED

OFF

HI

HI

SINGLE

DUAL

LO

LO

RECOMMENDED HEATING ELEMENT SETTINGS

Heating elements do not require preheating.  

A range of heating settings is listed in the following chart because 
the required temperature depends on: 


Type and quality of pan


Type, quantity and temperature of the food


Element used and cook’s preferences

TYPE OF FOOD

HEAT SETTINGS 

RADIANT ELEMENTS

Energy regulator

Melting butter, chocolate

Low

Delicate sauce, rice, simmering 
sauces with butter and egg yolk 

Low to Medium

Cooking vegetable

ZэZOIYV[OZ


eggs-fried or scrambled-,pasta,
milk, pancakes, pudding, simmering 
meats, steaming vegetables, pop 
corn, bacon, stewing meat soup, 
sauteed vegetables, spaghetti 
sauces

Medium

Braising meat, pan frying meat, 

эZO

eggs, stir frying, quickly brown 

or sear meats, hold rapid boil 

Medium to High

Boiling water for vegetables, pasta

High

Summary of Contents for GL1FR24ASSARN

Page 1: ...urchasing a Galanz product Please read this manual carefully for correct usage and safety and keep for future reference For service support and warrant y information call 800 562 0738 User Manual Mode...

Page 2: ...s 10 COOKTOP USE 11 Before Using the Cooktop 11 Cookware 11 Observe the Following Points in Canning 12 OVEN USE 14 Before Using the Oven 14 General 14 Oven Modes 15 Bake Tips and Techniques 16 Convect...

Page 3: ...d could result in death or serious bodily injury A potentially hazardous situation which if not avoided may result in moderate or minor injury All safety messages will tell you what the potential haza...

Page 4: ...oing so blocks HPY V OYV NO the oven and may cause carbon monoxide poisoning Aluminum foil linings may also trap heat ca ZPUN H YL OHaHYK CAUTION Do not store items of interest to children in cabinets...

Page 5: ...s ceramic ceramic earthenware or other glazed utensils are suitable for range top service without breaking due to the sudden change in temperature Utensil Handles Should Be Turned Inward and Not Exten...

Page 6: ...l Electrical Code ANSI NFPA 70 In Canada the range must be electrically grounded in accordance with Canadian Electrical Code Be sure the range is properly installed and grounded by a Disconnect the el...

Page 7: ...h those of your model d f e j k p o m l n HO T SUR FAC ES a b c g h i a Left Rear Surface Element b Left Front Surface Element Dual element c Clock Timer d Oven Vent e Model and Serial Number Plate f...

Page 8: ...Y When the power is connected the screen displays 12 00 and the bar above Set Clock To set the correct time press the up arrow or down arrow until the correct time is displayed After 5 seconds the clo...

Page 9: ...WYLZZ OL W HYYV VY KV U HYYV V ZL OL time to turn off the oven 3 Set the cooking temperature and cooking mode by turning the Thermostat knob and the Selector knob 4 After following these steps the bar...

Page 10: ...two radiant ribbon elements within the same element Either the small inner element or both inner and outer elements may be selected for use There HYL HU PU UP L U TILY VM OLH ZL PUNZ IL ween the LO an...

Page 11: ...D HEATING ELEMENT SETTINGS Heating elements do not require preheating A range of heating settings is listed in the following chart because the required temperature depends on Type and quality of pan T...

Page 12: ...t over 20 minutes after the elements have been turned off COOKWARE The choice of pan directly affects the cooking performance speed and uniformity For best results select pans with the following featu...

Page 13: ...ols slowly Not recommended Heats too slowly Imperfections in enamel may scratch cooktop Stainless Steel heats and cools moderately Soups sauces vegetables and general cooking OBSERVE THE FOLLOWING POI...

Page 14: ...ooktop or its location does not allow the canner to be centered on the surface unit use smaller diameter pots for good canning results Flat bottomed canners must be used Do not use canners P O HUNLK V...

Page 15: ...OVEN USE OVEN USE 14...

Page 16: ...y maintained at the set temperature COOKING MODE SELECTION KNOB Selects the oven function Each of the functions listed below can be used only with the correct temperature Light The oven light is off w...

Page 17: ...rature of ingredients and the sizL ZOHWL HUK UPZO of the baking utensil General Guidelines For best results bake food on a single rack with at least 1 11 2 2 5 3 cm space between utensils and oven wal...

Page 18: ...ZWLJP LK Heatproof glass or ceramic can be used Reduce temperature by another 25 F 15 C when using heatproof glass dishes for a total reduction of 50 F 30 C Dark metal pans may be used Note that food...

Page 19: ...pare the recipe using convection 1 2 3 4 5 See Troubleshooting for Baking and Roasting Problems FOODS RECOMMENDED FOR CONVECTION BAKE MODE Cookies 2 to 4 racks Yeast Breads Appetizers Biscuits Coffee...

Page 20: ...another position Large poultry may need to be covered with foil and pan roasted during a portion of the roasting time to prevent over browning After removing the food from the oven cover loosely with...

Page 21: ...180 82 Turkey not stuffed 12 15 325 160 1 10 14 180 82 Turkey not stuffed 16 20 325 160 1 9 11 180 82 Turkey not stuffed 21 25 325 160 1 6 10 180 82 1 Turkey Breast 3 8 325 160 15 20 170 77 total Comi...

Page 22: ...sure all controls are off and the oven and cooktop are cool Always follow label instructions on cleaning products Soap water and H ZVM JSV O VY ZWVUNL HYL Z NNLZ LK YZ unlesss otherwise noted Do not...

Page 23: ...y with a paper towel NOTE Do not use abrasive or corrosive detergents cleansers oven sprays spot removers or steel wool scouring pads SMUDGES FROM PANS WITH AN ALUMINUM BOTTOM Cleaning Method A cloth...

Page 24: ...dishwasher OVEN DOOR REMOVAL The oven door weighs 30 lbs 14kg For ease of installation and more thorough cleaning some oven doors may be removed IMPORTANT before removing the door Make sure oven is co...

Page 25: ...by reversing the previous steps Style 2 To remove the oven door 1 Open the door fully 2 Push down and turn the small levers situated on the two hinges 3 Grasp the door by its two outer edges and then...

Page 26: ...ctric shock cuts or burns IMPORTANT The light bulb in your oven is Type E 14 220 240V and 25W You must replace this bulb with an appliance bulb of the same type voltage and wattage To Replace the Ligh...

Page 27: ...ack position Pans touching each other or oven walls Food is dry or has Oven temperature too high shrunk excessively Baking time too long Oven door opened frequently Pan size too large Food is baking o...

Page 28: ...ting elements cycle off even when elements are turned to their highest settings Heating element temperature limiters are temporarily shutting off the elements due to exceeding the maximum allowable te...

Page 29: ...t cVVSLK Z M JPLU S Oven light is not working properly Light bulb loose or burned out Reinsert or replace the light bulb Touching the bulb P O UNLYZ TH cause the bulb to burn out Oven light stays on D...

Page 30: ...r repair of household fuses circuit breakers wiring or plumbing A product whose original serial number has been removed or altered Any service JOHYNLZ UV ZWLJP JHSS PKLU P LK HZ UVYTHS Z JO HZ normal...

Page 31: ...ss below within 30 days of purchase Galanz Americas 55 Challenger Road Suite 503 Ridgefield Park NJ 07660 Name Address City State ZIP Phone Email Model Number Serial Number Purchase Location PLEASE PR...

Page 32: ...2019 Galanz Americas Limited Company...

Reviews: