System
Galaxy
Quick
Guide
for
Bioscrypt
/
L
‐
1
Setup
and
Enrollment
System
Galaxy
Quick
Guide
Page
7
of
40
2.
SYSTEM INSTALLATION
INSTALL READER HARDWARE
Also
see
the
Bioscrypt
documentation
for
additional
wiring
information.
Wire
the
L
‐
1
Reader
to
the
DPI
board
in
the
System
Galaxy
access
control
panel
(508i
or
600/635)
Connect
the
L
‐
1
Reader
to
the
network/LAN
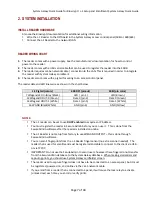
READER WIRING CHART
1.
The
reader
comes
with
a
power
supply.
See
the
manufacturer’s
documentation
for
how
to
control
power
to
the
reader.
2.
The
reader
comes
with
a
USB
serial
cable
that
can
be
used
to
register
the
reader
into
the
SADB
3.
The
reader
requires
cat
‐
5e
network
cable
/
connection
to
the
LAN.
This
is
required
in
order
to
integrate
the
reader
with
System
Galaxy
enrollment.
4.
The
reader
also
comes
with
a
pigtail
for
wiring
to
an
access
control
panel.
The
reader
data
and
LED
lines
wire
as
shown
in
the
chart
below.
L
‐
1
Pigtail
(colors)
600
DPI
(pinout)
508i
(pin
color)
7
Wiegand
LED
In
(Grey/Black)
LED
(
pin
1
)
LED
(Brown)
12
Wiegand
DOUT
‐
0
(Green)
Data
0
(pin
2)
Data
0
(Green)
14
Wiegand
DOUT
‐
1
(White)
Data
1
(pin
5)
Data
1
(White)
16
WGND
(Black/White)
GND
(pin
4)
GND
(Yellow)
NOTES
:
The
L
‐
1
reader
can
be
set
to
use
DHCP
enabled
to
acquire
an
IP
Address.
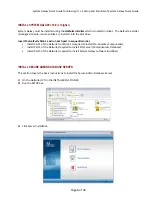
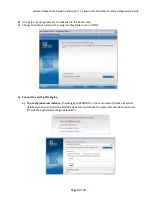
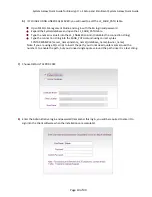
You
must
register
the
reader
in
Secure
Admin
before
you
can
use
it.
This
is
done
from
the
SecureAdmin
software
after
the
reader
is
installed
on
online.
The
L
‐
1
Reader
is
not
setup
from
factory
to
use
WIEGAND
OUTPUT
–
this
is
done
through
SecureAdmin
software.
You
can
enroll
fingerprints
from
the
L
‐
1
Reader
finger
sensor
(no
extra
scanner
needed).
The
reader
that
is
used
for
enrollment
must
be
registered
and
able
to
connect
to
the
client
via
USB
or
via
TCP/IP.
IMPORTANT:
Do
not
use
the
SecureAdmin
to
enroll
users;
however
these
fingers
do
not
transfer
from
the
SecureAdmin
database
to
the
System
Galaxy
database.
When
making
credentials
and
capturing
prints,
you
should
use
System
Galaxy
cardholder
screen.
The
reader
used
to
capture
fingers
does
not
have
to
be
connected
to
an
access
panel,
but
it
must
be
registered,
powered
on,
and
online
via
the
cat
‐
5
network
cable.
If
you
enroll
from
a
reader
that
is
connected
to
a
panel,
it
will
cause
the
lock
relay
to
activate
(unlock
door)
each
time
you
enroll
or
verify
prints.


