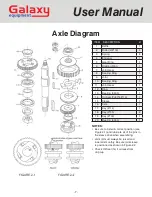
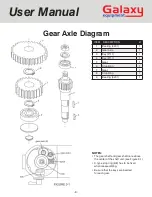
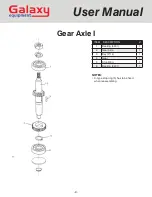
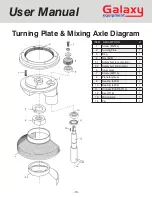
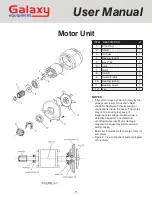
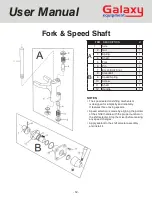
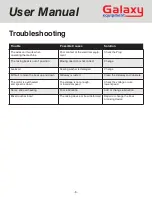
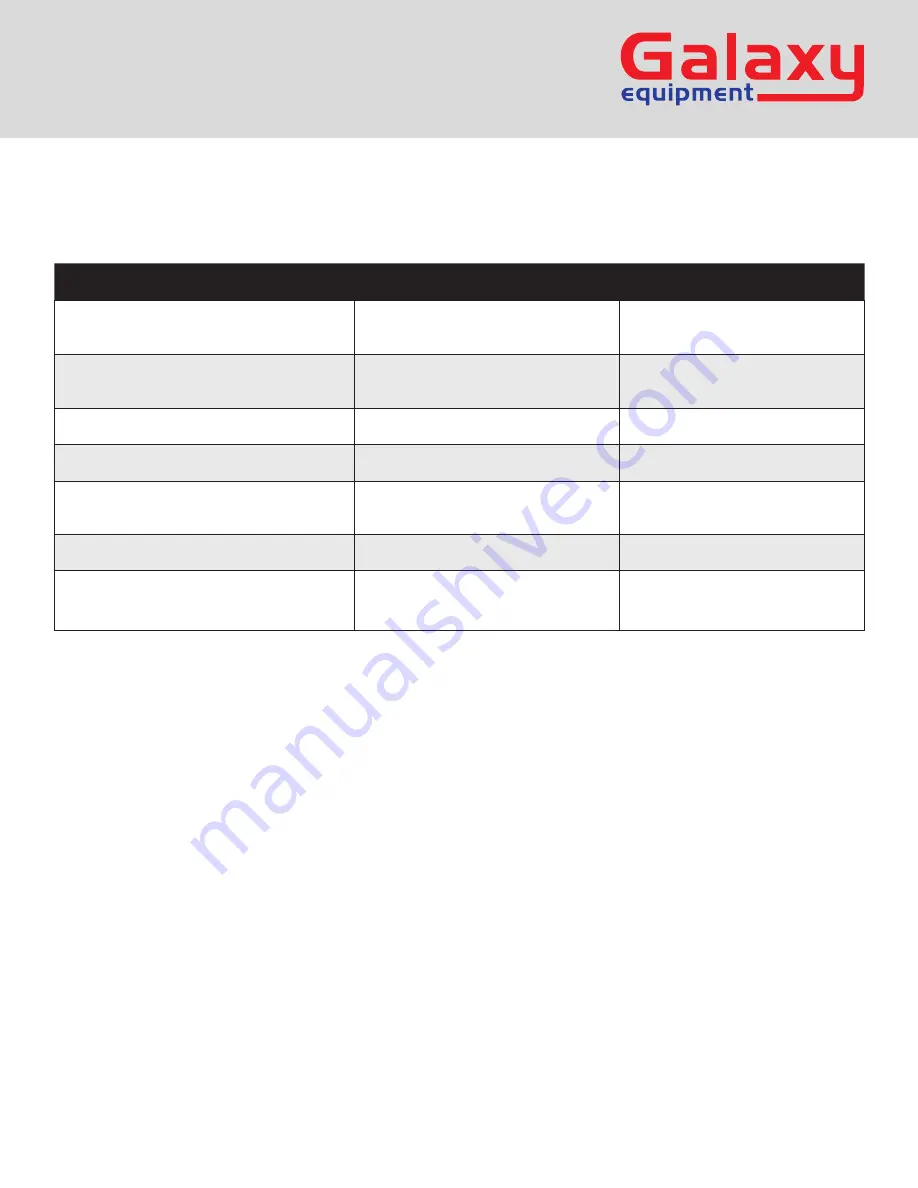
background image

- 6 -

User Manual

Troubleshooting

 Trouble  

 Possible Causes  

 Solution  

 The axles can’t work when  
 operating the machine  

Poor contact of the electrical equip-
ment  

 Check the Plug 

 The mixing bowl is out of  position  

Moving direction is not correct  
  

 Change
 

 Leaks oil  

Sealing washer is damaged  

 Change  

 Difficult to move the bowl up and down  

Slideway is rusted  

 Clean the slideway and lubricate 

 The motor is overheated  
 and speed is down  

The voltage is not enough, 
or incorrect speed  

 Check the voltage or use  
 lower speed  

 Noise  and overheating

Poor lubrication 

 Add or change lubrication  

 Mixer touches bowl  

The mixing device or bowl deformed  
 

 Repair or change the bowl  
 or mixing device  

Summary of Contents for 177GMIX10

Page 1: ...User Manual Planetary Mixers User s Manual 1 Please read the manual thoroughly prior to equipment set up operation and maintenance 177GMIX10 177GMIX20 1 2020 User Manual...

Page 2: ...tion Instructions 4 Mixer Capacity Chart 5 Troubleshooting 6 Figure 1 Axle Diagram 7 Figure 2 Gear Axle Diagram 8 Figure 3 Gear Axle I Diagram 9 Figure 4 Turning Plate Mixing Axle Diagram 10 Figure 5...

Page 3: ...Axle Cover 1 13 Gear Axle II 1 14 Center Axle 1 15 Motor 1 16 Screw 4 17 Rear Cover 1 18 Name Plate 1 19 Handle 1 20 Screw 4 21 Cover 1 22 Bowl s Board 1 23 Stand 1 24 Seat 1 25 Rubber Foot Back 1 26...

Page 4: ...The knob will be straight up Mixing Always use the correct attachment for the job A Whisk Suitable for mixing liquids and soft ingredients can work in all speeds Do not run for more than 15 minutes B...

Page 5: ...Qt Whipped Cream Wire Whisk 1 Qt 2 Qt Cake Batter Flat Beater 8 lb 20 lb When mixing dough pizza bread or bagels check your AR absorption ratio water weight divided by flour weight Above capacities b...

Page 6: ...rect Change Leaks oil Sealing washer is damaged Change Difficult to move the bowl up and down Slideway is rusted Clean the slideway and lubricate The motor is overheated and speed is down The voltage...

Page 7: ...g 6205 1 14 Oil Seal Pd30 45 10 1 15 Sleeve 1 16 Axle 1 17 Key 6 14 1 18 Key 5 35 2 19 Key 6 30 1 20 Bearing 6003 1 NOTES Be sure to install in correct position see Figure 2 1 and lubricate all of the...

Page 8: ...11 1 5 Gear 1 6 Stop Ring 1 7 Gear 1 8 Stop Ring 1 9 Bearing 6201 1 Gear Axle Diagram NOTES The gear shaft and gear shaft I are above the center of the shaft unit see Figure 3 1 C type stop ring 6 8...

Page 9: ...9 User Manual ITEM DESCRIPTION 1 Bearing 6201 1 2 Gear Axle 1 3 Key 5 14 1 4 Gear 1 5 Stop Ring 1 6 Bearing 6201 1 Gear Axle I NOTES C type stop ring 5 has to be fixed when reassembling...

Page 10: ...1 3 Ring 1 4 Nut M18 1 5 1 Safety Net Locomotion 1 5 2 Safety Net Immobility 1 6 Inner Gear 1 7 Screw M8 15 1 8 Planetary Gear 1 9 Bearing 6203 1 10 Bearing 6204 1 11 Oil Seal Pd25 50 10 1 12 Key 5 1...

Page 11: ...roken wires a defective capacitor or a defective centrifugal governor Motor damage may also be caused by bowl overload during mixing Motor set includes motor axle 6 rotor 7 and stator Figure 5 1 is a...

Page 12: ...s made by aligning the pointer of the shifter handle with the proper number on the shift selector Stop the mixer before making any speed changes Apply sealant to the shift selector assembly and instal...

Reviews: