background image

21

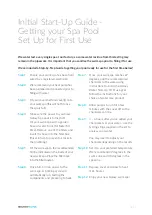
Initial Start-Up Guide -  

Getting your Spa Pool  

Set Up for First Use

We water test every single spa at our factory, so some water residue from this testing may 
remain in the pipework. It is important that you sanitise the swim spa prior to filling it for use. 

We’ve included a Step-by-Step Guide to getting your pool ready for use for the first time below! 

Step 1

  Ensure your swim spa has been hard 

wired by a registered electrician. 

Step 2

  We recommend your heat pump has 

been plumbed and connected prior to 
filling with water.

Step 3

  Fit your cover shelf and cover(s) onto 

your swim spa (this will not fit once 
the spa is full).

Step 4

  Make sure the power to your new 

Galaxy Spa pool is turned off. 
Fill your swim spa with a garden 
hose or water truck (for faster fill 
time). Remove one of the filters and 
insert the hose into the filter box 
(this will help to prevent air locks in 
the plumbing). 

Step 5

  Fill the swim spa to the recommended 

fill line, indicated on the inside of your 
new swim spa. Place the filter back 
into the filter basket. 

Step 6

  Once full, turn on power to the 

swim spa. A ‘priming cycle’ will 
automatically run, testing the 
components and preparing to heat.

Step 7

  Once your swim spa reaches 27 

degrees, add the recommended 
chemicals to the water using 
instructions found in the Galaxy 
Water Start-Up Kit (if using) or 
follow the instructions for your 
choice of water care product. 

Step 8 

Allow pumps to run for a few 
minutes with the cover off so the 
chemicals can mix. 

Step 9

  4 - 6 hours after you’ve added your 

chemicals, test your water - use the 
testing strips supplied in the kit to 
analyse your water.


You may need to adjust your 
chemicals depending on the results.

Step 10

  Set it to your preferred temperature. 

We recommend 32 degrees in the 
swim zone and 38 degrees in the 
spa zone. 

Step 11

  Replace cover and allow to heat 

(12+ hours). 

Step 12

  Enjoy your new Galaxy swim spa!

Summary of Contents for SWIM SPA

Page 1: ...SWIM SPA PRE DELIVERY GUIDE...

Page 2: ...on of a Galaxy Swim Spa There are a number of important steps decisions and actions that must be taken prior to delivery day to ensure a smooth delivery Please read through this guide thoroughly At th...

Page 3: ...irements 10 Recommended Cable Input Location 11 Positioning Requirements Component Layouts and Measurements 12 Above Ground or In Ground Options Building Regulations Consent 19 Out of Ground Installat...

Page 4: ...4...

Page 5: ...practical option so different methods of delivery can be explored such as a helicopter or crane For Swim Spas that need to reach over a house or from a distance greater then 7m a crane is a great opti...

Page 6: ...hboard mains Splashing while swimming is all part of the experience Does your positioning offer adequate drainage Is there enough room within the total foundation for other accessories such as steps h...

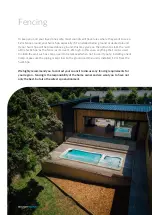
Page 7: ...a as the fence as it s over 1 2m high In this case anything that can be used to climb the wall such as steps need to be removed when not in use If you re installing a heat pump make sure the piping is...

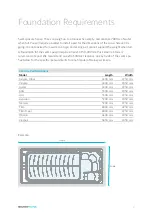
Page 8: ...l require at least a 150 200mm thick steel reinforced cured concrete pad We recommend an extra 100mm clearance on each side of the swim spa See below for the specific measurements for each model of Ga...

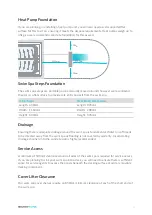
Page 9: ...h 1160mm Width 280mm Height 600mm Height 535mm Drainage Ensuring there is adequate drainage around the swim spa is fundamental Water run off needs to be directed away from the swim spa as flooding is...

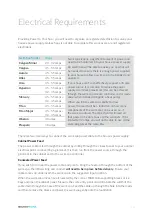
Page 10: ...the swimming jets at the same time Calypso Minor 20 32 amps Calypso 45 55 amps Aurora 45 55 amps Atlas 45 55 amps Ursa 45 55 amps Hyperion 45 55 amps 32 45 amps Mercury 45 55 amps 32 45 amps Titan 45...

Page 11: ...11 Recommended Cable Input Location CALYPSO CALYPSO MINOR AURORA ATLAS PROSPERO OBERON MERCURY HYPERION URSA TITAN MAJOR TITAN...

Page 12: ...rotected from the view sight lines of neighbours and the general public Weather is the swim spa protected from the wind The table that follows outlines the measurements of your swim spa as well as the...

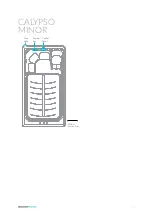
Page 13: ...13 CALYPSO MINOR 500mm Service Area Control Panel Drain Valve Control Box...

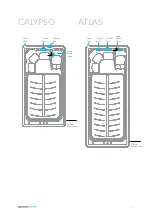
Page 14: ...14 ATLAS 500mm Service Area Control Box Control Panel Drain Valve Heat Pump Union CALYPSO 500mm Service Area Control Box Control Panel Drain Valve Heat Pump Union...

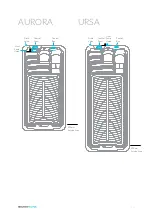
Page 15: ...15 URSA 500mm Service Area Control Box Control Panel Drain Valve Heat Pump Union AURORA 500mm Service Area Control Box Control Panel Drain Valve Heat Pump Union...

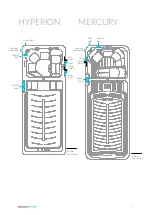
Page 16: ...ERCURY 500mm Service Area Heat Pump Union Control Panel Drain Valve Control Box Spa Zone Swim Zone Swim Spa Drain Valve 500mm Service Area Heat Pump Union Control Panel Drain Valve Swim Spa Drain Valv...

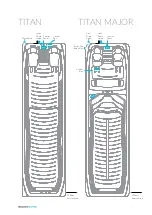
Page 17: ...17 TITAN TITAN MAJOR Control Box Control Panel Drain Valve Control Box Spa Drain Valve 500mm Service Area 500mm Service Area Heat Pump Union Heat Pump Union Control Panel Swim Spa Drain Valve...

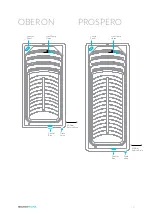
Page 18: ...18 OBERON PROSPERO 500mm Service Area 500mm Service Area Heat Pump Union Heat Pump Union Drain Valve Drain Valve Control Box Control Box Control Panel Control Panel...

Page 19: ...llation Sinking If you choose to sink the spa or build a deck up around it there are a few considerations you will need to take into account Building Consent You will need to install a fence around yo...

Page 20: ...mm holes to accommodate the input and output of the heat pump piping 3 Close the two shut off valves at either end of the heat pump unions 4 Plumb the correct unions from the heat pump to the swim spa...

Page 21: ...is will help to prevent air locks in the plumbing Step 5 Fill the swim spa to the recommended fill line indicated on the inside of your new swim spa Place the filter back into the filter basket Step 6...

Page 22: ...22 Pre Delivery Plan and Checklist Get Ready for Your Swim Spa s Arrival 1 Delivery site check Notes 2 Best delivery method ascertained Notes 3 Delivery booked Notes...

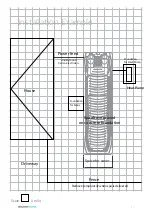
Page 23: ...nce House Driveway Heat Pump Spa above ground on concrete foundation Power feed Underground Call an electrician Space for cover Remove temporarily when spa is delivered Scale 5m Sq Foundation for Step...

Page 24: ...24 Scale 5m Sq Notes...

Page 25: ...25 Scale 5m Sq...

Page 26: ...0800 459 772 galaxyspas co nz GS0001 0862021...

Reviews: