background image

FLYING SAFE • BE AWARE OF YOUR ENVIRONMENT and SURROUNDINGS

TECHNICAL SPECFICATIONS & PARAMETERS

CAUTIONS & WARNINGS

Always fly on a sunny, bright day with as little wind as 
possible. Flying in extreme heat or cold can adversely 
affect your flying control and response of the vehicle.

After connecting the battery, lay the Galaxy Seeker on 
the ground. Please wait for approximately 5-7 seconds to 
allow the digital gyro to electronically stabilize. Push the 
throttle up and then back down to pair the radio control 
transmitter to the Galaxy Seeker. The lights will stop 
blinking and now you are all set to fly. 

Length: 280 mm
Width: 280 mm
Height: 100 mm

Charging Time: Approximately 60 minutes
Flying Time: Approximately above 5 minutes
Radio Control monitor viewing distance limit: approx. 50 meters

• Suitable for ages 14 and up. Adult supervision is always recommended.
• This product contains small parts which are a choking hazard. Keep away from small children.
• Keep Quadcopter at least 10 feet away during use.
• Accurately assemble the quadcopter and fly it under the guidelines of this manual. Small parts should be installed by an 
adult.
• Manufacturers and dealers disclaim all responsibility for damage caused by misuse. 
• Keep hands, hair and loose clothing away from rotors when powered on to to prevent damage to the vehicle or serious 
injury to oneself or others around.
• The quadcopter should never be flown in high winds in excess of 5 MPH or near a pool.
• Never leave the device unattended when being charged. 

PREPARING YOUR UNIT BEFORE FLYING

The throttle stick (left stick on the radio control) must be pointing down before the unit and the control are switched 

on. Move the ON/OFF switch to the ON position and the Power LED on the radio control will begin to blink.

Connect the battery cable to the power connector on the vehicle. The LEDs on the vehicle will now begin to blink. Place 

the quadcopter on the ground with the tail pointed towards you (the two red propellers are the rear of the vehicle). The 

quadcopter needs approximately 5 to 7 seconds to initialize and electronically stabilize the gyro. It will also pair with 

the radio control transmitter at this time. When the LEDs on the vehicle stay green without blinking, the pairing of the 

radio control and the quadcopter has been established.

Be sure to place the quadcopter on a level surface to ensure a proper and neutral alignment of the gyro.

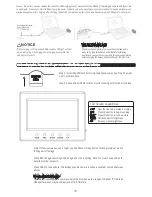
NOTICE

Summary of Contents for SEEKER

Page 1: ...WER SWITCH 1 360º FLIP Press once 2 INITIATE HOMEBEACON PRESS HOLD FOR 3 SECONDS see page 4 for details SIDE TRIM DIRECTION CONTROL STICK FORWARDS BACKWARDS TRIM THROTTLE STICK POWER LED 1 SPEED SETTING 2 INITIATE SMARTFLY PRESS HOLD FOR 3 SECONDS see page 4 for details Thank you for your purchase of the Galaxy Seeker Quadcopter You re just moments away from creating stunning aerial acrobatics ...

Page 2: ...tic round tabs into the holes on each rotor arm Firmly tighten the screws in place making sure that the X Guards are facing out and that the center bar of the guard is lined up with the arm of the rotor 1 Locate the battery underneat the unit Carefully disconnect the power cable underneath the Galaxy Seeker as shown in the photo Do not pull the battery by the wires as the wires may break off of th...

Page 3: ...otage Press REC to begin recording and REC again to stop recording Note You must have an SD card installed in order to record Press SNAP to take a photo The Eclipse onboard camera requires a couple of seconds between photos Optimal Video Performance The Galaxy Seeker s built in camera will provide live video up to a range of 164 feet 50 meters Video performance may become erratic after 50 meters S...

Page 4: ...laxy Seeker go lower in altitude Use the right stick Directional Stick to turn left right move forward or backward Normally the Galaxy Seeker s front is the cockpit Pressing Right or Left on the Throttle stick will strafe in that direction according to the cockpit Up moves the Galaxy Seeker forward while Down moves it backwards 360º FLIP Press the 360 button once on the bottom right of the radio c...

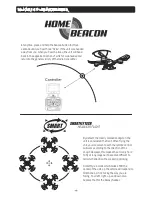
Page 5: ...ction the cockpit is pointing SmartFly is a mode which makes YOU the center of the unit so the vehicle will respond to directions as if it s facing the way you are facing Your left right up and down also become that for the Galaxy Seeker At anytime press and hold the beacon button for three seconds until you hear three Ticks If the unit was headed away from you when you hear the ticks the unit wil...

Page 6: ...f there isn t any accurate control of the vehicle make sure of the following Make sure the radio control transmitter is set to the ON position Make sure the battery on the vehicle is installed correctly The vehicle may fly erratically if wind conditions are too strong Fly the vehicle under calm conditions Make sure the radio control transmitter has paired correctly with the vehicle If not power do...

Page 7: ...be installed by an adult Manufacturers and dealers disclaim all responsibility for damage caused by misuse Keep hands hair and loose clothing away from rotors when powered on to to prevent damage to the vehicle or serious injury to oneself or others around The quadcopter should never be flown in high winds in excess of 5 MPH or near a pool Never leave the device unattended when being charged PREPA...

Page 8: ...FL 33179 For Customer Service please email Care OdysseyToys com Please note the units model number and name in your email Extra Parts Available Visit Odyssey online to order Extra Batteries New rotor blades X Guard components Model no ODY 1810FPV Galaxy Seeker ...

Reviews: