background image

OPERATION MANUAL   

 
RADIO  PROJECTION CLOCK 
EAN  4 0 1 7 8 0 5 4 2 4 9 7 5  


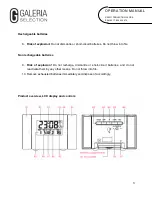
Interrupting the alarm (SNOOZE), switching off the alarm clock for the current day. 

1.  Once the alarm sounds, it can be cancelled by pressing the SNOOZE (B2) button. 

The “zZ” icon (A7) is flashing in the display. The alarm repeat functions has been set to 
5 minutes by default. The alarm sounds again after 5 minutes. 

2.  Press any other button to turn off the alarm for the current day. The alarm sounds the 

next day at the preset alarm time. The alarm time symbol (A2) lights up steadily in the 
display.  


Other functions 


Temperature display  

  In order to switch a temperature value from °Celsius to °Fahrenheit, press the 

DOWN 

button (B3) when in normal time display mode.  


Backlight 

  Press on top of the radio clock or press the 

SNOOZE

 (B2) button to turn on the 

backlight. After approx. 5 seconds, the light will turn off again. 


Projection 

  The alarm clock features 2 projection arms, left and right from the main body. The arms 

can be swiveled to the front by up to 90°. Adjust the sharpness of the projection by 
moving the device accordingly.  

  Press on the top of the radio clock to turn on the projection light. After approx. 5 

seconds, the light will turn off again. 

  Connecting the included power adapter to the adapter socket (B7) on the back of the 

device allows for continuous projection. To do so, first remove the batteries from the 
device and 

set the “24H PROJECTION” switch (B8) on the bottom of the device to “ON” 

position. 


WHEN USING THE POWER ADAPTER, ALWAYS REMOVE THE BATTERIES AND 
SET THE “24H PROJECTION TO “ON” POSITION IN ORDER TO ACTIVATE 
CONTINUOUS PROJECTION. 


Troubleshooting, maintenance and care  

  Do not install the device near interfering sources (TVs, computers, or similar).


  Avoid placing the device next to or on metal plates.


  We do not recommend using the device in location such as airports, basements, high-

rise buildings or factories. Do not start radio reception while in a moving vehicle such as 
a car or train.


Summary of Contents for 4017805424975

Page 1: ...n designed and manufactured to provide you with many years of satisfactory operation when used correctly To guarantee this please follow the safety instructions listed hereinafter 1 Do not expose the...

Page 2: ...ng correct polarity and as indicated in the battery compartment Caution Inserting the battery incorrectly poses an explosion hazard 1 Only replace with batteries of same type and suitable specificatio...

Page 3: ...ort circuit batteries Do not throw into fire Non rechargeable batteries 9 Risk of explosion Do not recharge dismantle or short circuit batteries and do not reactivate them by any other means Do not th...

Page 4: ...has been connected the clock starts searching for the radio clock signal transmitted by the atomic clock in Frankfurt Mainflingen This will take approx 5 to 8 minutes provided there is no interference...

Page 5: ...en using the clock for the first time the clock automatically starts searching for the radio signal and the reception icon starts flashing Once the device reveices the radio clock time the icon lights...

Page 6: ...n the following order Year month day language time display mode 24 or 12 hour display time zone hours and minute Setting the calendar The year indicator starts flashing Press the UP B4 and DOWN B3 but...

Page 7: ...All settings configured that far will be saved Alarm settings Setting the alarm time alarm 1 Press the MODE B6 button once to switch to alarm mode AL 2 Press and hold the MODE button B6 for 2 seconds...

Page 8: ...e alarm clock features 2 projection arms left and right from the main body The arms can be swiveled to the front by up to 90 Adjust the sharpness of the projection by moving the device accordingly Pre...

Page 9: ...and new batteries Technical data Radio alarm clock Temperature measuring range 10 C to 50 C Radio clock DCF77 Batteries 2 x new AAA 1 5 V batteries Power adapter Input 100 240 V 50 60 Hz 0 2 A Output...

Page 10: ...may explode 5 The connections should not be short circuited 6 Remove used batteries from the product immediately Remove the batteries if you know that the device will not be used for a long period Oth...

Page 11: ...ful to the environment and human health consumers are there for obligated to return batteries to retail or local collection facilities free of charge used batteries will be recycled they contain impor...

Page 12: ...u promptly read and comply with this Information If this product no longer functions correctly then check whether this is due to a reason such as for example an interrupted electrical supply in so far...

Reviews: