Page 8
3E4290 Gallagher T12 Reader | Edition 1 | August 2016
Copyright © Gallagher Group Limited
2.
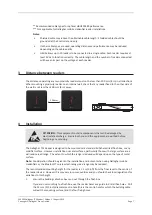
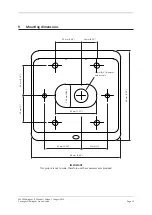
Run the building cabling out through the centre hole and through the reader bezel.
3.
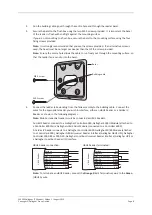
Secure the bezel to the flush box using the two M3.5 screws provided. It is important the bezel
of the reader is flush with and tight against the mounting surface.
If you are not mounting to a flush box, secure the bezel to the mounting surface using the four
fixing screws provided.
Note:
It is strongly recommended that you use the screws provided. If an alternative screw is
used, the head must be no larger nor deeper than that of the screw provided.
Note:
Ensure the centre hole allows the cable to run freely out through the mounting surface, so
that the reader facia can clip into the bezel.
Bezel
Building cable
M3.5 screw
M3.5 screw
4.
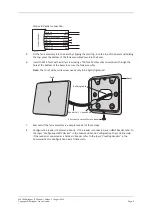
Connect the reader tail extending from the facia assembly to the building cable. Connect the
wires for the appropriate reader you wish to interface, either an HBUS Reader or a Cardax IV
Reader, as shown in the following diagrams.
Note:
Mobile credential readers must be connected as HBUS Readers.
An HBUS Reader connects to a Gallagher Controller 6000, Gallagher 4H/8H Module (attached to
a Controller 6000) or a Gallagher HBUS Door Module (connected to a Controller 6000).
A Cardax IV Reader connects to a Gallagher Controller 6000, Gallagher 4R/8R Module (attached
to a Controller 6000), Gallagher GBUS Universal Reader Interface (Gallagher GBUS URI), Gallagher
Controller 3000-8R or 3000-4R, Gallagher Local Bus Universal Reader Interface (Gallagher URI) or
a Gallagher Local Bus Reader I/O Interface.
HBUS Reader connection:
HBUS Reader terminated:
Positive
Red
Negative
Black
HBUS Termination Orange
HBUS A
Green
HBUS B
Brown
CDXIV TX
White
CDXIV RX
Blue
HBUS R
eader
Positive
Red
Negative
Black
HBUS Termination Orange
HBUS A
Green
HBUS B
Brown
CDXIV TX
White
CDXIV RX
Blue
HBUS R
eader
Note:
To terminate an HBUS Reader, connect the
Orange
(HBUS Termination) wire to the
Green
(HBUS A) wire.


