background image

EN - 20

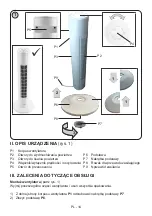
Note: Apply reverse procedure to disassemble the unit.

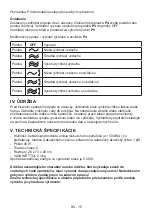
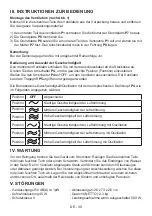
Control

Plug the assembled fan into wall socket. Set the required position (function)

by turning switch 

P4

, Switch off the ventilator by turning switch 

P4

 into position OFF. The 

ventilator can be held and carried using transport hole 

P5

.

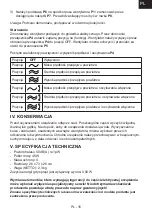
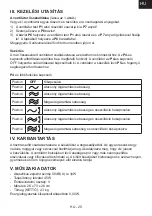
Set the speed/oscillation using the switch as below 

P4

:

Position

OFF

off

Position

Low air flow velocity

Position

Medium air flow velocity

Position

High air flow velocity

Position


Low air flow velocity with oscillation

Position


Medium air flow  with oscillation

Position


High air flow velocity with oscillation

IV. MAINTENANCE

Unplug the unit before cleaning or storing. Wipe the unit with an absorbent tissue, paper 

towel or soft cloth. Never use an abrasive to clean the appliance. Do not immerse the 

appliance or the cord in water or any other liquid. Cleaning dust and impurities settled 

inside the ventilator can be made by their vacuuming or blowing out. Store the cooled 

down appliance at a safe and dry place, out of reach of children and incapacitated people.

V. TECHNICAL SPECIFICATIONS

 -

Acoustic noise level of 50 dB(A) re 1pW

 -

Input 45 W

 -

Protection class II

 -

Size: 26 x 73 x 26 cm

 -

Weight (NETTO): 2.3 Kg

Power consumption in off mode is 0.00 W.

Expert service must do the large maintenance or to intervene into inside parts of the 

appliance! Non-observance of the instructions of the manufacturer cancels the right 

for guarantee repair!
The manufacturer reserves the right to change the technical specifications and

accessories for the respective models.

Summary of Contents for VEN 73T Blizzard

Page 1: ...U IT N VOD NA POU ITIE INSTRUKCJA OBS UGI INSTRUCTION MANUAL HASZN LATI UTAS T S BEDIENUNGSANLEITUNG 14 11 2022 Sloupov ventil tor St pov ventil tor Wentylator kolumnowy Tower fan Oszlop ventil tor S...

Page 2: ...demont p ed i t n m nebo dr bou nebo po ukon en pr ce spot ebi vypn te a odpojte od el s t vyta en m vidlice nap jec ho p vodu z el z suvky V dy odpojte spot ebi od nap jen pokud ho nech v te bez dozo...

Page 3: ...hu vych zej c ho ze spot ebi e se nesm nach zet dn spot ebi e s otev en m plamenem nebo hroz nebezpe naru en procesu ho en Nikdy na sebe nebo zv ata nenechte p sobit po del dobu proud vzduchu M e to z...

Page 4: ...Dr ka pro nap jec p vod P4 Sp na vyp na rychlost a oscilace P9 Nap jec p vod P5 Otvor pro p en en III POKYNY K OBSLUZE Sestaven ventil toru viz obr 1 Vyjm te jednotliv d ly ventil toru a odstra te ve...

Page 5: ...proud n vzduchu s oscilac Poloha Vysok rychlost proud n vzduchu s oscilac IV DR BA P ed ist n m spot ebi odpojte ze z suvky Jednotliv sti vy ist te vlhkou l tkou nebo houbou Zabra te vniknut vody do...

Page 6: ...padn bateri akumul torem po ukon en jeho ivotnosti nem lo b t nakl d no jako s b n m odpadem z dom cnosti Je nutn ho odv zt do sb rn ho m sta pro recyklaci elektrick ho a elektronick ho za zen Zaji t...

Page 7: ...m alebo dr bou spotrebi vypnite a odpojte od el siete vytiahnut m vidlice nap jacieho pr vodu z elektrickej z suvky V dy odpojte spotrebi od nap jania ak ho nech vate bez dozoru a pred mont ou demont...

Page 8: ...trebi a sa nesm nach dza iadne spotrebi e s otvoren m plame om preto e hroz nebezpe enstvo naru enia procesu horenia Nikdy na seba alebo zvierat nenechajte p sobi po dlh as pr d vzduchu M e to sp sobo...

Page 9: ...P9 Nap jac pr vod P5 Otvor pre pren anie III POKYNY NA OBSLUHU Zostavenie ventil toru vi obr 1 Vyberte jednotliv diely ventil toru a odstr te v etok obalov materi l 1 Zo spodku tel ventil tora P1 ods...

Page 10: ...o pr stroja Na odstr nenie siln ho alebo star ieho zne istenia pou ite m kk vlhk handri ku Usaden prach alebo pr padn ne istoty z vn tra ventil tora vysajte vys va om alebo ich vyf knite Vychladen spo...

Page 11: ...po ukon en jeho ivotnosti nem e by nakladan ako s be n m odpadom z dom cnosti Mus sa odovzda do pr slu nej zberne na recykl ciu elektrick ch a elektronick ch zariaden Zaru en m spr vnej likvid cie toh...

Page 12: ...ruszaj si podczas pracy przed monta em i demonta em przed cszyczeniem lub konserwacj nale y wy czy urz dzenie i od czy je od sieci elektrycznej poprzez wyci gni cie wtyczki przewodu zasilaj cego z gn...

Page 13: ...ia stwarza to bowiem niebezpiecze stwo zdmuchni cia go Nie kierowa strumienia powietrza przez d u szy czas w stron ludzi ani zwierz t Mo e to powodowa problemy zdrowotne Nale y u ywa tylko oryginalnyc...

Page 14: ...cznik pr dko ci i oscylowania P8 Rowek dla przewodu zasilaj cego P5 Otw r do przenoszenia P9 Nprzew d zasilania III ZALECENIA DOTYCZ CE OBS UGI Monta wentylatora patrz rys 1 Wyjmij poszczeg lne cz ci...

Page 15: ...owietrza i oscylowanie w czone Pozycja Wysoka pr dko przep ywu powietrza i oscylowanie w czone IV KONSERWACJA Przed czyszczeniem urz dzenie od cz z sieci Poszczeg lne cz ci wyczy wilgotn tkanin lub g...

Page 16: ...produkcie lub jego opakowaniu oznacza e produkt nie mo e by traktowany jako odpad komunalny lecz powinno si go dostarczy do odpowiedniego punktu zbi rki sprz tu elektrycznego i elektronicznego w celu...

Page 17: ...the appliance and disconnect it from the mains by pulling the power cord from the power socket Always unplug the appliance from power supply if you leave it unattended and before assembly disassembly...

Page 18: ...er of burning process interruption Never let the flow of air blow on you or animals for an extended period of time It may cause health problems Use only original parts designed for this type Holes for...

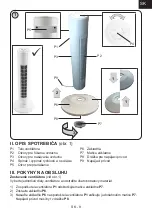
Page 19: ...d P5 Transport hole III INSTRUCTIONS FOR USE Assembling of unit see Fig 1 Take all parts out of the box and remove all packing material 1 Unscrew the base nut P7 from the bottom part of the fan body P...

Page 20: ...unit with an absorbent tissue paper towel or soft cloth Never use an abrasive to clean the appliance Do not immerse the appliance or the cord in water or any other liquid Cleaning dust and impurities...

Page 21: ...he applicable collection point for the recycling of electrical and electronic equipment By ensuring this product is disposed of correctly you will help prevent potential negative consequences for the...

Page 22: ...ek csak a k sz l k s csatlakoz vezet ke hat sugar n k v l tart zkodhatnak A tartoz kok vagy hoz f rhet r szek kicser l se el tt amelyek m k d s k zben mozognak beszerel s s sz tszerel s el tt tiszt t...

Page 23: ...tra sz nyegre A k sz l k haszn latakor gyeljen arra nehogy s r l s t rt njen Minden alkalommal miel tt a fogyaszt t a h l zatra csatlakoztatja ellen rizze hogy a kezel pulton a gombok kikapcsolt helyz...

Page 24: ...omos ram ltal okozott s r l sek t zk rok s a fenti biztons gtechnikai figyelmeztet sek figyelmen k v l hagy s b l ered k sz l kre vonatkoz j t ll si felel ss g rt II A K SZ L K LE R SA 1 brak P1 Venti...

Page 25: ...csol Poz ci OFF Kikapcsolva Poz ci Alacsony l g raml si sebess g Poz ci Alacsony l g raml si sebess g Poz ci Magas l g raml si sebess g Poz ci Alacsony l g raml si sebess g s osszcill ci bekapcsolva P...

Page 26: ...omos s elektronikus k sz l kek hullad kk nt val elt vol t sa Haszn lhat az Eur pai Uni s egy b eur pai orsz gok szelekt v hullad kgy jt si rendszereiben Ez a szimb lum a k sz l ken vagy annak csomagol...

Page 27: ...nn St rungen auftreten bei Wartungs und Pflegearbeiten nach dem Gebrauch und vor dem etwaigen Wechsel des Zubeh rs Trennen Sie das Ger t immer vom Stromnetz wenn Sie es unbeaufsichtigt lassen Nehmen S...

Page 28: ...b sich der Schalter in 0 Stellung befindet Aus und trennen Sie das Ger t nach Beendigung der Arbeit immer vom Stromnetz Platzieren Sie in den Luftstrom der aus dem Ventilator kommt keine anderen Ger t...

Page 29: ...ellt keinen Garantieanspruch dar wenn die angef hrten Sicherheitshinweise nicht eingehalten werden II BESCHREIBUNG DES GER TES Abb 1 P1 K rper des Ventilators P6 Grundplatte P2 ffnungen f r Luftaustri...

Page 30: ...mit dem entsprechenden Drehknopf P4 wie im Folgenden angegeben w hlen Position OFF Abgeschaltet Position Niedrige Geschwindigkeit der Luftstr mung Position Mittlere Geschwindigkeit der Luftstr mung Po...

Page 31: ...zuschneiden Das Ger t wird dadurch unbrauchbar gemacht Um das Ger t ordnungsgem zu entsorgen bringen Sie es in eine der entsprechenden Sammelstellen Die korrekte Entsorgung dieses Ger tes wird dazu be...

Page 32: ...n nou osobou nespr vn nebo neodborn mont e v robku po kozen p stroje vlivem iveln pohromy pou v n v robku pro jin ely ne je obvykl pou v n v robku k profesion ln i jin v d le n innosti pou v n v robku...

Page 33: ...yvom ivelnej pohromy pou vania v robku pre ely pre ktor nie je ur en pou vania v robku na profesion lne i in z robkov innosti pou vania v robku s in m ne doporu en m pr slu enstvom nespr vnej dr by v...

Page 34: ...zpiecze stwa zu ycie towaru przekraczaj ce zakres zwyk ego u ywania przez indywidualnego odbiorc ko cowego zw aszcza je eli by wykorzystywany do profesjonalnej lub innej czynno ci zarobkowej uszkodzen...

Page 35: ...y jednak w wczas jest upowa niony do odj cia kosztu cz ci zu ytych lub nie dostarczonych przez u ytkownika np baterii s uchawek zasilacza wraz z reklamowanym urz dzeniem 13 Okres gwarancji przed u a s...

Page 36: ......
Reviews: