


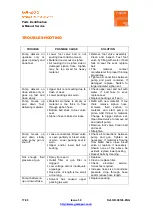
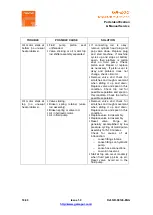


Parts Identification
& Manual Service
10/40
Issue 1.0
b) To turn off the electric motor:
Set the pressure to minimum by turning the pressure control knob fully counter
clockwise.
Move the ON/OFF switch to the OFF position.
NB
: Make sure that the spray gun does not have a tip or tip guard installed.
•
Close the bleed valve by turning it fully clockwise.
•
Start the engine or turn on the electric motor.
•
Turn the pressure control knob clockwise approximately 1/3 of the way down to
increase pressure.
•
Unlock the gun by turning the gun trigger lock to the unlocked position.
•
Trigger the gun into the metal waste container until the old solvent is gone and fresh
solvent is coming out of the gun.
•
Lock the gun by turning the gun trigger lock to the locked position.
•
Set down the gun and increase the pressure by turning the pressure control knob slowly
clockwise.
•
Check the entire
system for leaks. If leaks occur, follow the “Pressure Relief Procedure”
in this manual before tightening any fitting or hoses.
•
Follow the “Pressure Relief Procedure” in this manual before changing from solvent to
paint.
WARNING!
Be sure to follow the pressure relief procedure when
shutting the unit down for any purpose, including servicing or adjusting
any part of the spray system, changing or cleaning spray tips, or
preparing for cleanup.
PAINTING
•
Place the suction pipe into a container of paint.
•
Place the bleed hose into a metal waste container.
•
Set the pressure to minimum by turning the pressure control knob fully counter
clockwise.
•
Open the hydraulic shut-off valve located on the hydraulic pressure hose. The handle
should be in line with the hose.
•
Open the bleed valve by turning it fully counter clockwise.
•
Start the engine or turn on the electric motor.
a) To start the gas engine:
Move the fuel valve lever to the open position.
Move the throttle lever to its middle point.


