14
Removing the cutting head
•
Turn off the appliance and remove the power adaptor from the mains socket
9
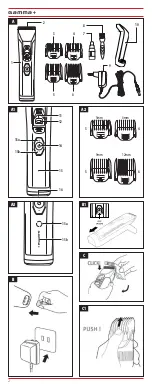
(fig.
A
).
•
Remove the guide comb in compliance with the instructions reported in
“Using
without the guide comb“
.
•
Keep the appliance with the display facing upwards.
•
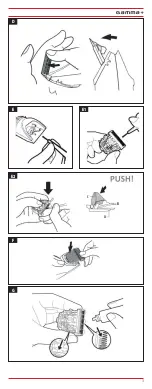
Press the centre part of the head downwards
2
(fig.
A
) using your thumb until it
has opened (fig.
D
); then extract it from the appliance.
•
Take care not to drop the head.
Blade block cleaning
•
Remove the head
2
(fig.
A
), as indicated in the paragraph
“Removing the cutting
head”
.
•
Using the supplied brush
8
(fig.
A
), remove hair:
– from the internal part of the appliance (fig.
E
);
– from the ends of the blade (fig.
E1
);
– from between the fixed blade
A
and mobile blade
B
: to lift the blade apply
downward pressure on the cleaning lever
C
(fig.
E2
).
•
Apply two/three drops of lubricating oil
7
(fig.
A
) in the gap between the fixed
and mobile blade (fig.
G
).
Cutting head assembly
•
Place the special assembling hook into its compartment situated on the appliance.
•
Push the head downwards and click the unit into its correct position (fig.
F
).
Lubrication
It is recommended to lubricate the blade unit daily or after every use.
To maintain perfect performance of the appliance over time, you are required to clean
the blade regularly (paragraph “Blade block cleaning”) and proceed with lubrication.
•
Remove the cutting head as indicated in the paragraph
“Removing the cutting
head”
.
•
Clean the blade block as indicated in the paragraph
“Blade block cleaning”
.
•
Apply two/three drops of lubricating oil
8
(fig.
A
) (you can also use oil for sewing
machines) in the gap between the fixed and mobile blade (fig.
G
).
Failure to lubricate the appliance is considered as “FAILURE TO COMPLY WITH
THE INSTRUCTIONS FOR USE”, therefore, the warranty will be automatically
rendered null and void.
DISPOSAL
The product packaging is made of recyclable materials. Separate the parts
according to their type and dispose of them in accordance with applicable
laws on the environmental protection.
INFORMATION TO USERS
in accordance with Legislative Decree No.49
of 14 March 2014 “Implementation of Directive 2012/19/EU on waste
electrical and electronic equipment (WEEE)”
The crossed bin symbol on the appliance indicates that at the end of its
lifespan, the product must be collected separately from other waste. The
user must deliver the appliance, with the essential components, at the end
of its lifespan, to the appropriate separate collection centres for electronic
and electrotechnical waste, or return it to the dealer when a new applicable
of equivalent type is purchased, at the rate of one to one, or 1 to zero for
appliances with longer side of less than 25 mm. Adequate separate collection
for subsequent start of the appliance discharged to recycling, treatment and
compatible environmental disposal helps to avoid possible negative effects
on the environment and on health and favours the recycling of the appliance
materials. Illegal disposal of the product by the user involves the application
of administrative sanctions as per Legislative Decree no. Legislative Decree
No.49 of 14 March 2014.
Disposing of the battery and power adapter.
•
Turn off the appliance.
•
Remove the battery from its compartment.
Do not dispose of the batteries and/or power adapter with normal
domestic waste.
Summary of Contents for EMPYRE
Page 3: ...3 D E2 F G E E1 C B A...
Page 40: ...40 CA CA EL CE SELV SELV III 2 3 1 A...
Page 41: ...41 3 5 C 40 C A 1 2 3 3 mm 1 8 inch 4 6 mm 1 4 inch 5 9 mm 3 8 inch...
Page 44: ...44 9 A 2 A D 2 A 8 A 1 A B C E2 7 A G F 8 A G 49 14 2014 2012 19 E A EE...
Page 45: ...45 1 25 cm 49 14 2014 LI PO 1 2 Gamma Pi s r l IT www gammapiu it...
Page 76: ...76 AR...
Page 77: ...77 1 3 4...
Page 78: ...78 5 7 8 0 1 2 1 5 1...
Page 79: ...79...
Page 80: ...80...
Page 81: ...81...
Page 82: ...82...
Page 87: ...3 D E2 F G E E1 C B A...
Page 88: ...4 e a a BG III SELV Safety Extra Low Voltage SELV III 2 3 1 A...
Page 89: ...5 3 5 C 40 C A 1 2 3 3 1 8...
Page 92: ...8 9 A 2 A D 2 8 A E1 A B C E2 7 A G F 8 G 49 14 2014 2012 19...
Page 93: ...9 1 25 49 14 2014 LI PO 1 2 Gamma Pi s r l IT www gammapiu it...
Page 142: ...58 RU III SELV Safety Extra Low Voltage SELV III 2 3 1 A...
Page 143: ...59 3 8...
Page 146: ...62 0 5 11 A1 12 A1 2 0 9 A 2 A D 2 A 8 A E E1 A B C E2 7 A G F 8 A G...
Page 147: ...63 49 14 2014 2012 19 25 49 14 2014 LI PO Lithium 1 2 Gamma Pi s r l...
Page 148: ...64 Centri assistenza tecnica IT www gammapiu it...
Page 161: ...77 UA III SELV SELV III 2 3 1 A...
Page 162: ...78 3 5 C 40 C A 1 2 3 3 1 8 4 6 1 4...
Page 165: ...81 9 A 2 A D 2 A 8 E E1 A B C E2 7 A G F 8 A G 49 14 2014 2012 19 RAEE 1 25...
Page 166: ...82 49 14 2014 LI PO 1 2 Gamma Pi s r l IT www gammapiu it...


