background image

POWER CONNECTION & CONTROLS

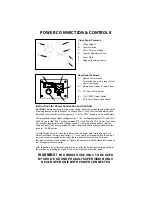
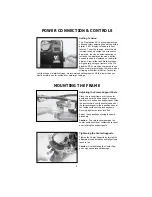
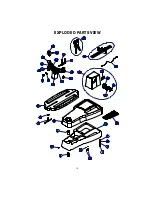
Front Panel Features

A - String Gripper
B - Tension Switch
C - L.E.D. Tension Display
D - Tension Adjustment Knob
E - Cover Plate
F - Gripper Reversing Switch
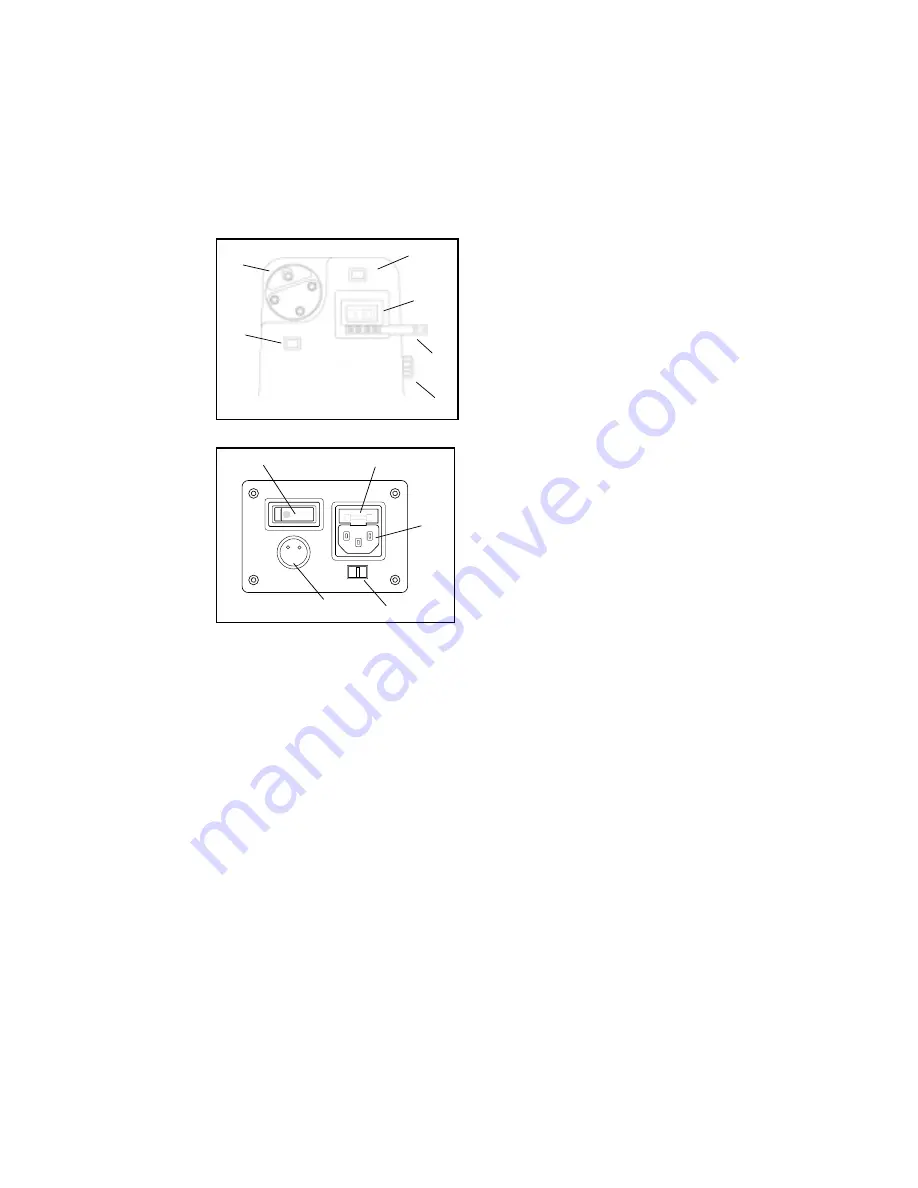
Rear Panel Features

A - Lighted Power Switch

To turn the power on, press the left

side of the switch.

B - 5 Amp Fuse Holder (w/ spare fuse)

C - A/C Power Cord Socket

D - 110V / 220V Select Switch
E - 2 Pin Foot Pedal Switch Socket

B

C

D

A

E

F

C

D

B

A

110V

220V

USE ONLY WITH 250V FUSE

Instructions for Power Connection and Controls

CAUTION ! 

Before connecting to the power supply, check the voltage supply switch (letter

D) setting located on the rear panel. To change from 110 to 220 volt service simply slide

the switch fully to the left or to the right until “1 10V” or “220V” appears on the switch plate.

The acceptable range of input voltages for the “110 V” setting is between 110 V and 120 V

@ 60 Hz and for the “220 V” setting, between 220 V and 240 V @ 50 to 60 Hz. If you have

any question regarding the input voltage supply for your area, please ask your electric

utility company. 


When using extension cords, use grounded heavy duty extension cords

rated for 15 AMP service.

To install the power cord, insert the female end of the power cord into the Power Cord

Socket located on the rear panel (letter C).  To connect the foot pedal switch, insert the 2

pin male connector located at the end of the foot pedal switch cord into the two pin

receptacle located on the back panel. Tighten the connector with the sleeve nut located on

the foot pedal switch connector.

After checking to be certain that the machine is set for the correct input voltage, switch on

the machine by pressing the Lighted On-Off Power Switch on the rear panel.

WARNING!  

FOR INDOOR USE ONLY. TO BE USED

BY ADULTS OR UNDER ADULT SUPERVISION ONLY.

NEVER OPEN UNIT WITH POWER CONNECTED

E

Summary of Contents for Progression ES II+

Page 1: ...STRINGING MA STRINGING MA STRINGING MA STRINGING MA STRINGING MACHINE CHINE CHINE CHINE CHINE OWNER S MANUAL Issue 1 March 18 2001 Copyright 2002 GAMMA Sports All Rights Reserved ES II...

Page 2: ...clude but are not limited to String Clamp adjustment as described on page 11 Quick Action Clamp Base adjustment as described on page 11 and the cleaning procedures listed on page 13 GAMMA s obligation...

Page 3: ...unting System Accomodates All Racquets Without Adapters Parallel Jaw Rotating Gripper w Diamond Dust Coated Gripping Surfaces Professional Quick Action Diamond Dust Coated Fixed String Clamps Durable...

Page 4: ...rounded edge toward the turntable Repeat procedure on the opposite side of the turn table NOTE 2 pcs of M10 cap screws 170 are provided with the machine in the event the lever lock bolts become incon...

Page 5: ...for the 110 V setting is between 110 V and 120 V 60 Hz and for the 220 V setting between 220 V and 240 V 50 to 60 Hz If you have any question regarding the input voltage supply for your area please as...

Page 6: ...light resis tance is felt Caution Overtightening the Center Sup ports may cause racquet damage POWER CONNECTION CONTROLS Setting Tension The Progression ES II stringing machine utilizes a rotary adjus...

Page 7: ...mage may occur The supports should be tightened to the point where the racquet frame will not move in the mounting system when the handle is grasped and attempts are made to move it Should any support...

Page 8: ...he Clamp Base Locking Nut as outlined below Note If the string slips in the string clamp while tensioning adjust the gap between the clamp jaws as per the following instructions Clamp Head Operation Q...

Page 9: ...opposite center holes Thread one end of the string through the adjacent grommet hole and pull excess by hand Secure one of the strings using a string clamp To tension a string push the tension switch...

Page 10: ...ng This will determine the starting point for the cross strings If applicable tie the first cross string using an appropriate starting knot STRINGING THE FRAME Weaving the Cross Strings Weave the cros...

Page 11: ...pressure on the string slowly pull the sheath out of the grommet hole to leave the end of the string exposed The Progression ESII includes the Path finder stringing awl which creates a pathway between...

Page 12: ...usting the Clamp Jaws The Quick Action Clamps will need minor adjustments according to what string type construction and gauge you are using To adjust the gap clamping pressure be tween the clamp jaws...

Page 13: ...on the calibrator Since adjustment of the Low LBs screw at 20 lbs can influence the tension at 60 lbs and visa versa repeat these steps until the set tension matchs the tension reading of the calibrat...

Page 14: ...by removing the adjustment screw Using a small nylon brush such as a toothbrush scrub the inside surfaces until all debris is removed Clean the jaws with isopropyl alcohol and re assemble String Clamp...

Page 15: ...D FOOT PEDAL SWITCH GRIPPER DRUM MTNG STAND TOP PLATE MTNG STAND PAD SUPPORT ARM LEFT SUPPORT ARM RIGHT SUPPORT LOCK KNOB PART 145 146A 147 148 172 174 180 187 188 189 198 202 252 70 72 73 108 109 167...

Page 16: ...15 EXPLODED PARTS VIEW...

Reviews: