background image


© Gamma 2014. All rights reserved. Confidential. 


Time Format 

You can configure the time format of your device. The handset supports two time formats (12 Hour or 24 
Hour). 

Date Format 

You can configure the date format of your device. The handset supports seven date formats. The available 
date formats are listed in the following table: 

Date Format 

Example 

WWW MMM DD 

Sat. Feb 15 

DD-MMM-YY 

14- Feb -15 

YYYY-MM-DD 

2015-02-14 

DD/MM/YYYY 

14/02/2015 

MM/DD/YY 

02/14/15 

DD MMM YYYY 

14 Feb 2015 

WWW DD MMM 

Sat. 14 Feb 


Input Method 

The  handset  provides  you  with  12  different  input  methods.  You  can  disable  the  infrequently  used  input 
method. Then you can only switch among the enabled input methods when editing. 

Shortcuts 

There are two types of shortcut on the handset: changeable and unchangeable shortcuts. A feature is pre-
assigned to each shortcut. For example, the star (*) button to turn on/off the silent mode and the hash (#) 
button to lock/unlock the keypad are unchangeable. 

The changeable shortcuts are the two soft keys and four navigation keys. The available features that can 
be assigned to each key may vary. 

You can assign the frequently used features to the changeable shortcuts of your handset. 

This helps you get quick access to a feature by pressing the corresponding shortcut directly without having 
to scroll through the menu when the handset is idle. 

Language 

Even if the language of the handset is not locked, the language has been defined on the configuration file 
and is set to “English” by default. That means even if the end user makes any changes to the language, 
once the device restart it will have the English language. 


Summary of Contents for Yealink W52P

Page 1: ...Gamma 2014 All rights reserved Confidential Yealink W52P Full User Guide...

Page 2: ...6 Main Menu Structure 7 Status 8 Intercom 8 Voice Mail 8 Call Features 8 Directory 8 Phone Settings 9 Advisory Tones 9 Ring Tones 9 Screen Saver 9 Colour Schemes 9 Display Backlight 9 Keypad Light 9...

Page 3: ...12 Redial a call 12 Transfer a call 12 Conference Call 13 Call Forwarding 13 Do Not Disturb 14 Voice Mail 14 DECT Repeater RT10 15 Useful information 15 Single Repeater 15 Multiple Repeaters 16 LED St...

Page 4: ...ential Introduction This user guide will help you to navigate and use your Yealink W52P It will give you an overview of your handset and walk you through tasks so you can successfully use your phone t...

Page 5: ...ndset Press the button on the base station for few seconds Once the registration LED flashes slowly this means that the base station is in the registration mode Press OK on the handset to enter the ma...

Page 6: ...is a new firmware available In order for the handset to start the upgrading process you have to confirm by pressing the Upgrade soft key Note To double check that your handset is using the latest firm...

Page 7: ...els The main menu is the top level menu which consists of six menu items Status Intercom Voice Mail Call Features Directory and Settings The next diagram is showing the structure of the main menu and...

Page 8: ...e You can access your voice mail system Set Voice Mail It is not recommended to make any changes on the voice mail settings Set Key 1 By default if you press the key 1 you will call to the voice mail...

Page 9: ...the screen saver to protect the LCD screen if you do not use your handset for a long time When the screen saver is enabled an analogue clock will be activated and appear on the LCD screen if the hand...

Page 10: ...are two types of shortcut on the handset changeable and unchangeable shortcuts A feature is pre assigned to each shortcut For example the star button to turn on off the silent mode and the hash butto...

Page 11: ...ws you to perform single digit dialling to predefined numbers You can assign the important numbers of your local directory to the speed dial keys of your handset Handset Reset You can reset individual...

Page 12: ...y Redial a call The redial number list stores the twenty last dialled phone numbers When the memory of the redial number list is full the handset will automatically erase the oldest dialled number whe...

Page 13: ...the number of the User B that you would like to add to the conference and then press or or or the OK soft key to dial out When User B answers the call press the Conf soft key to join all the parties i...

Page 14: ...teps to enable or disable the DND Go to the Main Menu Press Call Features and then Do Not Disturb Enable or Disable the feature Press OK Voice Mail When you are receiving a voice mail the icon is appe...

Page 15: ...er has the same radio coverage up to 300m in unobstructed outdoor areas and up to 50m inside buildings as the base station Repeater does not increase the quantity of call paths and it does share the c...

Page 16: ...to 50m inside buildings as shown in the figure below It is not possible to install the repeaters in series or daisy chain The maximum number of handsets that can be registered to your base station is...

Page 17: ...tering a repeater The repeater can register to the base station in two ways Auto Registration Manual Registration Note The Repeater Mode must be enabled on the base station In order to do that go to M...

Page 18: ...tart over again Set the base station in registration mode Long press the paging key on the base station till the first LED flashes The LED indicator on the repeater flashes If the LED flashes fast wit...

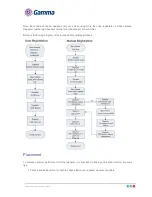
Page 19: ...tion Repeater number and handset number are independent of each other Below is the flowing diagram of the Auto and Manual Registrations Placement To achieve optimum performance for the repeater it is...

Page 20: ...on tone allows you to easily check the extent of the repeater s coverage area The tone is audible on the handset during a call To activate the verification tone on the repeater Switch off the repeater...

Reviews: