TRENCHER
TZ S
Use and maintenance instructions – Spare parts Via L.da Vinci,32/B
Rev. 01.2013 - EN (translation of the original instructions)
33
36034 Malo (VI) Italy
T E Z A
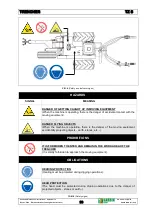
KEY FIG. 8
REF.
NAME
FUNCTIONS
1
Safety device for stopping the engine
(red) “ENGINE STOP”
When the lever is pressed the engine runs; as soon as it is
released the engine stops (micro-switch with normally-
open operation).
2
Adjustable lever for securing the handlebar.
Secures the handlebar in its work or transport positions.
9
Jack for raising and lowering the trench jib
“Up - down”
Turn “Clockwise” to “Lower” the trench jib, turn
“Anticlockwise” to “Lift” the trench jib.
10
Engine “ON-OFF” switch.
Turns the engine on-off.
11
Engine pull-start grip.
Starts the engine.
13
Cam stroke recovery ratchet ENGAGE-
DISENGAGE lever
“Engaged”: the ratchet grips the cog and immobilises the
machine until the cam, which transmits forwards drive to
the wheels, resets.
"Disengaged": when lever 16 is disengaged the wheels
are released and allow the machine to move forwards and
change direction.
14
LH wheel LOCK-RELEASE lever.
Releases the LH wheel and allows the machine to be
steered.
15
“Manual accelerator“
lever
“Forwards”: accelerates the engine. Depending on the
number of revs, the clutch transmits clockwise drive to the
trench chain (viewed from the left.
“Back”: decelerates the engine.
16
Tow ratchet “ENGAGE-DISENGAGE“ lever.
“Forwards”: the tow ratchet does NOT drive the cog.
“Back”: the tow ratchet drives the cog.
BEFORE STARTING THE MACHINE, AUTHORISED OPERATORS MUST PERFORM THE CONTROLS SHOWN
IN TAB. 15.
1
Make sure routine maintenance operations have been performed and recorded in the relative registration sheets (see
chap. 8).
2
Make sure there are no unauthorised people near the filtering station.
3
Make sure all the safety devices are mounted and are in perfect working order (see para 6.2).
4
Make sure the machine is in the “Machine off” condition (see para 2.2.2).
5
Check the fuel level.
6
Check the ambient temperature (see attached engine manual).
7
Make sure the levels of the engine oil, hydraulic oil, etc. can be seen in the relative sight glasses (see chap. 8).
8
Make sure all the components have been correctly installed.
9
Make sure the “Emergency stop” lever (Fig. 8 - Ref. 1) is working.
10
Make sure the safety guards are mounted.
11
Make sure there are no foreign bodies on the machine.
12
Make sure the required trenching equipment is mounted on the trench jib.
13
Check for damage and/or faults: in this case, do not turn on the machine and contact the safety manager.
14
Do not use the trencher on slopes greater than those permitted in the limits to use (see para 3.11).
15
Make sure you have read and understood all parts of this manual.
16
Use the mandatory personal protective equipment (PPE) (see para 6.4).
TAB. 15 (Checks prior to turning on)
7.3- CHECKS PRIOR TO STARTING

