TR-CL180 Lens Controller - User Manual
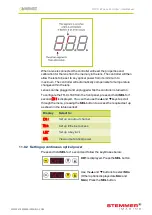
When a lens is connected the controller will read the properties and
calibration for the lens from the memory in the lens. The controller will then
allow the lens to be set to any optical power from its minimum to
maximum. The controller will automatically compensate for temperature
changes within the lens.
Lenses can be plugged and unplugged while the controller is turned on.
To configure the TR-CL180 from the front panel, press and hold
SEL
for 1
second.
CH1
is displayed. You can then use the
p
and
q
keys to scroll
through the menu, pressing the
SEL
button to access the required set up
as shown in the table overleaf:
Display
Select to:
CH1
Set up an output channel
Eth
Set up Ethernet access
LOC
Set up a key lock
UAL
View output optical power
11.0.2 Setting up continuous optical power
Press and hold
SEL
for 1 second and follow the keystrokes below:
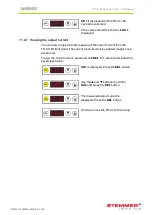
CH1
is displayed. Press the
SEL
button.
Use the
p
and
q
buttons to select
SCo
(Other options displayed are
SAc
and
SAn
). Press the
SEL
button.
—
18
—
TR-CL180 Lens Controller - User Manual
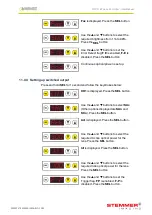
Foc
is displayed. Press the
SEL
button.
Use the
p
and
q
buttons to select the
required brightness from 1% to 99%.
Press the
SEL
button.
Use the
p
and
q
buttons to set the
Error Detect flag:
F E
is enabled,
F-E
is
disabled. Press the
SEL
button.
Continuous optical power is set up.
11.0.3 Setting up switched output
Press and hold
SEL
for 1 second and follow the keystrokes below:
CH1
is displayed. Press the
SEL
button.
Use the
p
and
q
buttons to select
SAc
(Other options displayed are
SAn
and
SCo
). Press the
SEL
button.
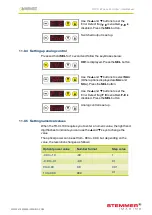
Act
is displayed. Press the
SEL
button.
Use the
p
and
q
buttons to select the
required Active optical power for the
lens. Press the
SEL
button.
Idl
is displayed. Press the
SEL
button.
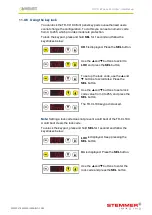
Use the
p
and
q
buttons to select the
required Idle optical power for the lens.
Press the
SEL
button.
Use the
p
and
q
buttons to set the
Trigger flag:
F P
is enabled,
F-P
is
disabled. Press the
SEL
button.
—
19
—
WWW.STEMMER-IMAGING.COM


