background image

www.DeubaXXL.de

www.DeubaXXL.de

8

9

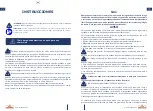
Location

Prior to starting the installation, familiarize yourself with the relevant local rules and 

regulations. When choosing the most suitable location for the greenhouse, make sure 

that the ground is stable and straight and that no exposed location is chosen where 

the greenhouse is completely free! A certain degree of protection against storms and 

gusts of wind must be guaranteed. Freestanding will otherwise cause damage. base. 

Set up the building only when the weather is fine and dry. Do not install if there are 

strong winds!

Instructions

If possible, set up the greenhouse together with 3 or more people. Otherwise, there 

could be material damage or even injuries.

•Choose a location that has enough space around the greenhouse for working. 

•Carefully follow the steps in the instructions to ensure correct installation. 

•Before starting the installation, make sure that all parts are present. 

•Make sure the foundation frame is flat on the floor.

•The foundation must be level. If the floor is uneven, level it. 

•  Always wear safety gloves, long sleeves and eye protection during installation. 

Some parts may have sharp edges and may cause injury! 

•  Do not attempt to assemble it in windy weather conditions as there is a risk 

that panels may be damaged or people injured.

•Prepare a first layer of stones or gravel for a reinforced concrete foundation. The 

foundation should be at least 10 cm thick. Allow the concrete to dry for at least 48 

hours.

•The foundations can also be made of bricks, stone blocks or concrete pedestals.

•The garden shed is not intended to be built directly on the lawn. 

•Your shed must be firmly anchored to the foundation to prevent damage from 

strong winds. No anchors are included in the equipment supplied!

•Do not enter into the roof! DANGER OF COLLAPSE! 

When using a foundation, that is not poured from concrete, you have to definitely 

observe, that the ground is firm and event. The product hast o be connected to a 

foundation! Only when it’s aligned accurately, the greenhouse can be placed in a 

durable and stable way. Even slightly leaning wallswon’t fit properly in the guides 

provided fort hem and can be easily unhinged by the wind.

It is necessary to anchor the greenhouse to the ground. The big greenhouse has a large 

contact surface for wind, which can lead to significant injuries and/or damages.

Give yourself plenty of time fort he installation process and once started, do not let 

yourself be interrupted. An incompletely assembled greenhouse could suffer (fatal) 

damage caused by the weather. There is a danger of injuries and damage to the 

property due to not properly assembled parts.

If you do not use the greenhouse, store it in a dry and frost-free place. The Plexiglas 

discs should not be pressed or bent.

Keep all parts away from fire and flying sparks.

Remember the exits! They are also the emergency Escape routes! If a fire should occur, 

contrary to All expecatations, the nearest exit could eventually. also be behind you!

Never put weight on the multi-skin sheets. Do not step on them and do not bend them. 

They will suffer damage or even break completely. Look for the UV protection sign.

Do never step onto the roof surfaces of a fully mounted greenhouse! You could fall/the 

house could collapse and you could suffer injuries! Do never make a fire inside oft he 

greenhouse! Always keep it away from open fire and flying sparks! 

Do not positiom the product on an escape route  Or within a well signposted fire 

service assembly area!

Do not use this product in case of missing parts or worn parts.

Always close the door of greenhouse when Entering or exiting. With an open door, 

wind, animals or other unwanted visitors can easily damage your greenhouse or 

the plants therein. Absolutely make sure to not lock people and/or animals in the 

greenhouse.

•Don’t underestimate the possible forces from the wind acting on the side and 

front surfaces greenhouse.

Before assembly

A suitable foundation should be prepared before the mounting oft he greenhouse. 

Such foundations (formwork) can be purchased in out online shop.

•Make sure that the day you select for installation is dry and free of wind.

•Remove the parts from the box and sort them by number. Make sure that all 

necessary parts are available for assembly. 

•Familiarize yourself on how to use all the tools.

•Keep children and pets away from the assembly site. 

•When using a ladder, make sure it is stable. Never place a heavy load on any part of 

the roof or shed. 

•Remove the protective foils before mounting.

•Avoid overhanging trees as much as possible, as falling leaves require regular cleaning 

and breaking branches are a source of danger.

•Small trees, shrubs or nearby fences can help protect against the wind.

Summary of Contents for Deuba 991462

Page 1: ...e Weg zu unseren neusten Produkten Angeboten und vieles mehr Deuba Serviceportal F r jede Art Service Reklamationen und technischen Support k nnen Sie sich vertrauensvoll an unsere geschulten Mitarbei...

Page 2: ...stabilen geraden Platz als Untergrund und achten Sie unbedingt darauf dass keine exponierte Stelle gew hlt wird wo das Gew chshaus vollst ndig frei steht Ein gewisser Schutz vor St rmen und st rmisch...

Page 3: ...s immer die T r hinter sich Bei offener T r k nnen Wind Tiere oder andere unerw nschte Besucher Ihr Gew chshaus oder die darin befindlichen Pflanzen besch digen Achten Sie unbedingt darauf keine Mensc...

Page 4: ...frei zu halten Es kann unter einer zu hohen Schneedecke einbrechen und eine Gefahr k nnte entstehen Eine Schneeh he von mehr als 10 cm kann bereits gef hrlich werden Schichth hen von 36 cm bei trocken...

Page 5: ...nhouse has a large contact surface for wind which can lead to significant injuries and or damages Give yourself plenty of time fort he installation process and once started do not let yourself be inte...

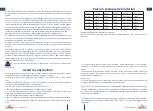
Page 6: ...securing your greenhouse according to EK5 AK8 decision 03 12 2012 4 5 in the table above and please follow the rules Part No Length Width Height Foundation Weight Force 991468 190cm 190cm 195cm 190 x...

Page 7: ...ement expos n est choisi o la serre est compl tement libre Un certain degr de protection contre les temp tes et les rafales de vent doit tre garanti Dans le cas contraire la pose en pose libre causera...

Page 8: ...rger depuis notre magasin en ligne Veiller ce que le jour choisi pour l installation l air soit sec et qu il n y ait pas de vent Retirer les pi ces du carton et les trier par num ros S assurer que tou...

Page 9: ...i pi piccole al di fuori dalla portata dei bambini Inoltre soprattutto all apertura del pacco assicurati di tenere buste di plastica e materiali per l imballaggio fuori dalla portata dei bambini Peric...

Page 10: ...e il tetto PERICOLO DI COLLASSO Il capanno degli attrezzi deve essere saldamente ancorato alle fondamenta per evitare danni causati da forti venti La fornitura non comprende le ancore Non calpestare i...

Page 11: ...e inferiore a 30 cm Si consigliano 50 cm L altezza della fondazione dal suolo A non deve superare il 50 dell altezza totale della fondazione stessa Per rendere la vita di tutti i giorni il pi semplice...

Page 12: ...ra las tormentas y r fagas de viento De lo contrario la independencia causar da os AVISO Encuentre un lugar estable y fijo como base Instale la casa de jard n en un lugar seco y agradable No la instal...

Page 13: ...as las piezas necesarias Familiar cese con el funcionamiento de todas las herramientas Mantenga a los ni os y las mascotas alejados del sitio de instalaci n Cuando use una escalera aseg rese de que se...

Page 14: ...e mantener el techo libre de nieve Una capa de nieve muy gruesa puede provocar que se rompa o provocar riesgos de colapso Una profundidad de nieve de m s de 10 cm puede ser peligrosa las capas de niev...

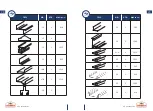
Page 15: ...xl de www deubaxxl de TEIL NR STK Ma IN mm 12 1 618 13 4 14 1 1255 15 1 635 16 A 1 1310 17 A 1 1310 18 2 TEIL NR STK Ma IN mm 19 1 380 20 2 1586 4 1235 21 A 22 4 1302 23 2 595 24 1 616 25 2 1292 26 2...

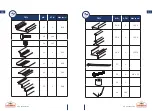
Page 16: ...deubaxxl de www deubaxxl de TEIL NR STK Ma IN mm 27 1 616 28 146 29 147 30 2 522 31 1 609 32 1 595 33 1 598 TEIL NR STK Ma IN mm 34 A 2 1350 35 A 1 1350 36 A 2 1357 5 37 1 38 1 M6 x 30 39 1 40 162 30...

Page 17: ...xl de TEIL NR STK Ma IN mm 41 5 605 42 8 43 4 44 1 45 1 46 2 47 16 M4 5 x 19 48 6 M4 x 7 5 49 A 2 1235 50 23 22 x 8 x 9 TEIL NR STK Ma IN mm 51 3 52 2 53 1 54 1 580 55 1 580 56 4 625 57 2 540 58 1 480...

Page 18: ...ren zu k nnen Important If necessary do not tighten the screws completely during assembly in order to be able to easily readjust them in the course of assembly Important Si possible ne pas serrer comp...

Page 19: ...www deubaxxl de www deubaxxl de 37 9 9 7 24 26 26 2 36 37 2x 1...

Page 20: ...www deubaxxl de www deubaxxl de 3 A A A A A A 56 54 56 56 54 56 54 4 A A 55 55 55 4 4 5 5 1 1 1 38 39...

Page 21: ...www deubaxxl de www deubaxxl de 5 14 55 55 38 39 52 51 51 53 53 40 41 6...

Page 22: ...www deubaxxl de www deubaxxl de 14 42 43 6 2x 7...

Page 23: ...xl de www deubaxxl de 35 33 5 4 44 458 This side inside mount Ce c t l int rieur montent Protecci n UV Importante Monte este lado por la parte de dentro Protezione UV Importante Montare questo lato al...

Page 24: ...e contact your local disposal or recycling centers for advice Gesti n de residuos primas valiosas a un punto de recogida especializado para que el proceso de reciclaje apropiado pueda iniciarse Si no...

Page 25: ...GmbH Co KG darf dieses Handbuch auch nicht auszugsweise in irgendeiner Form reproduziert werden oder unter Verwendung elektronischer mechanischer oder chemischer Verfahren vervielf ltigt oder verarbe...

Reviews: