8
Assembly
1.
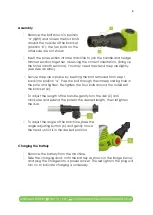
Remove the bolt shown in position
‘a’
(right) and loosen the four bolts
around the outside of the bracket
(position ‘b’); the two bolts on the
other side are not shown.
2.
Insert the pole section into the machine to join the handle and hedge
trimmer sections together, observing the correct orientation, (lining up
the holes in both sections). You may need to extend the pole slightly
(see step 4 below).
3.
Secure the pole in place by inserting the bolt removed from step 1
back into position ‘a’
. Pass the bolt through the corresponding hole in
the pole and tighten. Re-tighten the four bolts around the outside of
the bracket (b).
4.
To adjust the length of the handle, gently turn the dial (2) anti-
clockwise and extend the pole to the desired length, then retighten
the dial.
5.
To adjust the angle of the machine, press the
angle adjusting button (6) and gently move
the head until it is in the desired position.
Charging the battery
1.
Remove the battery from the machine.
2.
Slide the charging dock onto the battery as shown in the image below
and plug the charger into a power socket. The red light on the plug will
turn on to indicate charging is underway.


