11
NL - INSTALLATIE VAN DE LAMPEN
• Plaats de producten op de gewenste plaats en leg
de kabels zodanig dat deze ruimschoots op de
transformator of kabels kunnen worden aangesloten.
• Als producten voorzien zijn van een afvoergat voor
water dan moet dit gat naar beneden worden gericht.
• Gebruik corrosievaste bevestigingsmaterialen
(standaard meegeleverd) als u de producten wilt
vastschroeven.
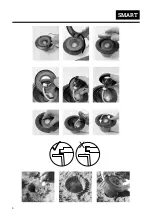
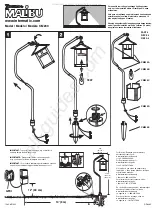
• Sluit de stekkers van de producten aan op de
hoofdkabel met behulp van de connector zoals
aangegeven op afbeelding op pag 5.
• Raadpleeg de handleiding van uw transformator voor
meer informatie.
EN - INSTALLATION OF THE LIGHTS
• Install the products in the desired position and lay
the cables so they can be comfortably connected to
the transformer or main cable.
• If products are provided with a drain hole for water,
this hole must be pointing downwards.
• Use non-corrosive fixing materials (supplied as
standard) if you want to bolt the products down.
• Connect the lights to the main cable by using the
connector as shown in figure on page 5.
• Consult the manual of your transformer for more
information.
NL - VEILIGHEID
• Monteer dit product altijd zodanig dat het bereikbaar
blijft voor onderhoud. Dit product mag niet vast
worden ingegoten of ingemetseld.
• Schakel het systeem uit door de stekker van de
transformator uit de wandcontactdoos te nemen
voor het plegen van onderhoud.
• Reinig het product regelmatig met een zachte,
schone doek. Vermijd schuurmiddelen die het
oppervlak kunnen beschadigen.
• Reinig producten met RVS onderdelen eenmaal per
6 maanden met RVS reiniger.
• Gebruik geen agressieve chemische reinigings-
middelen bij het schoonmaken van het product,
dit kan onherstelbare schade aan het product
veroorzaken.
• Beschermingsklasse III: dit product mag alleen
worden aangesloten op veilgheidslaagspanning tot
maximaal 12 volt.
• Dit product is bestand tegen een omgevings-
temperatuur van: -20 tot 50°C.
• Gebruik dit product niet in ruimtes waar brandbare
gassen, dampen of vloeistoffen opgeslagen zijn.
EN - SAFETY
• Always fit this product so that it can still be accessed
for servicing or maintenance. This product must not
be permanently embedded or bricked in.
• Turn off the system by pulling the plug of the
transformer from the socket for maintenance.
• Regularly clean the product with a soft, clean cloth.
Avoid abrasives that can damage the surface.
• Clean products with stainless steel parts with a
stainless steel cleaning agent once per six months.
• Do not use aggressive chemical cleaning agents
when cleaning the product. This can cause
irreparable damage.
• Protection class III: this product may only be
connected to safety extra-low voltage up to a
maximum of 12 Volt.
• This product is suitable for outside temperatures of:
-20 to 50°C.
• Do not use this product in areas where combustible
gases, fumes or liquids may be stored.
DE
-
INSTALLATION DER LAMPEN
• Installieren Sie das Produkt in der gewünschten
Position und verlegen Sie die Kabel so, dass
sie einfach mit dem Transformator oder dem
Hauptkabel verbunden werden können.
• Wenn Produkte über eine Wasserablauföffnung
verfügen, muss diese nach unten zeigen.
• Wenn Sie die Produkte fest in Boden verankern
möchten, verwenden Sie dazu Befestigungsmaterial
aus nicht-rostenden Materialien (als Standard
mitgeliefert).
• Verbinden Sie die Leuchten an den Hauptkabel mit
dem Konnektor wie auf Bild auf Seite 5 gezeigt wird.
• Weitere Informationen finden Sie in Ihrer Anleitung
zum Transformator.
FR
-
INSTALLATION DES LAMPES
• Installez les produits dans la position désirée et
positionnez les câbles de telle sorte qu’ils puissent
être raccordés confortablement au transformateur
ou au câble principal.
• Si les produits sont équipés d’un orifice d’évacuation
de l’eau, orientez celui-ci vers le bas.
• Utilisez des équipements de fixation non corrosifs
(fournis en standard) si vous souhaitez visser les
produits.
• Raccordez les prises des produits au câble principal
comme indiqué dans l’image à la page 5.
• Consultez le mode d’emploi de votre transformateur
pour de plus amples informations.
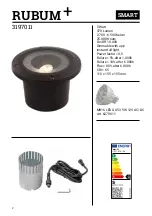
Summary of Contents for 3197011
Page 4: ...4 X SMART ...


