background image

11 x 11 ft Curved Pergola Assembly Instructions

                           GFM00110B

Step 13:

Insert the Ground Spike (Y) into the corresponding holes on the 

Base (S) to fix leg tubes.

9

13

S

Y

See our extensive assortment of outdoor living products on-line at 

www.sears.com and www. kmart.com.

Summary of Contents for GFM00110B

Page 1: ...02628062 8 805670024222 11 ft x 11 ft CURVED PERGOLA Product Code D71 M83028 ...

Page 2: ...PORATION AT PHONE 1 866 905 4107 BETWEEN THE HOURS OF 8 30 AM TO 5 00 PM PST MONDAY THROUGH FRIDAY FOR ANY QUESTIONS OR PROBLEM YOU MAY HAVE NOTE THIS GAZEBO IS MADE FOR THE PURPOSE OF PROVIDING LIMITED OITDOOR SUN SHADE AND NOTHING ELSE IT IS NOT AS A TOY A SHELTER OR A TENT CHILDREN UNDER AGE OF 12 NEAR TEH FACILITY SHOULD BE SUPERVISED BY A COMPETENT AUDIT IMPORTANT ...

Page 3: ...C D E F G H I J K L M 1 PC 1 PC 1 PC 1 PC 2 PCS 2 PCS 2 PCS 2 PCS 2 PCS 2 PCS 2 PCS 4 PCS 12 PCS Tow Rope Crossbeam 1 Tow Rope Crossbeam 2 Top Tube Bending Tube 1 Bending Tube 2 Side Bending Tube 1 Side Bending Tube 2 Tow Rope Leg Tube Leg Tube Sunshade Replacement Canopy M6 15 Nuts Bolts M5 15 Nuts Bolts ...

Page 4: ... Q R S T U V W X Y Z 72 PCS 10 PCS 8 PCS 2 PCS 1 PC 4 PCS 2 PCS 2 PCS 2 PCS 2 PCS 6 PCS 4 PCS 16 PCS M6 16 Nuts Bolts M6 35 Nuts Bolts M6 72 Nuts Bolts Rope Holder Top Tube Connector Base Decorative Base 1 Decorative Base 2 Decorative Extrusion 1 Decorative Extrusion 2 Ground Spike Allen Wrench Sliding Tube ...

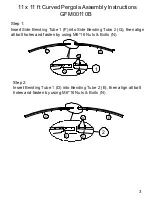
Page 5: ... 1 Insert Side Bending Tube 1 F into Side Bending Tube 2 G then align all bolt holes and fasten by using M6 16 Nuts Bolts N Step 2 Insert Bending Tube 1 D into Bending Tube 2 E then align all bolt holes and fasten by using M6 16 Nuts Bolts N F F 1 G G N N E E D D 2 ...

Page 6: ...sembled Bending Tube D and E close to Top Tube C then align all bolt holes and fastened by using M6 35 Nuts Bolts O Step 5 Put the final assembled Side bending Tube F and G close to Top Tube C then align all bolt holes and fasten by using M6 35 Nuts Bolts O Step 6 Line up the bolt holes on the assembled tube with corresponding bolt holes on Tow Rope Crossbeam A and B then screw in the M6 16 Nuts B...

Page 7: ...to Top Tube C and tighten by using M6 35 Nuts Bolts O O O O O Step 8 Insert the Sliding Tube X into the Replacement Canopy K and pass through pulley until it reaches to the other end Then insert the tube joint on Canopy K one with another through pulley Finally align the holes on the pulley as well as Canopy K by using M6 15 Nuts Bolts L and tighten it k 7 c x x k L 8 ...

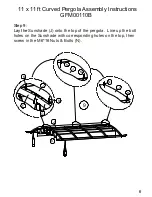
Page 8: ...a Assembly Instructions GFM00110B Step 9 Lay the Sunshade J onto the top of the pergola Line up the bolt holes on the Sunshade with corresponding holes on the top then screw in the M6 16 Nuts Bolts N 9 N N N N N N J J J J F G K ...

Page 9: ...d Decorative Base 2 U into Tow Rope Leg Tube H and Leg Tube I respectively then screw in the M6 16 Nuts Bolts N 2 Align all bolt holes on Base S with corresponding bolt holes on Leg Tube H and I and screw together by using M6 16 Nuts Bolts N with Allen Wrench Z 10 H H H N N N N N N S S T U I I I T U ...

Page 10: ...lt holes on Leg Tube H and I and screw together by using M6 16 Nuts Bolts N and M6 72 Nuts Bolts P 2 Align all bolt holes on Decorative Extrusion 2 W and Decorative Extrusion 1 V with corresponding bolt holes and screw together by using M6 16 Nuts Bolts N Step 12 Screw the Rope Holder Q onto the Tow Rope Leg Tube H by using M5 15 Nuts Bolts M N P 11 H H I I P 2 1 N N N V W I I H H 12 Q M ...

Page 11: ...embly Instructions GFM00110B Step 13 Insert the Ground Spike Y into the corresponding holes on the Base S to fix leg tubes 9 13 S Y See our extensive assortment of outdoor living products on line at www sears com and www kmart com ...

Page 12: ...ng winter months CARING FOR A GAZEBO CANOPY Wash with a mild solution of soap and water rinse thoroughly Dry completely Do not use bleach or solvents Store canopy indoors during winter months to prevent collapse ASSEMBLY Always assemble your gazebo on a soft non abrasive surface The gazebo is heavy use care when handling Assembly by two adults is recommended Follow manufacturer s instructions care...

Reviews: