background image

3

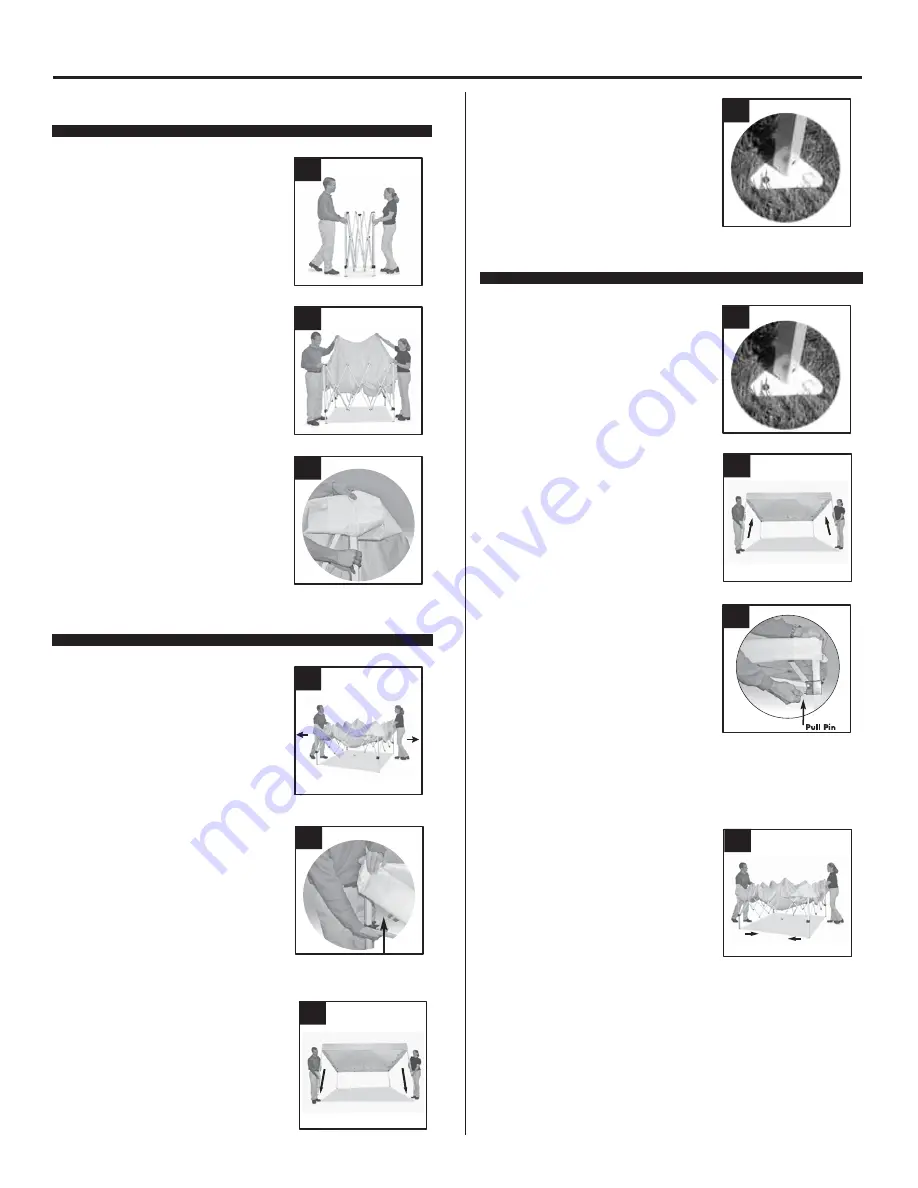
ASSEMBLY INSTRUCTIONS

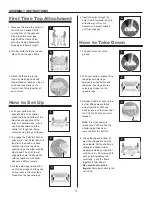
1.


Place your frame in the center of 

the area to be shaded. With 
your partner on the opposite 
side, grasp two outer legs, 
slightly lift the frame off the 
ground, and step backwards, 
stopping at full arms’ length.

1

3.


Attach the fabric top to the 

frame by matching hook and 
loop attachment straps on top of 
hook and loop strips on the 
frame. Push firmly together at 
each corner.

3

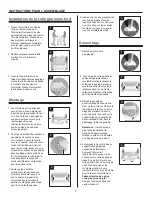
1.


With your partner on the 

opposite side of the shelter, 
grasp the top and bottom of the 
diamond shaped area of the 
truss on opposite sides. Lift up 
and step backward until the 
shelter is 3/4 opened, being 
careful not to pinch your fingers.  


First Time Top Attachment

How to Set Up

2

2.


Gently unfold the fabric top and 

place it over the open frame. 

1

2.


To engage the Pull Pin Slider at 

each corner, first lift the fabric off 
the slider, then with one hand 
hold the top of the leg while 
pushing up on the slider with the 
other hand. The Pull Pin will 
engage the hole. Pull down the 
valance fabric over the slider. 
Repeat on all four corners.

2

2.  With your partner, slightly lift up 

two adjacent outer legs, 
depress the snap button and  
telescope inner legs into the 
outer legs. Repeat on the 
opposite legs.

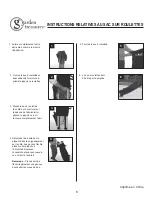
4.


Grasp the top and bottom of 

diamond shaped truss by the 
close labels. Lift the shelter up 
slightly and shake it while 
stepping towards your partner 
until the unit is 3/4 closed. With 
each partner grasping two 
outer legs,  push the frame 
together to fully close it. 

  Be careful not to pinch 

fingers! 

Store the shelter in the 

carry bag. 

4

How to Take Down

3

3.


Release Pull Pin at each corner 

by first lifting valance fabric 
away from slider. With one 
hand push up on the truss near  
the Pull Pin. Pull the pin out to 
release. 

Note

: It is much easier to 

release the Pull Pin when the 
shelter weight has been 
removed from the Pull Pin

.    

3.


Lift the outer legs up and slide 

out the inner legs until the snap 
button locks in the outer legs. 
Repeat on the opposite legs.

3

4. Insert the spike through the 

hole in each footplate. Push in 
with either your foot or a 
hammer on harder surfaces 
until fully engaged.

2

1. Pull each spike out of the 

ground.

4

1

Summary of Contents for 0403307

Page 1: ...UP TENT Fran ais p 5 Espa ol p 9 1 Questions problems missing parts Before returning to your retailer call our customer service department at 1 800 643 0067 8 a m 8 p m EST Monday Friday ATTACH YOUR R...

Page 2: ...ed to the original purchaser and applies to defects in materials and workmanship of your patio furniture provided your furniture is maintained with care and used only for personal residential purposes...

Page 3: ...down the valance fabric over the slider Repeat on all four corners 2 2 With your partner slightly lift up two adjacent outer legs depress the snap button and telescope inner legs into the outer legs...

Page 4: ...g is designed to be pulled by the handle 5 Close the roller bag 6 1 Close your shelter completely as shown in the picture ROLLER BAG INSTRUCTIONS 5 2 Printed in China 4 Turn the shelter upside down by...

Page 5: ...66 M SUR 3 66 M 5 Des questions des probl mes des pi ces manquantes Avant de retourner l article au d taillant appelez notre service la client le au 1 800 643 0067 entre 8 h et 20 h HNE du lundi au ve...

Page 6: ...un enduit dans la plupart des magasins d articles de sport et des quincailleries Vissez l g rement les boulons si l armature se desserre La pr sente garantie ne s applique qu l acheteur initial de l...

Page 7: ...deux montants ext rieurs adjacents enfoncez le bouton pression puis faites entrer les montants int rieurs dans les montants ext rieurs R p tez cette tape pour les montants oppos s 4 Empoignez le haut...

Page 8: ...tir par la poign e 5 Fermez le sac roulettes 6 1 Fermez compl tement votre abri soleil comme le montre l illustration INSTRUCTIONS RELATIVES AU SAC SUR ROULETTES 5 2 Imprim en Chine 4 Retournez l abri...

Page 9: ...NTE 12X12 9 Preguntas problemas piezas faltantes Antes de volver a la tienda llame a nuestro Departamento de Servicio al Cliente al 1 800 643 0067 de lunes a viernes de 8 a m a 8 p m hora est ndar del...

Page 10: ...elta Esta garant a se extiende al comprador original y la misma se aplica a defectos en los materiales y la mano de obra de sus muebles para patio siempre que estos se conserven con cuidado y solo se...

Page 11: ...n las cuatro esquinas 2 2 Con la ayuda de su compa ero levante levemente las dos patas exteriores adyacentes presione el bot n a presi n luego extienda las patas interiores de manera que se introduzca...

Page 12: ...o rodante est dise ado para jalarse de la manija 5 Cierre el bolso rodante 6 1 Cierre la tienda completamente como se muestra en la imagen INSTRUCCIONES DEL BOLSO RODANTE 5 2 Impreso en China 4 Coloqu...

Reviews: