background image

5

EN  

This is the translation of the original German operating 

            instructions. 

Please read these operating instructions carefully and note the information
given. Use these operating instructions to familiarise yourself with the
product, the proper use and the safety instructions. 

For safety reasons, children and young people under the age of 16, as 
well as people not familiar with these operating instructions, may not use
this product. Persons with reduced physical or mental capabilities may
only use this product when supervised or instructed by an authorised
person. Children should be supervised to ensure that they do not play
with the product. Never operate the product when you are tired, ill or
under the influence of alcohol, drugs or medicine.

Correct use :

The Wall-Mounted Hose Box with automatic battery-powered hose
roll-up serves the irrigation of the garden and is intended for use in the 
private home- and hobby garden. It may not be used in public facilities,
parks, sports facilities, on streets and in agriculture and forestry. 
The Hose Box is only suitable for outdoor use. 

Observance of this User’s Manual is the condition for correct use.

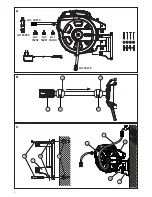
Contents (Fig. A) :

Safety Instructions : 

CAUTION ! 

V  

Read the Operating Instructions before 
initial operation. 

CAUTION ! 

The Hose Box may not be opened. 

Follow the Safety Instructions on the Battery Charger.

RISK OF EXPLOSION ! Physical injury ! 
The Battery Charger may not be used to charge other batteries or 
rechargeable batteries.

The Battery Charger may only be used to charge the GARDENA 
Li-Ion battery located in the Controller. 

Never expose the Battery Charger to moisture or wetness.

RISK OF FIRE ! Short-circuit ! 
Do not bridge contacts of the Battery Charger with metal parts. 

Check before each use : 
Carry out a visual inspection each time before using the Battery Charger. 

After intensive use, first let the battery cool before charging.

End of charging / storage : 
Store the Battery Charger with disconnected mains plug. 
Follow the Safety Instructions on the Controller. 

RISK OF FIRE ! Short-circuit ! 
Do not bridge contacts of the Controller with metal parts. 

Check before each use : 
Carry out a visual inspection each time before using the Controller.

Use / Responsibility : 

ATTENTION ! Due to the danger of physical injury, the Controller may not
be used as an energy source for other appliances. You may only use the
Controller for the intended GARDENA Wall-Mounted Hose Box Art. 8025. 

Electrical safety : 

RISK OF FIRE ! 
The battery to be charged must be placed on a non-flammable, heat
resistant and non-conductive surface while charging. Keep corrosive,
flammable and easily combustible objects clear of the battery charger
and the battery. 

Do not cover the battery charger and the battery while charging. Unplug
the battery charger immediately in the event of smoke formation or fire. 

Only Original GARDENA Battery Chargers may be used as battery
chargers. If other battery chargers are used, the batteries may be
destroyed and fires may even be caused.

RISK OF EXPLOSION ! 

Protect battery against heat and fire. Do not place on radiators or expose 
to intense sunlight for long periods. 

Only use and charge the battery in an ambient temperature between 5 °C
and 45 °C. After long periods of use, first allow the battery to cool down. 

The mains charging cable must be inspected regularly for signs of dam-
age and ageing (brittleness) and may only be used in perfect condition. 

Putting into storage : 

The battery should be stored at 0 to 25 °C to minimise self-discharge.
Never store it connected to one of the connecting devices to prevent
misuse and accidents. 

Without the battery fitted, the Hose Box may also be exposed to rain. 

Do not store battery in places with static electricity. 

The battery must not be opened. 

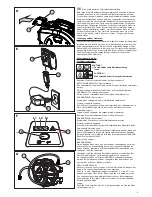
If required, the stopper can be shifted (Fig. B) :

1. Press the release button 

G

and remove the Controller 

H

2. Loosen the 2 screws 

2

on the stopper 

3

with a screwdriver. 

3. Hold the watering hose securely while shifting, shift the stopper 

3

and screw tightly again with the 2 screws 

2

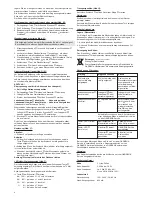
Mount wall bracket (Fig. C) :

The supplied wall plugs are suitable for cement walls (plaster up 
to 1 cm). For other wall types, special wall plugs must be used. 

1. Release the locking screws

D

and remove the Hose Box from the 

wall bracket 

7

2. Mark holes using the wall bracket 

7

, drill into the wall with an 8-mm

drill and stick in the wall plugs 

8

3. Screw the wall bracket 

7

with the 4 screws 

9

(width across flats 

10-mm) and the 4 washers 

0

4. Stick the Hose Box 

B

onto the wall bracket 

7

5. Secure the Hose Box 

B

with the safety screw 

D

6. Connect the connecting hose 

C

to the tap. 

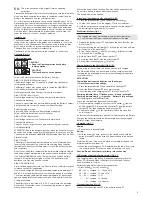
Charge battery in the Controller (Fig. D / E) :

Before using for the first time, the battery must be fully charged. 

The lithium-ion battery can be charged at every charging level and
charging can be interrupted at any time without damaging the battery 
(no memory effect). 

ATTENTION ! 
Overvoltage destroys the batteries and the charger.

V

Observe correct mains voltage. 

1. Press the release button 

G

and remove the Controller 

H

2. Insert the Battery Charger 

J

into a mains socket. 

3. Insert the plug of the charging cable 

I

into the Controller 

H

Charging indicator lamp 

K

flashes green :   Battery is charged. 

Charging indicator lamp 

K

is lit green :   Battery is fully charged. 

(For charging time, see Technical Data). 
Check the charge status regularly while charging.

4. Once completely charged, disconnect, the Controller

H

from the 

battery charger

J

. Disconnect the Controller

H

from the battery 

charger

J

first, then unplug the battery charger

J

5. Slide the Controller 

H

on the Controller-insert on the Hose Box 

until it snaps in. 

So that the fully charged battery does not self-discharge via the Battery
Charger, the Controller should be disconnected from the unplugged
Battery Charger after charging. 

Operation (Fig. F) :

Unwind : 

v

Pull out hose to desired length. 

Roll up : 

v

With the end of the hose, go back to the Hose Box and hold the 
button pressed 

L

until the hose has been rolled up to the desired

length. 

Protective function : If the hose is blocked or completely rolled up, the
motor automatically switches off. 

v

When the connecting hose 

C

is removed from the tap, place it onto 

the anti-drip device 

F

so that no water will drip from the hose. 

Caution ! Do not direct water jet directly into the housing. 

LED display of battery-charging status (Fig. F) :

The charging level of the battery is displayed briefly every time the 
button

L

is pressed. When the battery is fully charged, the hose

can be rolled up to 70 times. 

Battery charging status indicator during operation: 

v

Press button 

L

on the Controller

H

.

    66 - 100 % charged    L1, L2 and L3 lit. 

    33 -  65 % charged    L1 and L2 lit. 

    10 -  32 % charged    L1 lit. 

     1 -

9 % charged    L1 flashing. 


0 % charged    No indicator.

Transport position (Fig. G) :

Connect the connecting hose 

C

to the anti-drip device 

F

Summary of Contents for 8025

Page 1: ...a com bateria PL Instrukcja obs ugi B bna na ciennego ze zwijaczem akumulatorowym HU Haszn lati utas t s Akkumul toros t ml doboz CS N vod k pou it Akumul torov n st nn box na hadici SK N vod na pou i...

Page 2: ...2 Art 13 182 Art 18202 Art 18201 Art 18200 Art 8 1 300 Art 15 182 A 1 2 2 3 3 B 7 12 16 9 7 10 8 13 14 C...

Page 3: ...werden Setzen Sie das Ladeger t niemals Feuchtigkeit oder N sse aus BRANDGEFAHR Kurzschluss Kontakte des Ladeger ts nicht mit Metallteilen berbr cken Pr fung vor jeder Benutzung F hren Sie vor jeder B...

Page 4: ...diesen auf den Nachtropfstopp F stecken damit kein Wasser aus dem Schlauch tropft Achtung Wasserstrahl nicht in das Geh use richten LED Akku Zustandsanzeige Abb F Der Ladezustand des Akkus wird nach...

Page 5: ...be inspected regularly for signs of dam age and ageing brittleness and may only be used in perfect condition Putting into storage The battery should be stored at 0 to 25 C to minimise self discharge...

Page 6: ...u de m dicaments Utilisation conforme Le d vidoir mural avec enroulement automatique sur accu du tuyau sert l arrosage du jardin et est destin une utilisation dans un potager ou un jardin Toute utilis...

Page 7: ...charg s allume en vert Dur e de chargement voir Caract ristiques techniques En cours de chargement v rifier r guli rement la progression du chargement 4 Lorsque le chargement est termin d branche le...

Page 8: ...een omgevingstemperatuur tussen 5 C en 45 C Na sterke belasting accu eerst laten afkoelen Het laadsnoer moet regelmatig op tekenen van beschadiging en ver oudering scheurtjes worden onderzocht en mag...

Page 9: ...PLOSIONSFARA Risk f r personskador Laddaren f r inte anv ndas f r att ladda andra batterier Endast GARDENA Li ion batteriet i styrdelen f r laddas upp med laddaren Uts tt aldrig laddaren f r fuktighet...

Page 10: ...langen FARA Rikta inte vattenstr len in i h ljet LED batteristatusangivelse bild F Batteriets laddningsstatus visas kort efter varje tryckning p knappen L Slangen kan rullas upp med fullt batteri upp...

Page 11: ...kal akkuen f rst k le af Opladerens kabel skal j vnligt kontrolleres for tegn p beskadigelser og ldning revnedannelse og det m kun benyttes i fejlfri stand Opbevaring Accuen b r opbevares ved mellem 0...

Page 12: ...n lataamiseen Latauslaitteella saa ladata vain ohjainosassa olevaa GARDENA Li Ion akkua l milloinkaan j t latauslaitetta alttiiksi kosteudelle tai sateelle PALOVAARA Oikosulku l kytke metalliosia lata...

Page 13: ...vett Huomio l suuntaa vesisuihkua koteloon Akun j nnitetilan LED n ytt valot kuva F Akun lataustila n kyy painikkeen L jokaisen painalluksen j lkeen lyhyen aikaa Akun ollessa t yteen ladattu letku voi...

Page 14: ...lleres for tegn p skader eller aldringer spr het og m bare brukes i feilfri tilstand Lagre Batteriet b r oppbevares mellom 0 og 25 C for holde selvutladingen p et lavt niv Lagre det aldri tilkoplet ti...

Page 15: ...l irrigazione di aree verdi e per l utilizzo privato in giardino e per hobby Non pu essere utilizzato in impianti pub blici parchi centri sportivi su strade e nel settore agrario e forestale L avvolgi...

Page 16: ...odulo di comando H dal caricabatterie J Separare prima il modulo di comando H dal carica batterie J quindi scollegare il caricabatterie J 5 Inserire il modulo di comando H sopra il supporto dello stes...

Page 17: ...l de entre 5 C y 45 C Tras un trabajo intenso dejar primero que se enfr e el Accu El cable de carga debe controlarse regularmente para ver si presenta signos de desperfectos y envejecimiento fragilida...

Page 18: ...onamento ATEN O A caixa da mangueira n o deve ser aberta Prestar aten o s regras de seguran a do carregador PERIGO DE EXPLOS O Les es no corpo O carregador n o pode ser utilizado para carregar outro t...

Page 19: ...hora isso significa que existe uma avaria ver Repara o de Avarias LED indicador do estado da bateria Fig F O estado de carga da bateria ser indicado premindo brevemente a respectiva tecla L Com a bate...

Page 20: ...r tylko w temperaturze otoczenia mi dzy 5 C do 45 C Po znacznym obci eniu pozostawi najpierw akumulator do och odzenia Przew d adowarki nale y kontrolowa pod k tem uszkodze i starzenia si zerwanie Wol...

Page 21: ...s A t lt k sz l ket nem szabad m s akkumul torok elemek t lt s re haszn lni A t lt k sz l kkel kiz r lag a vez rl r szben l v GARDENA Li Ion akkut szabad t lteni A t lt k sz l ket soha ne tegye ki ned...

Page 22: ...ll t ra F hogy a t ml b l ne csepegjen ki v z VIGY ZAT A v zsugarat ne ir ny tsa a h zba Akku llapotjelz LED K p F Az akku t lt si llapot t a gomb L minden egyes megnyom sa ut n r vid id re kijelzi Te...

Page 23: ...mu slune n mu z en Akumul tor pou vejte a nab jejte jej pouze za teploty okol mezi 5 C a 45 C Po siln m zat en nechte akumul tor nejd ve ochladit Pravideln kontrolujte nab jec kabel zda nejev zn mky...

Page 24: ...si pre tajte n vod na pou itie POZOR Box na hadicu sa nesmie otv ra Dbajte na bezpe nostn pokyny na nab ja ke NEBEZPE ENSTVO EXPL ZIE Riziko razu Nab ja ka sa nesmie pou va na nab janie in ch akumul...

Page 25: ...niu F aby voda z hadice po pou it nevytekala Pozor Nestriekajte vodn m l om do telesa boxu LED ukazovatele stavu nabitia akumul tora obr F Stav nabitia akumul tora sa kr tkodobo zobraz po ka dom stla...

Page 26: ...NA 8025 GARDENA 5 C 45 C 0 25 C 1 G H 2 2 2 3 3 3 2 2 C 1 cm 1 D 7 2 7 8 3 7 4 9 10 mm 4 0 4 B 7 5 B D 6 C D E V 1 G H 2 J 3 I H K K 4 H J H J J 5 H LED 8 F v v L v C F LED F v L H 66 100 L1 L2 L3 33...

Page 27: ...1 2 H 2012 19 EE GARDENA GARDENA GARDENA GARDENA GARDENA 5 2 25 Ah i 18 5V 2 55 80 4 05 100 100 240 V 50 60 Hz 600 mA RU 16 A V GARDENA K K GARDENA 8025 GARDENA 5 C 45 C K LED M LED M H H 5 GARDENA 3...

Page 28: ...E V 1 G H 2 J 3 I H K A K A Te 4 H J H J J 5 H F v v L v C F F L 70 v L H 66 100 L1 L2 L3 33 65 L1 L2 10 32 L1 1 9 L1 0 G C F 1 2 H RL 2012 19 EU GARDENA B GARDENA GARDENA GARDENA GARDENA Te e e 5 2...

Page 29: ...lede znakov po kodb ali staranja lomljivost napravo smete uporabljati samo v brezkompromisnem stanju Shranjevanje Akumulator naj bo shranjen pri 0 do 25 C da se manj izprazni Nikoli ne shranjujte akum...

Page 30: ...izvodom Nikada ne upotrebljavajte ure aj ako ste umorni bolesni ili pod utjecajem alkohola droge ili lijekova Primjerena uporaba Zidna kutija s crijevom s automatskim namatanjem crijeva na akumulator...

Page 31: ...provjeravajte napunjenost 4 Kada se upravlja ki dio H napuni odvojite je od punja a J Najprije odvojite upravlja ki dio H od punja a J a zatim odvojite punja J s napajanja 5 Gurnite upravlja ki dio H...

Page 32: ...enja bateriju treba najpre ostaviti da se ohladi Redovno proveravajte da li je napojni kabel o te en ili lomljiv i koristite ga samo ako je u besprekornom stanju Skladi tenje Bateriju treba uvati na...

Page 33: ...uvom krpom Ne koristite rastvara e Za vreme nekori enja Skladi tenje i uvanje preko zime Pre vremenskog perioda smrzavanja zidnu kutiju za crevo sa motorom i upravlja ku jedinicu u uspravljenom polo a...

Page 34: ...5 B D 6 C D E V 1 G H 2 J 3 I H K A K A 7 4 H J H J J 5 H F L C F F L 70 v L H 66 100 L1 L2 L3 33 65 L1 L2 10 32 L1 1 9 L1 0 G C F 1 2 H RL2012 19 EU GARDENA GARDENA GARDENA GARDENA GARDENA 5 2 25 18...

Page 35: ...c rcare trebuie verificat n mod regulat pentru a constata eventualele deterior ri sau semne datorate vechimii fragilitate iar uti lizarea acestuia este permis doar n stare tehnic irepro abil Depozitar...

Page 36: ...ler bu r n yaln zca yetkili bir ki inin g zetimi alt nda ve verilecek talimatlar do rultusunda kullanabilirler ocuklar n r nle oynamamalar n g vence alt na almak i in onlar n g zetilmesi gerekir Cihaz...

Page 37: ...as nlenmelidir Dikkat Su f skiyesini g vdeye do ru tutmay n LED batarya arj durumu g stergesi Resim F Bataryan n arj durumu tu L her bas l tan sonra k sa s re g sterilir arj tamamen dolu halde iken ho...

Page 38: ...DENA 8025 GARDENA 5 C 45 C 0 25 C B 1 G H 2 2 2 3 3 3 2 2 C 1 1 D 7 2 7 8 8 3 7 4 9 10 4 0 4 B 7 5 B D 6 C D E Memory V 1 G H 2 J 3 I H K K 4 H J H J J 5 H F L v C F F L 70 v L H 66 100 L1 L2 L3 33 65...

Page 39: ...shkurt r Mos anashkaloni lidhjet e kontakteve t karikuesit me pjes metalike Kontroll para do p rdorimi Realizoni para do p rdorimi nj kontroll pamor t karikuesit Pas nj ngarkese t fort t bateris para...

Page 40: ...s s bateris Fig F Gjendja e karikimit e bateris tregohet shkurtimisht pas do shtypje t butonit L Tubi me bateri plot sisht t karikuar mund t grumbullohet deri 70 her Treguesi i gjendjes s bateris gjat...

Page 41: ...ellel ei ilm neks kahjustusi ega vananemise tundem rke m rad Toitejuhet tohib kasutada vaid siis kui see on laitmatult korras Hoiustamine Akut tuleks ladustada temperatuuril 0 kuni 25 C et iset hjenem...

Page 42: ...alima krauti tiktai valdymo dalyje esant GARDENA li io jon akumuliatori Niekada nepalikite kroviklio dr gnoje arba lapioje aplinkoje GAISRO PAVOJUS Trumpasis jungimas Kroviklio kontakt ne untuokite me...

Page 43: ...krovimo proceso metu reguliariai tikrinkite krovimo lyg 4 Pasibaigus krovimo procesui atskirkite valdymo dal H nuo kro viklio J Pirma atskirkite valdymo dal H nuo kroviklio J o po to i traukite krovik...

Page 44: ...t uzl d anas kabeli vai taj nav konstat jamas boj jumu vai nolietojuma trausluma paz mes un lietojiet ier ci tikai nevainojam st vokl Uzglab ana Akumulatoru vajadz tu uzglab t temperat r no 0 l dz 25...

Page 45: ...kst veikt tikai firmas GARDENA servisa noda as vai GARDENA autoriz tie d leri Nor des Dro bas apsv rumu d tenes dr kst nomain t tikai GARDENA servisa centra person ls Tehniskie dati Akumulators 5 liti...

Page 46: ...osia voidaan niell asennuksen yhteydess ja muovipussi aiheuttaa tukehtumisvaaran Pid pienet lapset kaukana asennuksen aikana NO Fare Denne maskinen skaper et elektromagnetisk felt under drift Under o...

Page 47: ...ui Pericol La montare piesele mici ar putea fi nghi ite i exist pericol de sufo care din cauza pungii din plastic La momentul mont rii ine i copiii mici departe TR Tehlike Bu makine i letim s ras nda...

Page 48: ...r n gon annan f r inte ha f rs kt reparera produkten Tillverkarens garanti g ller ej s rskilda verenskommelser mellan terf rs ljare och k pare Vid st rningar ber vi dig s nda in produkten tillsammans...

Page 49: ...nia T to z ruka sa vz ahuje na v etky podstatn z vady v robku preuk zate ne sp soben chybami materi lu alebo v roby Na jej z klade sa v m poskytne n hradn bezchybn zariadenie alebo bezplatn oprava zas...

Page 50: ...n Garancia n fjal e dh n nga prodhuesi nuk i prek t drejtat p r garanci q mund t drejtoh en p rball tregtarit shit sit N raste t garancis luteni t d rgoni aparatin defekt bashk me nj fotokopje t kupon...

Page 51: ...not responsible if you cause the product to become of unacceptable quality or if the product is damaged by abnormal use II Warranty Periods GARDENA Branded Products 2 Years 8 Years 10 Years 12 Years 1...

Page 52: ...dnie z niemieck ustaw o odpowiedzialno ci za produkt niniejszym wyra nie o wiadczamy e nie ponosimy adnej odpowiedzialno ci za szkody ponie sione na skutek u ytkowania naszych produkt w w przypadku gd...

Page 53: ...abaixo mencionado est de acordo com as directrizes harmonizadas da UE padr es de seguran a e de produtos espec ficos Este certificado ficar nulo se a unidade for modificada sem a nossa aprova o PL Dek...

Page 54: ...Akku Wandschlauchbox Description of the unit Roll up automatic Li Ion D signation de l appareil D vidoirs box muraux sur accu Omschrijving van het apparaat Accu wandslangenbox Produktbeskrivning Batte...

Page 55: ...55...

Page 56: ...dena husqvarna co uk Italy Husqvarna Italia S p A Via Santa Vecchia 15 23868 VALMADRERA LC Phone 39 0341 203 111 assistenza italia it husqvarna com Japan KAKUICHI Co Ltd Sumitomo Realty Development Ko...

Reviews: