background image

5

cs@discoverhomeproducts.com

USA

1855 965 5310

AFTER SALES SUPPORT

6

cs@discoverhomeproducts.com

USA

1855 965 5310

AFTER SALES SUPPORT

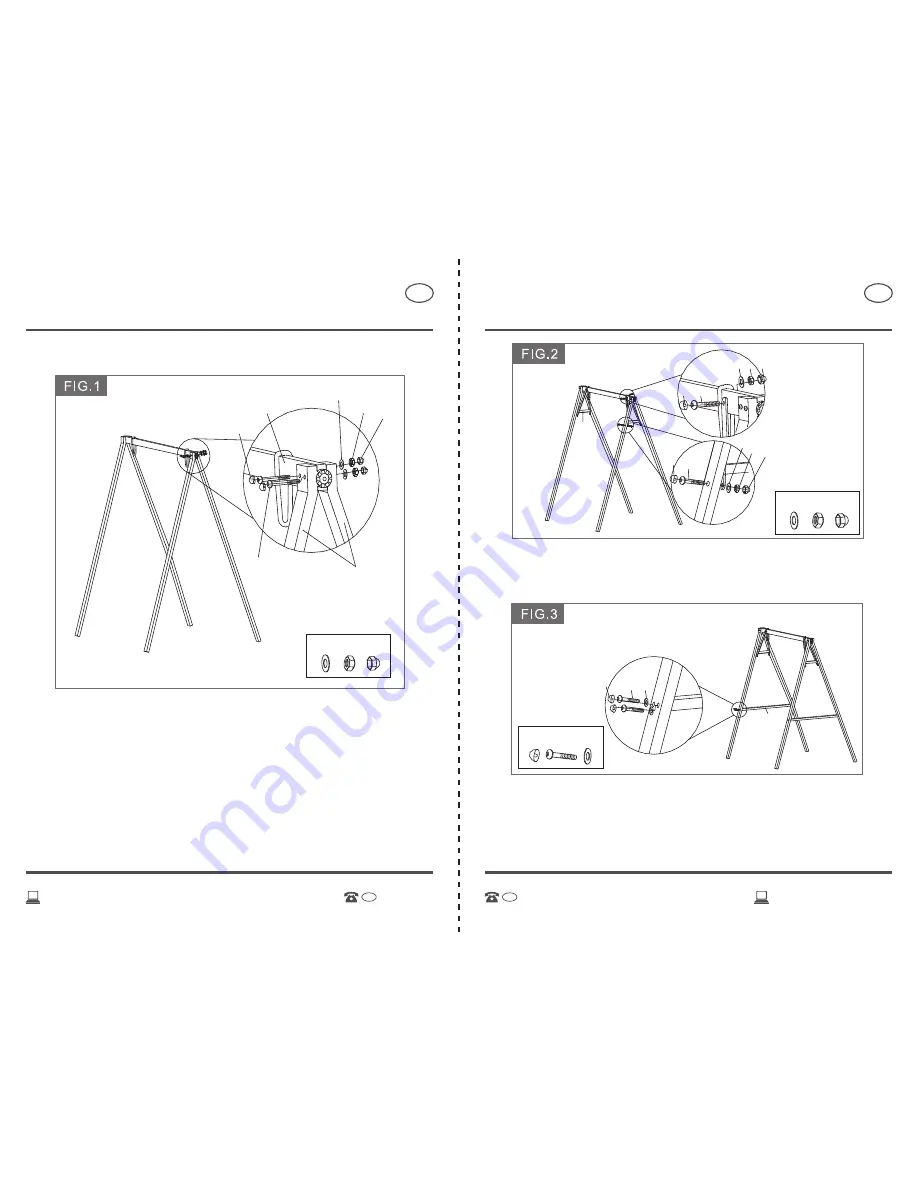
STEP 1: Remove all parts from the box and place them on a non-abrasive surface. 
Align the two holes at one end of Top Cross Bar(C) with the two holes in the top 
of the Front Leg Tube (A) and the two holes in the top of Back Leg Tube (A) on the 
other side. Insert a Bolt (R) through Front Leg Tube (A), Top Cross Bar (C), Back Leg 
Tube (A), and into Washer (V), and Nut (U) for each hole. Don’t tighten all bolts 
until you finish the assembly and cover with Caps (W, Y). See Fig.1. Repeat this step 
on the other side of the frame.

STEP 2: Connect the Top Cross Side Brace (H) and Top Cross Bar (C) with Bolt (P), 
Washer (V) and Nut (U). Then connect the Top Side Brace (H) to the Front and 
Back Leg Tubes (A) with Bolt (N), Washer (V) and Nut (U) and cover with 
Caps (W, Y). See Fig.2. 

STEP 3: Adjust the angle of the two legs. Place a Leg Cross Bar (B) between two 
legs on one end of the frame, lining up the bolt holes. For each hole in the front 
and back legs, insert Bolt (N), and Washer (V) through the Leg Tube (A) and into 
the Leg Cross Bar (B). Do not completely tighten and cover with Cap (Y). 
See Fig.3. Repeat this step for the cross bar between the other legs.

2 Person Swing

Assembly Instructions

Assembly Instructions

2 Person Swing

USA

USA

Y

C

V

R

A

V

U W

C

A

W

U

U W

V UW

V

U W

Y

Y

H

c

P

N

V

V

N

Y

A

A

B

B

Y

N

V

Summary of Contents for 43537

Page 1: ...P gina 13 User Guide Manual del usuario DISTRIBUTED BY DISTRIBUIDO POR ALDI INC BATAVIA IL 60510 www aldi us USA MODEL 43537 PRODUCT CODE 43537 04 2016 2 YEARWARRANTY A OS DE GARANT A AFTER SALES SUPP...

Page 2: ...abrasive surface such as a carpet or cardboard to avoid damaging the item Seek assistance to assemble bulky or heavy items After final alignments make sure all screws and nuts are securely tightened...

Page 3: ...on Bolt M6x12mm Bolt M6x35mm Canopy Cloth 2 Person Swing Parts List Parts List 2 Person Swing Bolt M6x70mm Bolt M6x85mm Bolt M6x50mm Knob Nut Washer Nut Cap Plastic Washer Bolt Cap Driver Hex Wrench 8...

Page 4: ...eat this step on the other side of the frame STEP 2 Connect the Top Cross Side Brace H and Top Cross Bar C with Bolt P Washer V and Nut U Then connect the Top Side Brace H to the Front and Back Leg Tu...

Page 5: ...4 Repeat this step on the other side Then securely tighten the Bolts and Nuts and cover with Caps W Y 2 Person Swing Assembly Instructions Assembly Instructions 2 Person Swing USA USA E E F G Y Y S S...

Page 6: ...gear hole on the Canopy Frame K and into the gear hole on the Top Cross Bar C Repeat this step with the second knob on the other Side See Fig 8 Don t tighten completely You can change the tilt of the...

Page 7: ...1 855 965 5310 In order to make a claim under the warranty please send us via email The original receipt and the warranty card properly completed Photos of the damage if applicable The warranty does n...

Page 8: ...sibilidad de lesiones Realizar el ensamblaje del producto sobre una superficie suave no abrasiva tal como una alfombra o cart n para evitar que se da e el art culo Solicite asistencia para ensamblar l...

Page 9: ...USA USA Referencia para los tornillos 1 1 PASO 1 Extraiga todas las piezas de la caja y col quelas sobre una superficie no abrasiva Alinee los dos orificios en un extremo del travesa o superior C con...

Page 10: ...emo del bastidor alineando los orificios de los tornillos Para cada orificio en las patas delanteras y traseras inserte un perno N y arandela V a trav s del tubo de la pata A y en el travesa o de la p...

Page 11: ...mas piezas y pasos para fijar el tubo de colgar a la parte opuesta PASO 6 Sujete el gancho de resorte J al extremo del tubo de colgar E y fije el gancho a la estructura de la pata que se ensambl en el...

Page 12: ...22 cs discoverhomeproducts com Informaci n de la garant a USA Sus datos Nombre Direcci n Fecha de la compra Lugar de la compra Correo electr nico Descripci n del defecto Tel fono Por favor mantenga su...

Page 13: ...ant a completada de manera adecuada Fotograf as de los da os si es aplicable La garant a no cubre a los da os ocasionados por Cualquier acto de la naturaleza Da os debidos al viento y el agua Uso no r...

Reviews: