background image

25cc 4 Stroke Petrol Hedge Trimmer

AFTER SALES SUPPORT

e-mail: help@powertoolsupport.com

1800 909 909

MODEL: №. 

YR-HT250  •  08/2016  •  52742

(toll free)

AFTER SALES SUPPORT

(toll free)

e-mail: help@powertoolsupport.com

1800 909 909

MODEL: №. 

YR-HT250  •  08/2016  •  52742

25cc 4 Stroke Petrol Hedge Trimmer

25

Using the Hedge Trimmer with the Trimmer on its side

Often, when either of the rear rotating handle (13) positions, i.e 90° to the left or 

the right is selected, the hedge trimmer will be orientated with the blade (1) in 

a vertical position. Please note the following tips.
1.   Practice a little with the new orientation of the tool. The balance and feel is 

slightly different than in the horizontal position.

2.   FILL the fuel tank (15) fully when the tool is positioned with the blades (1) 

vertical. The fuel pick up tube may not reach the bottom of the tank with 

these orientations.

3.   Ensure the rear rotating handle locking lever (14) is fully engaged, and the 

handle is locked in position.

4.   Fill the oil reservoir (17) with the unit on its side as this is the best position to 

access and fill with oil.

5.    Each time the handle is in the rotated position, check and ensure the blades 

are NOT engaged when the hedge trimmer is at idle. DO NOT use the hedge 

trimmer if the blades are engaged at idle.


NOTE:

  All protective devices of the machine as well as protective equipment 

must be maintained in good operating condition during the period of use.

   Petrol hedge trimmers transmit vibrations to the operator during use. These 

vibrations can generate increased fatigue. For this reason, we recommend 

taking regular breaks during work. We also recommend taking a break after 

a few hours of work to rest the engine. If abnormal noise or vibration occurs 

during operation, turn the hedge trimmer off immediately and have the 

problem corrected.

Trimming Instructions

Before operating your unit, review ALL SAFETY PRECAUTIONS in this 

manual.

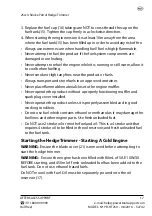
1. WORKING POSITION. 

Maintain proper footing and balance and do not overreach. Wear safety 

goggles, ear muffs, non-skid footwear and rubber gloves when trimming. 

Hold the hedge trimmer firmly in both hands and turn the hedge trimmer 

ON. Always hold the hedge trimmer, as shown in the illustrations, with 
one hand on the rear handle and one hand on the front handle (4) (Fig U). 
NEVER hold the hedge trimmer by the protective guard (3).

Summary of Contents for 52742

Page 1: ... powertoolsupport com Read all safety warnings and all instructions thoroughly before operating this product Ensure you keep your manual in a safe place for future reference IM ed 9 8 2016 52742 25CC 4 STROKE PETROL HEDGE TRIMMER ...

Page 2: ... website or contact details for example Advantage You are not required to manually enter a website address or contact details How it works To scan the QR code all you need is a smartphone with QR codes reader software and an Internet connection This type of software can be downloaded for free from your smartphone s app store Try it out now Just scan the QR code with your smartphone and find out mo...

Page 3: ...21 Operation of theThrottleTrigger Adjusting the speed 21 The Operation of the Rear Rotating Handle 22 Use of the Petrol HedgeTrimmer 23 Using the HedgeTrimmer with theTrimmer on its side 25 Trimming Instructions 25 Blade Maintenance 26 Blade Lubrication 27 Greasing 27 Air Filter 27 Cleaning the Air Filter 28 Carburettor Adjustment 28 Spark Plug 28 Servicing 29 Fuel Filter 30 Storage and Maintenan...

Page 4: ... is not suitable for commercial industrial or trade use This Hedge Trimmer has been designed for trimming shaping and pruning hedges shrubs and trees IMPORTANT INFORMATION NOTE This is a 25cc 4 Stroke Petrol Hedge Trimmer The motor MUST be filled with 80ml of SAE 10W 30 BEFORE starting Fresh unleaded fuel must be used in this unit Do NOT use Ethanol based fuels Do NOT mix oil with fuel NOTE First ...

Page 5: ...tion choke closed Run position choke open Use at a distance of at least 15m from other people Thrown objects and rotating line can cause severe injury Do not operate the unit without the safety guard in place Keep away from rotating cutter Keep hands away from moving parts Explosive material Extremely hot surface Do not touch a hot muffler gear box or cylinder you may get burned These parts get ex...

Page 6: ...ne who is responsible for their safety or have been instructed by such a person with regard to how the unit is to be operated Children should be supervised to ensure that they do not play with the device Non skilled persons and first time users should read and understand the full instruction manual before proceeding with use of the product or recommended maintenance tasks Save these instructions W...

Page 7: ...ss properly Do not wear loose clothing or jewellery Keep your hair clothing and gloves away from moving parts Loose clothes jewellery or long hair can be caught in moving parts If devices are provided for the connection of dust extraction and collection facilities ensure that these are connected and properly used Use of these devices can reduce dust related hazards Personal safety Do not force the...

Page 8: ... the work to be performed Use of the power tool for operations different from intended could result in a hazardous situation Service Have your power tool serviced by a qualified repair personnel using only identical replacement parts This will ensure that the safety of the power tool is maintained Do not operate in a hazardous location Such areas include where there is a risk of explosion of petro...

Page 9: ...ors Never fill fuel tank when engine is running or hot Do not smoke when filling fuel tank Use only for pruning This product is designed only for use in trimming leaves and small branches It must never be used for any other purpose as doing so could result in unforeseen accidents and injuries Keep hands and fingers well away from the blade Wear work gloves eye protection ear protection solid shoes...

Page 10: ...e personal injury from the cutter blade Prior to cutting with the hedge trimmer always check the area to be cut for hidden objects Be observant for fencing wire Garden stakes or electrical cables Ensure to remove any of these objects prior to starting Do not use the hedge trimmer in poor weather conditions Do not use the hedge trimmer in poor light Always use both hands when operating the hedge tr...

Page 11: ...AFTER SALES SUPPORT toll free e mail help powertoolsupport com 1800 909 909 MODEL YR HT250 08 2016 52742 25cc 4 Stroke Petrol Hedge Trimmer 11 9 ...

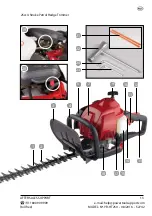
Page 12: ...Spark plug cover front housing 8 Spark plug 9 Recoil starter 10 On Off switch 11 Throttle trigger 12 Safety Lever 13 Rear rotating handle 14 Rear rotating handle locking lever 15 Fuel tank 16 Fuel tank cap 17 Oil dipstick Oil reservoir 18 Grease nipple 19 Primer bulb behind air filter cover 20 Choke lever red behind bottom of air filter cover 21 Blade covers 22 Spark Plug Spanner Screwdriver Combi...

Page 13: ...AFTER SALES SUPPORT toll free e mail help powertoolsupport com 1800 909 909 MODEL YR HT250 08 2016 52742 25cc 4 Stroke Petrol Hedge Trimmer 13 17 18 19 22 24 23 20 15 14 13 12 10 11 9 7 5 4 3 2 1 21 ...

Page 14: ...de cover 21 align the cover over the first 2 blade teeth and then slide the blade cover 21 fully onto the blades 1 Fig B Adding and Checking the oil IMPORTANT The motor of this Hedge Trimmer is packed with NO OIL in the motor Prior to starting the engine oil MUST be added to the oil reservoir 17 Failure to add sufficient oil will result in damage to the engine which is NOT covered under the warran...

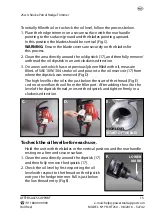
Page 15: ...iously been filled with oil measure 80mL of SAE 10W 30 4 stroke oil and pour into the oil reservoir 17 from where the dipstick was removed Fig D The high level for the oil is the just below the start of the thread Fig E i e do not overflow the oil from the filler port After adding the oil to the level of the dipstick thread re insert the dipstick and tighten firmly in a clockwise direction To chec...

Page 16: ...ver fill Fuelling IMPORTANT Fuel goes off after about 3 4 months If you find your unit does not start first change the fuel in the tank with newly purchased fuel WARNING Do not refill fuel tank while engine is running or is hot Move at least 10m away from the refuelling site before starting engine NOTE Do not use fuel that contains ethanol Use fresh unleaded fuel Do not smoke when refuelling or op...

Page 17: ...uels in an approved container Never place flammable material close to the engine muffler Never operate the product without a properly functioning muffler and spark plug cover installed Never operate the product unless it is properly assembled and in good working condition Do not use fuel which contains ethanol or methanol as it may damage the fuel lines and other engine parts Use fresh unleaded fu...

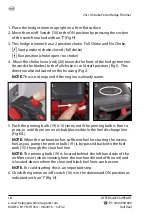
Page 18: ...direction also indicated on the housing Fig J NOTE This is not required if the engine is already warm 5 Push the priming bulb 19 6 10 times until the priming bulb is firm to press or until there are no air bubbles visible in the fuel discharge line Fig K L NOTE When the carburettor has sufficient fuel for starting the excess fuel as you pump the primer bulb 19 is by passed back into the fuel tank ...

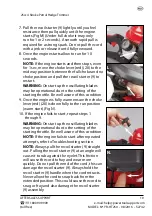
Page 19: ...tting of the starting throttle Be well aware of this condition 9 Once the engine is fully warm ensure the choke lever red 20 is down fully to the run position warm start Fig N 10 If the engine fails to start repeat steps 1 through 9 WARNING On start up the oscillating blades may be operational due to the setting of the starting throttle Be well aware of this condition NOTE If the engine fails to s...

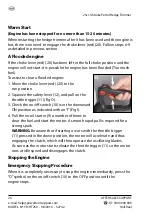
Page 20: ...he run position 2 Squeeze the safety lever 12 and pull on the throttle trigger 11 Fig O 3 Check the on off switch 10 is in the downward ON position as indicated with an I Fig I 4 Pull the recoil starter 9 a number of times to clear the fuel and start the motor A smooth rapid pull is required for a strong spark WARNING Be aware that if starting occurs with the throttle trigger 11 pressed in the dow...

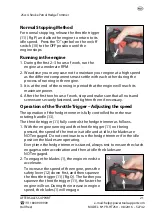
Page 21: ...l nuts and screws are securely fastened and tighten them if necessary Operation of theThrottleTrigger Adjusting the speed The operation of the hedge trimmer is fully controlled from the rear rotating handle 13 The throttle trigger 11 fully controls the hedge trimmer as follows 1 With the engine running and the throttle trigger 11 not being pressed the speed of the motor is at idle and at idle the ...

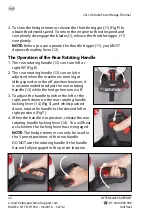
Page 22: ...2 The rear rotating handle 13 can only be adjusted when the machine is running at idling speed or in the off position however it is recommended to adjust the rear rotating handle 13 while the hedge trimmer is off 3 To adjust the handle to either the left or the right push down on the rear rotating handle locking lever 14 Fig S and whilst pushed down rotate the handle to the desired left or right p...

Page 23: ...object is accidentally hit immediately turn off the engine and examine the equipment Never operate the unit with damaged or defective parts Do not operate the hedge trimmer with other people or animals in the immediate vicinity If you are operating it on a slope stand below the cutting attachment Do not operate on a slope or hill if there is the slightest chance of slipping or losing your footing ...

Page 24: ...lade for damage Never work towards people or solid objects such as walls trees or vehicles etc Always release the throttle trigger and allow the engine to return to idle speed when not cutting DO NOT jam the controls in the on fast condition Operate the controls by hand only Always check the product to be trimmed and do not cut close to fencing wire or services but not limited to electricity gas p...

Page 25: ... and ensure the blades are NOT engaged when the hedge trimmer is at idle DO NOT use the hedge trimmer if the blades are engaged at idle NOTE All protective devices of the machine as well as protective equipment must be maintained in good operating condition during the period of use Petrol hedge trimmers transmit vibrations to the operator during use These vibrations can generate increased fatigue ...

Page 26: ...nd sweep up Fig U Blade Maintenance WARNING Ensure the engine is switched off before undertaking all maintenance work tasks Your hedge trimmer should be stopped and oiled occasionally during use 1 The cutting blades 1 are made from high quality hardened steel and with normal usage they will not require resharpening However if you accidentally hit a wire fence stones glass or other hard objects you...

Page 27: ...mmer is switched off and blades 1 have come to a complete stop For easier operation and longer blade life lubricate the blade before and after each use Apply light machine oil along the edge of the blade s 1 bar Fig W Greasing The engine requires re greasing after approximately every 25 hours of operation Apply lithium grease into the gearbox through the grease nipple 18 after 25 hours running Fig...

Page 28: ... the air filter sits in the recess provided then close the air filter cover 5 ensuring both the tabs are back into place on the latch CAUTION Replace filter if frayed torn damaged or unable to be cleaned Replacement air filters are available for purchase by calling 1800 909 909 or by emailing help powertoolsupport com Carburettor Adjustment The carburettor is pre set at the factory for optimum per...

Page 29: ...rection 4 Clean and adjust the spark plug gap to 0 6 0 7mm Replace any damaged or visibly worn plug with a new spark plug 5 Re Install the spark plug 8 finger tight then tighten with the supplied spark plug spanner 22 Do not over tighten 6 Re install the spark plug cover front housing 7 and secure back in position by applying the centre fixing screw and tightening by using the supplied 4mm hex key...

Page 30: ...ll the fuel filter off the fuel line Fig AC AD Replace the new fuel filter by pushing it onto the fuel line until it is secure and then inserting the fuel filter and fuel line back into the fuel tank Fig AE When the inside of the fuel tank is dirty it can be cleaned by rinsing the tank out with petrol The fuel filter should be changed only when it is showing signs of blockage or there is insuffici...

Page 31: ...uld be sorted taken to the local recycling centre and disposed of in an environmentally safe way 9 Check the operation of the On Off switch 10 controls prior to use or during maintenance check refer to service centre if not operating correctly 10 Check the condition of the blade for sharpness cutting edge damage and binding jamming of the blades prior to use or during maintenance check 11 Check th...

Page 32: ... Warnings Your Gardenline Hedge Trimmer has many features that will make your job faster and easier Safety performance and dependability have been given top priority in the development of this Hedge Trimmer making it easy to maintain and operate Use only Gardenline replacement parts for your product Non conforming parts or modifications made to parts will void your warranty Environmental protectio...

Page 33: ...s support services details of which can be found in this manual and on the product itself After Sales Support TEL 1800 909 909 Service Support If you have any issues with the operation of your product please take it with a copy of your receipt to one of our National Service Agents for repair A listing of our Service Agents is included with your product however you can also find our most updated li...

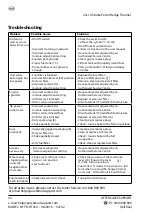
Page 34: ...ntre Drain fuel tank 15 add fresh fuel mixture Drain fuel tank 15 add fresh fuel mixture No power under load Incorrect carburettor mixture adjustment setting Old or contaminated fuel Dirty spark plug 8 Choke partially closed Air filter 6 is blocked Air filter 6 is blocked Fuel filter is blocked Dirty air filter Remove clean and reinstall filter Replace the Fuel filter Replace or clean air filter 6...

Page 35: ...gth 550mm Bar length 650mm Maximum Cutting capacity Ø 24mm Fuel tank capacity 450ml Fuel type Unleaded petrol Do not use fuel that contains ethanol OilTank Capacity 80ml Oil type 4 stroke SAE 10W 30 Spark Plug CDK CMR6A Net Weight 6 3kg Noise label rating 82dBA taken at 7 5 metres You must wear ear protection at all times Product Dimensions 108cm x 23cm x 25cm tolerances L x W x H This product com...

Page 36: ...ducts are developed to our stringent quality specifications If you are not entirely satisfied with this product please return it to your nearest ALDI store within 60 days from the date of purchase for a full refund or replacement or take advantage of our after sales support by calling the supplier s Customer Service Hotline Made in China Gardenline is a registered trademark of ALDI Stores DISTRIBU...

Reviews: