background image

AFTER SALES SUPPORT


  0151 649 1500      

  1890 946244


  www.einhell.co.uk

28

41cc Petrol Chainsaw – GLPC 41

Safety

7.   Safety notes primarily for the end user or
occasional user

Kickback safety precautions


WARNING!

Kickback can lead to dangerous loss of control of the 

chainsaw and result in serious or fatal injury to the saw 

operator or to anyone standing close by. Always be alert. 

Rotational kickback and pinch-kickback are major chainsaw 

operational dangers and the leading cause of most accidents.

– 

 KICKBACK may occur when the NOSE or TIP of the guide 

bar touches an object, or when wood closes in and pinches 

the saw chain in the cut. 

–   Tip contact in some cases may cause a lightning-fast 

reverse reaction, kicking the guide bar up and back 

toward the operator. 

– 

 PINCHING the saw chain along the BOTTOM of the guide 

bar may 

PULL the saw forward away from the operator. 

PINCHING the saw chain along the TOP of the guide bar 

may 

PUSH the guide bar rapidly back toward the operator. 

   Any of these reactions may cause you to lose control of the 

saw, which could result in serious personal injury. 

Summary of Contents for GLPC 41

Page 1: ...e you will enjoy using your purchase for many years to come If you require technical support or in the unlikely event that your purchase is faulty please telephone our Helpline for immediate assistanc...

Page 2: ...ion When abroad you must also observe country specific guidelines and laws Store the instruction manual for future use If you pass the chainsaw on to third parties please be absolutely sure to include...

Page 3: ...and or serious injury Keep all safety regulations and instructions in a safe place for future use Proper Use The chain is designed exclusively for sawing wood You may only fell trees if you have recei...

Page 4: ...tended purpose Any other use is deemed to be a case of misuse The user operator and not the manufacturer will be liable for any damage or injuries of any kind resulting from such misuse Reasonably for...

Page 5: ...safety goggles to guard your eyes from flying materials objects and a sound proof helmet ear plugs or the like to protect your hearing Wear a safety helmet if there is a risk of objects falling on you...

Page 6: ...ese pages should be carefully read before attempting to operate this unit DANGER 1 RED Warns about a dangerous method of working that must not be used 2 GREEN Recommended operation for safe sawing DAN...

Page 7: ...feature designed to reduce the possibility of injury due to kickback by stopping a moving saw chain in milliseconds It is activated by the CHAIN BRAKE lever 10 STOP SWITCH immediately stops the engin...

Page 8: ...ted away Failure to do this may result in accident or injury if the moving chain catches something or they are catapulted away CAUTION Petrol is highly flammable There is a risk of fire if the fuel is...

Page 9: ...cautions must be observed to avoid injuries and damage Please read the complete operating manual with due care Keep this manual in a safe place so that the information is available at all times If you...

Page 10: ...ion and which offers protection such as long trousers sturdy work shoes hard wearing gloves a helmet a face mask or goggles to protect your eyes and good quality ear defenders to reduce the noise Wear...

Page 11: ...or safely assembled Loose parts and screws could cause damage to the machine or personal injury if parts come loose or fall off during use There is also a greater risk of vibration injury if screws ar...

Page 12: ...mage or injury l Store the equipment and accessories in a safe place protected from naked flames and heat spark sources such as gas heaters tumble driers oil stoves or portable radiators etc There is...

Page 13: ...djusted or repaired Risk of accident or injury r Always operate the equipment in its high speed range for trimming and cutting Do not let the engine run at low speed at the start of cutting or during...

Page 14: ...xed correctly with 2 stroke oil Otherwise there is a risk of causing permanent damage to the engine and of voiding the manufacturer s guarantee b Do not smoke while refuelling or using the equipment T...

Page 15: ...n extended period of time take regular breaks Tiredness whilst using a machine could result in damage to the machine or personal injury i Do not use the equipment when tired or under the influence of...

Page 16: ...he spilled liquid Fire explosion risk n When transporting your chainsaw always fit the chain guard over the bar and chain Risk of cutting o To detect significant damage or defects the equipment must b...

Page 17: ...the chainsaw on A tool or spanner in contact with a rotating part of the device may result in injury e Avoid an abnormal posture Maintain a safe position and keep your balance at all times This will...

Page 18: ...e of the chainsaws Check to make sure that the moving parts are functioning properly and not stuck and whether parts are broken or damaged so as to affect the function of the chainsaw Have damaged par...

Page 19: ...and mental capacities or lack of experience and knowledge e g older children The chainsaw may not be used by children and persons with impaired physical sensory or mental capacities or lack of experi...

Page 20: ...associated with using the chainsaw If used improperly or in a negligent manner the chainsaw can inflict serious injury Carefully read through the instructions on proper handling preparatory steps main...

Page 21: ...ing so Damaged switches must be replaced by a customer service workshop Do not use the chainsaw if the power switch cannot be turned on and off Defects in the machine including defects affecting prote...

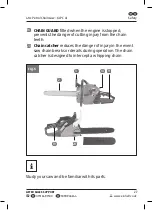
Page 22: ...safety regulations and instructions 6 Safety features Fig 5 2 LOW KICKBACK SAW CHAIN helps significantly reduce kickback or the intensity of kickback due to specially designed depth gauges and guard...

Page 23: ...ted when the engine is stopped prevents the danger of cutting injury from the chain teeth 20 Chain catcher reduces the danger of injury in the event saw chain breaks or derails during operation The ch...

Page 24: ...al dangers and the leading cause of most accidents KICKBACK may occur when the NOSE or TIP of the guide bar touches an object or when wood closes in and pinches the saw chain in the cut Tip contact in...

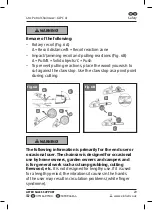
Page 25: ...wish to cut against the claw stop Use the claw stop as a pivot point during cutting Fig 6A A B A A B C A Fig 6B WARNING The following information is primarily for the end user or occasional user The...

Page 26: ...d circulation during the breaks Ensure that the equipment makes the least possible vibration through regular maintenance and correctly tightened parts on the equipment Kickback may occur when the nose...

Page 27: ...t overreach or cut above shoulder height Follow the manufacturer s sharpening and maintenance instructions for the saw chain Only use replacement bars and chains specified by the manufacturer or the e...

Page 28: ...in brake lever and clutch area See Fig 20d Fig 20e on Page 51 Never remove debris from the machine while the engine is running To remove debris from the chain and chain bar switch the machine off and...

Page 29: ...ON The actual vibration values when operating the machine can deviate from the values given in the manual or specified by the manufacturer This can be caused by the following influencing factors which...

Page 30: ...oothly before you start using the equipment Check that all screws are securely fastened and also check all the safety devices Before adding fuel and starting the chainsaw you must check the tension of...

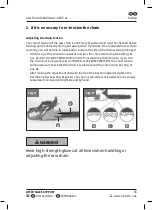
Page 31: ...ld the tip of the chain bar upwards and turn the chain tensioning wheel Fig 8 pos A IN A CLOCKWISE DIRECTION in order to increase the chain tension If you turn the chain tensioning wheel IN A COUNTER...

Page 32: ...can be moved smoothly but is still closely seated Fig 9 pos A Increase the tension by turning the chain tensioning wheel IN A CLOCKWISE DIRECTION B When the saw chain is correctly tensioned hold the t...

Page 33: ...of the chain brake is to reduce the possibility of injury due to kickback however it cannot provide the intended measure of protection if the saw is operated carelessly Always test the chain brake bef...

Page 34: ...trol and special 2 stroke engine oil Mix the fuel mixture as indicated in the fuel mixing table CAUTION Do not use a fuel mixture which has been stored for longer than 90 days CAUTION Never use 2 stro...

Page 35: ...tisfactorily on any petrol intended for automotive use including oxygenated petrols It is recommended to use unleaded petrol as fuel Lubrication of chain and chain bar Whenever you refill the fuel tan...

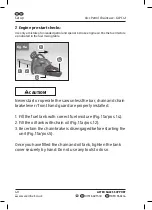
Page 36: ...ble Fig 11a 5 14 12 1 2 CAUTION Never start or operate the saw unless the bar chain and chain brake lever front hand guard are properly installed 1 Fill the fuel tank with correct fuel mixture Fig 11a...

Page 37: ...rranty will be voided if the machine is used in commercial trade or industrial businesses or for equivalent purposes Operation Please note that the statutory regulations governing noise abatement may...

Page 38: ...e Hold the saw firmly as shown Pull the starter cord rapidly 2 times Fig 12a pos 7 Fig 12d Beware of moving chain 5 Push in the choke lever as far as it will go Fig 12b pos 17 6 Switch the stop switch...

Page 39: ...0 seconds to warm up Press the safety throttle lock throttle lever briefly the engine will go to idling speed Fig 12e pos 11 pos 19 CAUTION Always pull the starter cable slowly until you feel the init...

Page 40: ...ain oil Fig 11a pos 12 See the section Fuel and oil on page 38 Be certain the chain brake is disengaged before starting the unit Fig 11b pos 5 1 Make sure the stop switch is in the I ON position Fig 1...

Page 41: ...ain brake lever front hand guard Fig 11b pos 5 This will immediately stop the chain Then switch the ON OFF Fig 11b pos 10 switch to Stop 0 Normal procedure Let go of the throttle lever Fig 12e pos 19...

Page 42: ...elled Direction of fall fall Fig 13 pos B is controlled is controlled by the notching cut Before any cuts are made consider the location of larger branches and natural lean of the tree to determine th...

Page 43: ...e falling tree before you push it over Before making the final cut always recheck the area for bystanders animals or obstacles Felling cut Use wooden or plastic wedges Fig 15 pos A to prevent binding...

Page 44: ...nd when bucking as this causes rapid dulling of the chain When bucking on a slope always stand on the uphill side 1 Log supported along entire length Cut from top overbuck being careful to avoid cutti...

Page 45: ...cutting the correct position for vertical bucking is essential Fig 19 A Hold the saw firmly with both hands and keep the saw to the right of your body while cutting B Keep the left arm as straight as...

Page 46: ...e lever on the Bar fastening knob Fig 20b pos B completely unscrew COUNTERCLOCKWISE Fig 20b 20d Then remove the complete side cover Fig 20b Fig 20a Fig 20b D B Complete any necessary replacement of pa...

Page 47: ...clear of dirt and any build up of residue 1 Make sure the Chain brake lever is pulled back into the DISENGAGED position Fig 20a 2 Turn the chain tensioning wheel Fig 20b pos D IN A COUNTER CLOCKWISE...

Page 48: ...g 21a pos A pointing CLOCKWISE around the loop Slip the chain around the sprocket Fig 21b pos B behind the clutch Fig 21b pos C Make sure the links fit between the sprocket teeth Fig 21b Guide the dri...

Page 49: ...0d pos E fits into the hole Fig 20d pos G in the chain bar Fit the Chain brake lever front hand guard Fig 22 and turn the bar fastening knob lever Fig 22d pos B clockwise to secure it The chain is not...

Page 50: ...ment setting Have carburettor adjusted by an Authorised Service Centre No power under load Incorrectly gapped spark plug Clean gap or replace plug Runs erratically Incorrect carburettor mixture adjust...

Page 51: ...oroughly every time after it has been used This applies particularly to the chain and bar Keep the air vents and the motor housing free of dirt and dust as far as possible Wipe the equipment with a cl...

Page 52: ...e chain brake periodically to ensure proper function Perform a chain brake test prior to initial cutting following extensive cutting and definitely following any Chain brake service Test chain brake a...

Page 53: ...off and take your unit to the nearest Authorized Service Centre for service 7 If the chain brake functions properly turn the engine off and return the chain brake to the DISENGAGED position Air Filter...

Page 54: ...Fig 24b 4 Lift out the air filter Fig 24b pos C 5 Clean the air filter Wash the filter in clean warm soapy water Rinse in clear cool water Air dry completely before refitting It is advisable to have...

Page 55: ...1 2 Fig 11c NOTICE Do not pull hose completely out of tank 6 Lift the filter out of tank Fig 25 pos A 7 Pull the filter off the fuel pipe with a twist and clean it If the filter is damaged dispose of...

Page 56: ...vice 1 Set the On Off switch to Stop 0 2 Remove the top cover Fig 24a pos A by undoing the cover fastening screw Fig 24a pos B on the cover You can then remove the cover Fig 24a pos A 3 Disconnect the...

Page 57: ...To do this turn the idling speed screw Fig 25 pos B clockwise until the machine runs smoothly at idling speed If the idling speed is so fast that the chain turns as well it has to be reduced by turnin...

Page 58: ...horoughly clean guide bar sprocket tip before lubrication NOTICE The saw chain does not have to be removed in order to lubricate the sprocket tip of the chain bar Lubrication is possible during work w...

Page 59: ...ar wear the following guide bar maintenance procedures are recommended CAUTION Always wear protective gloves during maintenance operations Do not carry out maintenance when the engine is hot Turning t...

Page 60: ...It automatically supplies the bar and the chain with the right quantity of oil The moment the engine is accelerated the oil also starts to flow through the bar plate more quickly as well The chain lu...

Page 61: ...your own saw chain special tools are available from the professional Service Centre Fig 29 Chain sharpening Sharpen the chain using protective gloves and a round file of 3 16 4 8 mm Always sharpen th...

Page 62: ...nks removed from a loop of chain This could cause damage to the sprocket Chain lubrication Always make sure the automatic oiler system is working properly Keep the oil tank filled with Chain Bar and S...

Page 63: ...the motor housing free of dirt and dust as far as possible Wipe the equipment with a clean cloth or blow it down with compressed air at low pressure It is easiest to remove sawdust and wood chippings...

Page 64: ...let it run until the equipment stops 3 Leave the engine to cool approx 5 minutes 4 Remove the spark plug see Spark plug Fig 24b on page 60 You will need the supplied combined spark plug wrench screwd...

Page 65: ...k capacity 260 ml Oil tank capacity 210 ml Anti vibration function Yes Chain wheel teeth 6 teeth x 9 525 mm Chain brake Yes Clutch Yes Automatic chain lubrication Yes Low kickback chain Yes Net weight...

Page 66: ...Wear protective gloves Key Part Numbers Chain type OREGON 91P057X Bar type OREGON 160SDEA041 Spark plug L8RTF Service information We have competent service partners within the UK whose contact detail...

Page 67: ...AFTER SALES SUPPORT 0151 649 1500 1890 946244 www einhell co uk 71 41cc Petrol Chainsaw GLPC 41 Technical data Declaration of conformity...

Page 68: ...hone numbers for AFTER SALES SUPPORT 3 Or contact via the Einhell UK Ltd website How do I obtain spare parts not covered by the warranty Make sure you have the information from the product data label...

Page 69: ...ompleted warranty card together with it Einhell UK Ltd Unit 9 Stadium Court Wirral International Business Park Plantation Road Bromborough CH62 3QG AFTER SALES SUPPORT Aftersales support available Mon...

Page 70: ...d of the safety and maintenance instructions Other improper treatment or modification After the expiry of the warranty period you still have the possibility to have your product repaired at your own e...

Page 71: ...collection centre The unit and its accessories are made of various types of material such as metal and plastic Defective components must be disposed of as special waste Ask your dealer or your local c...

Page 72: ......
Reviews: