background image


1

SAFETY


Warning! Read this first. 


Warning! Please read and follow the safety 

instructions carefully before using the unit. 

Warning! In case of damage to the power 

cord, it must be replaced by the manufacturer, 

repairer or any qualified person authorized to 

prevent electric shock. 


    During operation, do not reach into the   

chute assembly 8. The machine runs on for   

a few seconds after being switched off.   

    Never allow children or people unfamiliar   

with these instructions to use the ma- 

chine. Local regulations may restrict the   

age of the operator. When not in use store   

the machine out of reach of children. 

    This tool is not intended for use by persons   

(including children) with reduced physical,   

sensory or mental capabilities, or lack of   

experience and knowledge, unless they   

have been given supervision or instruction   

concerning use of the appliance by a per- 

son responsible for their safety. 

Children should be supervised to ensure   

that they do not play with the appliance. 

    Before switching on, the machine must be   

assembled according to the enclosed in- 

structions. 

    It is recommended for increased electrical   

safety to use a Residual Current Device   

(RCD) with a tripping current of not more   

than 30 mA. Always check your RCD every   

time you use it. 

    Use only extension cables that are intend- 

ed for outdoor use and are protected   

against splashes of water. 

 Do not touch the plug or socket with wet   

hands. 

    Do not run over, crush or pull the power   

supply cable or extension lead, otherwise   

it may be damaged. Protect the cable from   

heat, oil and sharp edges. 

 Other persons and animals should remain   


at a distance of 3 metres or more when the   

machine is being used. The operator is re- 

sponsible for third persons in the working   

area. 

    GARDEO can assure flawless functioning of   

the machine only when original accesso- 

ries are used. 

 Become familiar with the instruction man- 

ual before attempting to operate this ma- 

chine. 

 Avoid wearing loose-fitting clothing, hang- 

ing cords or ties. 

 Only operate the machine in open space   

(e. g. not too close to a wall or other fixed   

objects) and on a firm, level surface. 

 Do not operate the machine on paved or   

gravel surface where ejected material   

could cause injury. 

 Before starting the machine, check that all   

screws, nuts, bolts and other fasteners are   

properly secured and that guards and   

screens are in place. Replace damaged or   

unreadable warning and operating labels. 

 Before starting the machine, make certain   

that the chute assembly is empty. 

 Keep your face and body away from the   

chute assembly. 

 Do not allow hands or any other part of the   

body or clothing inside the chute assembly,   

discharge chute or near any moving part. 

 Keep proper balance and footing at all   

times. Do not overreach. Never stand at a   

higher level than the base of the machine   

when feeding material. 

 Always stand clear of the discharge zone   

when operating the machine. 

 When feeding material into the machine be   

extremely careful that pieces of metal,   

rocks, bottles, cans or other foreign ob- 

jects are not included. 

 If the cutting mechanism strikes any for- 

eign object or if the machine should start   

making any unusual noise or vibration, im- 

Summary of Contents for GBV2501SWB

Page 1: ...GETAUX TRADUCTION DES INSTRUCTIONS D ORIGINE NL HAKSELAAR VERTALING VAN DE ORIGINELE INSTRUCTIES GB SHREDDER ORIGINAL INSTRUCTIONS S19 M05 Y2014 Sous r serve de modifications Technische wijzigingen vo...

Page 2: ...isez soigneusement ces instructions d utilisation Avant toute intervention sur le m canisme de coupe arr tez l outil de jardin et retirez la fiche de la prise de courant Au cas o le c ble serait endom...

Page 3: ...r Portez des lunettes de s curit Portez une protection acoustique N utilisez l outil de jardin pas par temps de pluie et ne l exposez pas la pluie Ne marchez pas sur le bac de r cup ration Utiliser de...

Page 4: ...nfants doivent tre surveill s pour assurer qu ils ne jouent pas avec l outil de jardin Avant la mise en fonctionnement l outil de jardin doit tre mont conform ment aux instructions jointes l outil de...

Page 5: ...le m canisme de coupe heurterait un corps tranger ou que l outil de jardin commencerait faire des bruits tranges ou vibrer arr tez imm diatement l outil de jardin pour arr ter le couteau Retirez la fi...

Page 6: ...outil de jardin et maintenez le propre Contr lez l outil de jardin et pour des raisons de s curit remplacez les pi ces us es ou endommag es Veillez ce que les pi ces de rechange soient des pi ces d o...

Page 7: ...nnoir de remplissage 3 Support 5 Pied du support 7 Bouton poussoir de verrouillage 9 Interrupteur de sens d orientation 11 Bouton de r initialisation protection anti surcharge 2 Bouton 4 Bac de ramass...

Page 8: ...les accessoires unit centrale accessoires 3 Montez la roue et le pied de support couvercle de la roue boulon joint douille roue rondelle crou 10 crou 11 Support 12 couvercle du pied de support 13 Pie...

Page 9: ...nt 1 Avant de d marrer la machine regardez dans la chambre d alimentation afin de vous assurer qu elle est vide 2 Gardez la figure et le corps l cart de l ouverture d alimentation 3 Ne laissez pas vos...

Page 10: ...e doit tre bien fix en position et l interrupteur de s curit verrouill Alimentation Alimentez le mat riau d chiqueter du c t droit de l entonnoir d alimentation Le mat riau est automatiquement tir l i...

Page 11: ...s ligneuses peuvent tre enlev s en retirant le mat riau et en m me temps en alternant entre les directions de coupe et de d gagement des couteaux de hachage Attention Attendez toujours que la d chique...

Page 12: ...de r initialisation protection anti surcharge 2 bouton vert 1 pour red marrer 3 5 Instructions li es l utilisation du broyeur 1 Appuyez sur ON la machine fonctionne 2 Le commutateur de marche arri re...

Page 13: ...outon rouge 0 pour mettre le broyeur hors tension 3 7 Lorsque le bac de ramassage est rempli Le niveau de d bris de mat riau d chiquet dans le r servoir de collecte peut tre contr l en regardant trave...

Page 14: ...assurer qu il n est pas plein d gagez le contenu apr s une p riode de coupe prolong e 4 Vous ne devez ins rer que des mati res qui ne permettront pas le blocage de l entonnoir de remplissage 5 R duise...

Page 15: ...aiguilles Vous pouvez la tourner d un demi cercle dans le sens des aiguilles pour obtenir la distance de 0 5 mm Astuces Les mati res et les branches lourdes se bloquent dans les lames de d coupe dura...

Page 16: ...rdon d alimentation chaque fois que vous devez abandonner la machine Protection contre l humidit Coupez le moteur puis enlevez le cordon d alimentation avant de proc der au nettoyage l entretien et to...

Page 17: ...mati res ou les arbres plus importants ins rer 4 2 Maintenance Prenez soin de votre machine et nettoyez la r guli rement afin d obtenir un rendement et des performances sur le long terme Veillez ce q...

Page 18: ...11 4 3 Entretien Attention Si la machine pr sente des d fauts veuillez contacter votre distributeur GARDEO 81 rue de Goz e 6110 Montigny le Tilleul Belgique info eco repa com 0032 71 29 70 70...

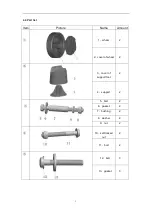
Page 19: ...ces Article Image Nom Quantit 1 roue 2 2 couvercle de roue 2 3 couvercle du pied de support 2 4 support 2 5 boulon 2 6 joint 2 7 douille 2 8 rondelle 2 9 crou 2 10 crou verrouillage automatique 2 11 b...

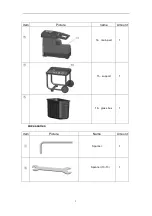
Page 20: ...2 Accessoires Article Image nom Quantit 14 Pi ce de base 1 15 support 1 16 Bac de ramassage 1 Article Image Nom Quantit Cl 1 Cl 10 13 1...

Page 21: ...tifs individuels de protection de l ou e Valeur quadratique moyenne pond r e de l acc l ration selon la norme applicable 2 5 m s La valeur totale de vibrations d clar e a t mesur e conform ment une m...

Page 22: ...7 0 Maintenance et stockage Prenez soin de votre machine et nettoyez la r guli rement afin de pr server son efficacit et ses performances long terme Maintenez les fentes de ventilation propres et exem...

Page 23: ...clauses de garantie reportez vous aux conditions de garantie ci jointes ENVIRONNEMENT Si apr s un certain temps vous d cidez de remplacer votre machine ne vous en d barrassez pas avec les ordures m n...

Page 24: ...aarschuwing Lees de gebruiksaanwijzing door Schakel het tuingereedschap uit en trek de stekker uit het stopcontact voordat u werkzaamheden aan het hakselmechanisme uitvoert Als de kabel tijdens de wer...

Page 25: ...rdat u deze aanraakt Draag een veiligheidsbril Draag een gehoorbescherming Gebruik het tuingereedschap niet in de regen en laat het niet in de regen liggen of staan Ga niet op de opvangbox staan Gebru...

Page 26: ...ties ontvangen ten aanzien van het gebruik van het tuingereedschap Kinderen moeten onder toezicht staan om zeker te stellen dat zij niet met het tuingereedschap spelen V r het inschakelen moet het tui...

Page 27: ...mee invoert Als het hakselmechanisme een voorwerp raakt of als het tuingereedschap begint te trillen en ongewone geluiden begint te maken dient u het tuingereedschap onmiddellijk uit te schakelen om h...

Page 28: ...n stilstaan Onderhoud het tuingereedschap en houd deze schoon Controleer het tuingereedschap Versleten of beschadigde delen moeten veiligheidshalve worden vervangen Zorg ervoor dat vervangingsonderdel...

Page 29: ...zicht 1 2 3 4 7 5 6 8 9 10 11 1 Invoertrechter 3 Drager 5 Dragervoet 7 Vergrendelschakelaarduwer 9 Draaischakelaar 11 Reset knop overbelastingsbescherming 2 Knop 4 Grasbak 6 Wiel 8 Toestelinlaat 10 Aa...

Page 30: ...chine en de accessoires eruit mainframe accessoires 3 Monteer het wiel en de steunvoet deksel van wiel bout pakking lagerbus wiel tussenring moer 10 moer 11 drager 12 deksel van steunvoet 13 steunvoet...

Page 31: ...voerkamer kijken om zeker te zijn dat deze leeg is 2 Houd uw gezicht en lichaam uit de buurt van de invoeropening 3 Laat uw handen of enig ander lichaamsdeel of stuk kleding niet in de invoerkamer afv...

Page 32: ...de machine moet de verzameldoos stevig in positie zijn en de veiligheidsschakelaar vergrendeld zijn Invoeren Voer het versnipperen materiaal in de rechterzijde van de invoertunnel in Het materiaal wor...

Page 33: ...Grote voorwerpen of houtachtige stukken kunnen worden verwijderd door het materiaal terug te trekken en tegelijkertijd te veranderen tussen de versnipper en loslaatrichtingen van het versnippermes Op...

Page 34: ...5 min kan de motor worden herstart Druk op de 1 resetknop overbelastingsbeschermer 2 groene knop 1 om te herstarten 3 5 Instructies voor gebruik van de hakselaar 1 Druk op ON machine treedt in werkin...

Page 35: ...de knop 0 om deze uit te zetten 3 7 Als de grasbak vol is Het niveau van versnipperd afvalmateriaal in het verzamelreservoir kan worden gecontroleerd door te kijken door de sleuven op het bovenvlak va...

Page 36: ...uiten wordt getrokken 3 Kijk in de grasbak om te controleren of deze al dan niet vol is maak deze tijdig leeg om een tijd te kunnen versnipperen 4 Steek maar zoveel materiaal in de grasbak dat de invo...

Page 37: ...tel niet meer linksom kunt draaien U kunt de inbussleutel een halve slag rechtsom draaien om de afstand 0 5 mm te bekomen Tips Zwaar materiaal of takken leiden tot blokkering van de versnippermessen t...

Page 38: ...tact telkens u de machine onbeheerd achterlaat Bescherm tegen vochtigheid Zet de motor uit en trek de stekker uit het stopcontact vooraleer u reiniging onderhoud of herstellingen uitvoert Gevaarlijke...

Page 39: ...pening gebruik een stang voor het aanduwen van materialen of bredere takken voor de invoer 4 2 Onderhoud Verzorg uw machine regelmatig en houd ze goed schoon om langdurige effici ntie en prestaties te...

Page 40: ...11 4 3 Blijf voorzichtig Als de machine een defect vertoont neem dan contact op met de machinedealer GARDEO 81 rue de Goz e 6110 Montigny le Tilleul Belgique info eco repa com 0032 71 29 70 70...

Page 41: ...4 Onderdelenlijst Item Beeld Naam Bedrag 1 wiel 2 2 wieldeksel 2 3 deksel van steunvoet 2 4 steun 2 5 bout 2 6 pakking 2 7 lagerbus 2 8 tussenring 2 9 moer 2 10 borgmoer 2 11 bout 2 12 bout 3 13 pakki...

Page 42: ...2 Accessoires Item Beeld naam Bedrag 14 hoofdelement 1 15 steun 1 16 grasbak 1 Item Beeld Naam Bedrag Moersleutel 1 Moersleutel 10 13 1...

Page 43: ...hout toepassing zijnde standaard LpA Geluidsdrukniveau 80 6 dB A K 3 dB A LwA Geluidsprestatieniveau 90 3 dB A K 2 83 dB A AANDACHT Draag gehoorbeschermers wanneer het geluidsniveau 85dB A overschrij...

Page 44: ...te schakelen Nadat de blokkering werd verwijderd moet u de keerschakelaar weer in positie A zetten Stroomuitval Controleer het voedingssnoer de stekker en uw huisaansluitingszekering en aardlekschake...

Page 45: ...u het versnippermes behandelen met een beetje ecologische olie Als de machine wordt gestopt voor onderhoud inspectie of opslag of om een willekeurig hulpstuk te vervangen de motor uitzetten de aanslu...

Page 46: ...er zich vocht ophoopt GARANTIE Lees de bijgevoegde garantievoorwaarde door voor de termijnen en voorwaarde van garantie MILIEU Als uw machine na verloop van tijd aan vervanging toe is geef hem dan nie...

Page 47: ...ad instruction manual Before handling the cutter switch off and remove the plug from the mains supply If the cable is damaged or cut through while working do not touch the cable but immediately remove...

Page 48: ...protection Wear ear protection Do not use the machine in the rain or leave it outdoors when it is raining Do not stand on the collection box Use non slip boots or shoes and stable In accordance with E...

Page 49: ...ead otherwise it may be damaged Protect the cable from heat oil and sharp edges Other persons and animals should remain at a distance of 3 metres or more when the machine is being used The operator is...

Page 50: ...motor is running Switch off allow the cutter to stop and re move the plug from the mains supply whenever you leave the work area Do not tilt the machine while it is running Do not expose the machine...

Page 51: ...iew 1 2 3 4 7 5 6 8 9 10 11 1 Feeding funnel 3 Support 5 Support foot 7 Interlock switch pusher 9 Rotational direction switch 11 Reset button overload protector 2 Knob 4 Grass Box 6 Wheel 8 Appliance...

Page 52: ...t of the machine and accessories mainframe accessories 3 Mount the wheel and the support foot cover of wheel bolt gasket bushing wheel washer nut 10 nut 11 Support 12 cover of Support foot 13 Support...

Page 53: ...er level than the base of the machine when feeding material into it 5 Always keep the discharge zone clear when operating this machine 6 When feeding material into the machine be extremely careful tha...

Page 54: ...st be completely shredded before introducing additional materials Ensure that the shredded material can fall freely from the discharge chute safe delivery The ventilation slots must not be covered by...

Page 55: ...on or off Interlock switch pusher start button stop button running button reverse button Reset button overload protector 3 2 control panel green button 1 start the shredder red button 0 stop the shred...

Page 56: ...the clockwise button to make it run in clockwise position press the anticlockwise button to make it run in opposite position 3 Pull out the grass box when the machine running the machine will stop 4...

Page 57: ...Press the red button 0 to switch off 3 7 When the grass box is full The level of shredded scrap material in the collection reservoir can be monitored by looking through the slots on the upper face of...

Page 58: ...3 Look into the grass box to check whether full or not clear it in time for a period time of cutting 4 Only insert as much material so as to prevent blockage of the feeding funnel 5 Chop garden waste...

Page 59: ...ld not turn anti clockwise the hex key anymore You can turn clockwise by half circle to achieve the distance 0 5mm Tips Heavy material or branches result in blocking of the cutting blades during conti...

Page 60: ...ords off the socket whenever you leave the machine Protect against moisture Shut off engine and remove power cord before performing cleaning maintenance or repair work Danger objects may be thrown out...

Page 61: ...es from the feed intake opening use a bar for pushing materials or wider trees to insert 4 2 Maintenance Take care of your machine and clean it regularly to obtain long lasting efficiency and performa...

Page 62: ...12 4 3 Maintenance Warning If the machine has any defects please contact your distributor GARDEO 81 rue de Goz e 6110 Montigny le Tilleul Belgique info eco repa com 0032 71 29 70 70...

Page 63: ...Part list Item Picture Name Amount 1 wheel 2 2 cover of wheel 2 3 cover of support foot 2 4 support 2 5 bolt 2 6 gasket 2 7 bushing 2 8 washer 2 9 nut 2 10 self locked nut 2 11 bolt 2 12 bolt 3 13 gas...

Page 64: ...2 Accessories Item Picture name Amount 14 main part 1 15 support 1 16 grass box 1 Item Picture Name Amount Spanner 1 Spanner 10 13 1...

Page 65: ...protection devices hearing Weighted root mean square acceleration according to relevant standard 2 5 m s The declared vibration total value has been measured in accordance with a standard test method...

Page 66: ...omplete standstill 7 0 Maintenance and Storage Take care of your machine and clean it regularly to obtain long lasting efficiency and performance Keep the air vents clean and free from dust Use only a...

Page 67: ...dity build up GUARANTEE Refer to the enclosed guarantee conditions for the terms and conditions of guarantee ENVIRONNEMENT Should your machine need replacement after extended use do not put it in the...

Page 68: ...leeftijd van de bediener Bewaar de machine buiten het bereik van kinderen wanneer deze niet wordt gebruikt Dit gereedschap is er niet voor bestemd om te worden gebruikt door personen inclusief kinder...

Page 69: ...5...
Page 70: ...13683 2003 A2 2011 EN 62233 2008 EN 55014 1 2006 A1 2009 A2 2011 EN 55014 2 1997 A1 2001 A2 2008 EN 61000 3 2 2006 A1 2009 A2 2009 EN 61000 3 11 2000 Niveau de puissance acoustique dB A Garanti 93 Ca...

Page 71: ...4 A12 2006 A2 2006 A13 2008 A14 2010 EN 13683 2003 A2 2011 EN 62233 2008 EN 55014 1 2006 A1 2009 A2 2011 EN 55014 2 1997 A1 2001 A2 2008 EN 61000 3 2 2006 A1 2009 A2 2009 EN 61000 3 11 2000 Geluidsver...

Page 72: ...4 2010 EN 13683 2003 A2 2011 EN 62233 2008 EN 55014 1 2006 A1 2009 A2 2011 EN 55014 2 1997 A1 2001 A2 2008 EN 61000 3 2 2006 A1 2009 A2 2009 EN 61000 3 11 2000 Sound power level dB A Guaranteed 93 Tec...

Page 73: ...006 A13 2008 A14 2010 EN 13683 2003 A2 2011 EN 62233 2008 EN 55014 1 2006 A1 2009 A2 2011 EN 55014 2 1997 A1 2001 A2 2008 EN 61000 3 2 2006 A1 2009 A2 2009 EN 61000 3 11 2000 Schallleistungspegel dB A...

Page 74: ...le Tilleul Belgique T l 0032 71 29 70 70 Fax 0032 71 29 70 86 Made in China S A V sav eco repa com Service Parts separated 32 71 29 70 83 32 71 29 70 86 Fabriqu en Chine Vervaardigd in China Made in...

Reviews: