background image

8

•  Batteries  should  not  be  used  in 

temperatures  under  0 °C.  They 
may  become  damaged  and  lose 
their capacity.

•  Never use normal alkaline batter-

ies! They might leak or explode in 
the device!

•  Keep  these  instructions  in  a  safe 

place and pass them on when giv-
ing the device to a third party.

•  This unit is suitable for outdoor use.
•  Please  make  sure  that  the  con-

nected hosepipe is laid out in such 
a way, that it does not become a 
tripping hazard. 

4. Contents

•   Solar Water Animal-repellent
•   Sprinkler unit
•   Solar Panel
•   Ground spike, 2-parts
•   Standard connector for garden hose
•   2 x rechargeable batteries (AA)
•   Stopper Cap
•   Instruction manual

5. Getting started

The Gardigo Solar Water Animal-repellent is powered by re-
chargeable  batteries.  The  garden  hose  is  connected  with  a 
quick snap connector. 

Inserting the batteries:

1.   You will need two Mignon (AA) rechargeable batteries. 
2.  Open the cover of the battery compartment   located be-

low the PIR sensor by sliding it downwards.

3.  Open the battery compartment by lifting up the latch  .
4.  Insert the batteries. Pay attention to the polarity. The mi-

nus end of the battery always connects to the spring in the 
battery compartment.

5.  Close the battery compartment. Make sure that the rubber 

sealing is in the groove and has not been twisted. 

6.  Slip the cover of the battery compartment   back on.
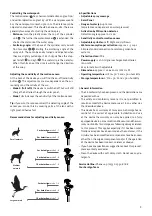
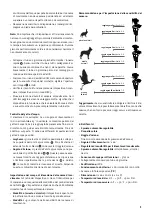
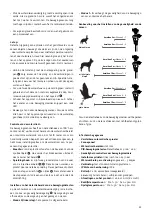
Assembly:

1.   Screw the plastic tube to the connector   at the bottom of 

the device.

2.  Screw the metal spit to the plastic tube  . 
3.  Screw the quick connector for the garden hose to the metal 

spit  . 

4.  Screw the spraying unit   to the top of the device.
5.  Align the solar panel 

 so that it receives direct sunlight 

throughout the day. Insert the plug into the socket located 
on the back of the device.

6.  The repellent can now be set up in the garden or near the 

pond. 

7.   The batteries may not be fully charged. Leave the device in 

the sun for 2 – 3 hours and allow the batteries to charge. 

Operation:

To set up the Water Repellent choose a spot that will oversee 
the area you want to clear of animals. Make sure to look for a 
position where the animals will walk across the sensors view-
ing area rather than walking directly towards the sensor. Make 
sure  that  the  view  of  the  sensor  is  not  obstructed  by  leaves 
or  foliage  and  that  the  surface  of  the  sensor  is  clean.  When 
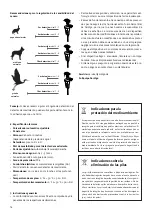
adjusting sensor sensitivity you need to consider what kind of 
animal you want to scare away and the distance of detection 
(see below). It is possible to adjust the angle and the distance 
of  the  waterspout.  Make  sure  that  the  sensor  has  a  stable 
stand, as the recoil during the waterspout can be quite strong.

•   Place the ground spit into the ground. If the earth is too hard 

we  recommend  to  soften  it  by  soaking  it  with  water.  The 
sensor should not be higher than 1 m above the area that is 
being controlled. 

•   If you want to place the device in an area that has no soil, we 

recommend the use of an umbrella stand. 

Note:

 False alarms can be triggered by objects that are warmer 

than  the  surroundings,  by  strong  water  movement,  by  rapid 
temperature changes and by house pets. On very hot days it 
may occur that an animal is not detected as the surrounding 
temperature  is  equal  to  that  of  the  body  temperature.  This 
function is normal for a PIR sensor. 

•   Connect  your  garden  hose  to  the  quick  connector  on  the 

spike  . Make sure that the hose and all connections are in 
good condition and that there is no leakage. Make sure that 
there is no sand or other debris is in the garden hose. 

•   If you do not want to use the second outlet in the spike, then 

close this with the supplied cap  I.

•   You should check the function of the device, before opening 

the water tap. 

•   Switch the device to position 9 and wave your hand in front 

of  the  motion  sensor.  If  you  hear  a  silent  click,  then  the 
device has been activated and the valve for the water has 
switched. Open your water tap to full. 

Summary of Contents for 60085

Page 1: ...Gebrauchsanweisung 3 Instruction manual 7 Notice d utilisation 10 Manual de instrucciones 13 Istruzioni per l uso 17 Instructies 21 Solar Wasser Tierabwehr Art Nr 60085...

Page 2: ...2...

Page 3: ...ich meiden Wie weit der Wasserstrahl reichen kann h ngt mit dem Wasserdruck und den Einstellungen der Reichweite zusammen Der Streuwinkel kann bis zu 170 ein gestellt werden Das Produkt kann an allen...

Page 4: ...s Akkus einsetzen 1 Sie ben tigen zum Betrieb 2 x Mignon AA Akkus enthalten 2 ffnen Sie die Abdeckung des Batteriefachs unterhalb des Sensors indem sie die Abdeckung nach unten hin weg schieben 3 ffne...

Page 5: ...elders Bewegen Sie die Hand vor dem Bewegungssensor Wenn Sie ein leises Klicken h ren ist das Ger t aktiviert und das Wasserventil hat durchgeschaltet Drehen Sie den Wasserhahn voll auf Steuerung des...

Page 6: ...f r das Recycling von elektrischen und elektronischen Ger ten abgegeben werden Das Symbol auf dem Produkt der Gebrauchsanweisung oder der Verpackung weist darauf hin Die Werkstoffe sind gem ihrer Kenn...

Page 7: ...nimals The device is environmentally friendly and does not have any harmful ef fect on the animals as it is only a burst of water which is used to startle them Every trigger alarm uses 2 3 cups of wat...

Page 8: ...e the device in the sun for 2 3 hours and allow the batteries to charge Operation To set up the Water Repellent choose a spot that will oversee the area you want to clear of animals Make sure to look...

Page 9: ...adhesive foil Recommendations for adjusting sensitivity sensor 6 Specifications Adjustable spray coverage Solar Panel Range of water jet up to 10m adjustable and dependent on water pressure Activatio...

Page 10: ...nt et facilement n importe quel endroit n cessaire et offre une protection optimale contre les animaux Le dispositif n a pas d effet n faste sur les animaux car seule l eau est utilis e comme moyen de...

Page 11: ...it pas t d plac e 6 Replacez le couvercle de protection sur le compartiment piles 7 Le dispositif est maintenant pr t fonctionner Assemblage 1 Vissez le tube en plastique du piquet la partie inf rieur...

Page 12: ...plus courte est la port e du jet d eau L angle de diffusion Au pied du bec d aspersion se trouvent deux clips de d limitation de l angle de diffusion qui peuvent s carter Les clips respectifs servent...

Page 13: ...ez le dispositif afin de ne pas les d ranger Nettoyez le dispositif avec un chiffon humide Ne pas utili ser de produits nettoyants abrasifs ou de solvants Service service gardigo de Votre quipe Gardig...

Page 14: ...el aparato es adecua do para el lugar de aplicaci n en cuesti n Este dispositivo no se destina al uso por personas incluidos los ni os menores de 8 a os con ca pacidades f sicas sensoriales o mentales...

Page 15: ...por vigilar Si no hay tierra a su disposici n recomendamos el uso de una base para sombrillas Nota Se pueden producir activaciones err neas causadas por objetos con una temperatura superior a la del...

Page 16: ...sco tas que no deben ser estorbadas Si el dispositivo llega a ensuciarse limp elo con un trapo h medo No use limpiadores abrasivos ni disolventes Si tiene alguna pregunta o sugerencia acerca de este p...

Page 17: ...in rapidamente e facilmen te in qualsiasi luogo offrendo la miglior protezione possi bile da animali indesiderati Il dispositivo non ha alcun effetto dannoso sugli animali in quanto utilizza solamente...

Page 18: ...ano batteria inserendo le quattro viti Assicu rarsi prima della chiusura che l anello di tenuta sia corret tamente posizionato e che non si sia spostato 6 Far scorrere nuovamente la copertura protetti...

Page 19: ...uzzante Pi all esterno di estende l unita di blocco minore sar il raggio d azione Angolo d azione ai piedi dell unit spruzzante sono pre senti due clip di limitazione Queste possono esse re mosse tram...

Page 20: ...tici bens dovr essere conferito presso un punto di raccolta per il recupero di apparecchiature elettriche ed elettroniche come indicato dal simbolo riportato sul prodotto stesso nel manuale di istruzi...

Page 21: ...en de bereikinstellingen De verstrooiingshoek kan worden aangepast tot 170 Het product kan snel en gemak kelijk worden bevestigd aan alle getroffen gebieden en biedt een optimale bescherming tegen die...

Page 22: ...4 Plaats de batterijen Besteed aandacht aan de polariteit Het wordt getoond in de behuizing Het negatieve uitein de van de batterij wijst altijd naar de veer in het batterij compartiment 5 Sluit het b...

Page 23: ...al aanpassen Je hebt twee instellingsopties om de waterstraal aan te pas senaan de gegeven locatie Breedte draai de plastic schroef aan de bovenkant van de spuiteenheid Hoe verder het blokkeermes uits...

Page 24: ...sluiting bijvoor beeld door de polenw af te plakken tevigo GmbH Raiffeisenstr 2 D 38159 Vechelde Germany www gardigo com 7 Algemene informatie De CE conformiteit werd bewezen de overeenkomstige verkla...

Reviews: