background image


13-25-637 v02     Page 26 


7.1 

Cooling air volume/minimum cross 


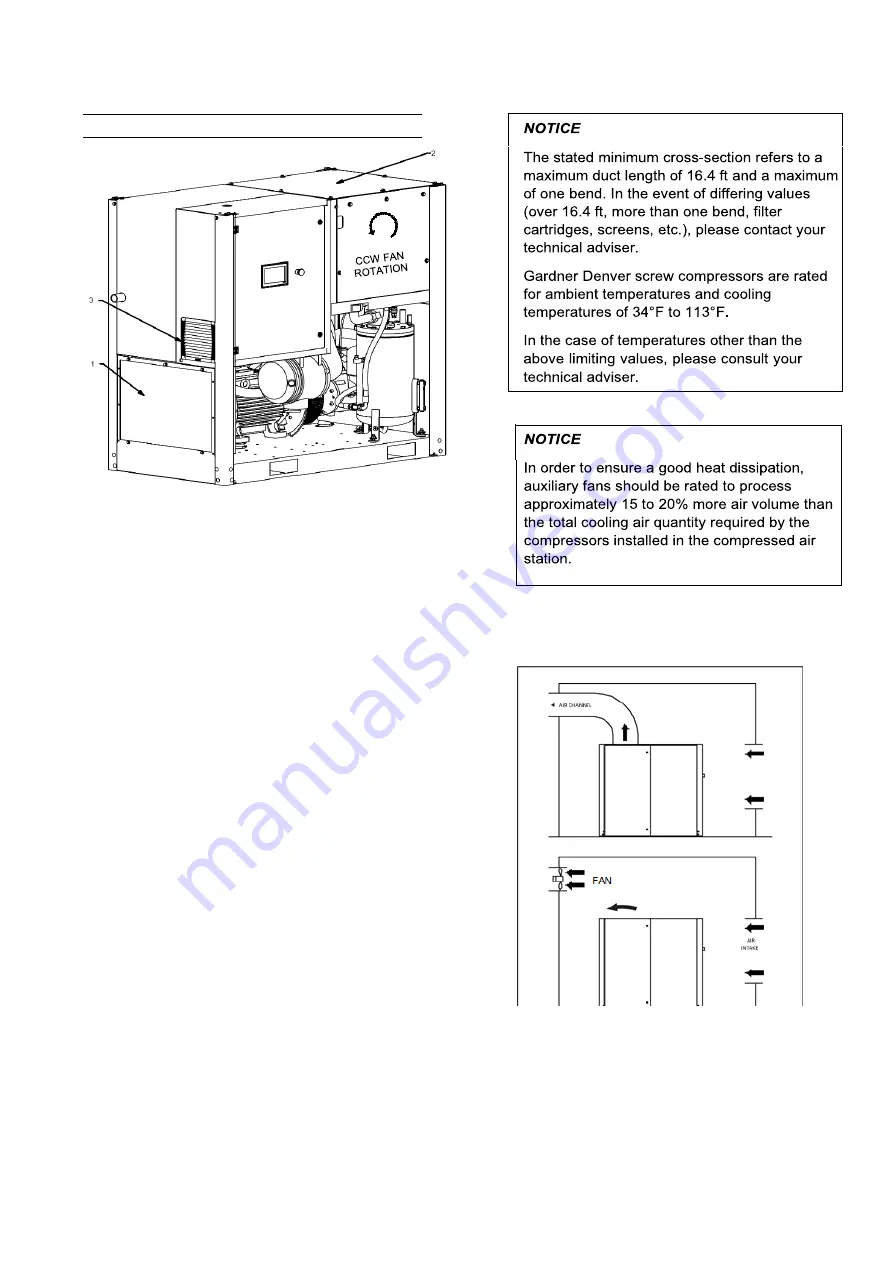
Fig. 9 

Cool air intake 

Cool air exhaust (Fan rotation counter-clockwise) 

Control cabinet cool air intake (L30RS-L45RS only) 


The cooling air volume required by these screw 
compressors is as follows: 

L30 

2296 cfm 

L30RS 

2296 cfm 

L37 

2755 cfm 

L37RS 

2755 cfm 

L45 

3073 cfm 

L45RS 

3073 cfm 


If conditions are not favorable, we recommend the 
installation of venting ducts. However, the velocity 
of the cooling air should not exceed 17ft/sec. We 
recommend  a  minimum  duct  cross-section  of 
approx. 6 ft

2


The figures below show the recommended 
ventilation sections arrangement: 


Fig. 10 

Summary of Contents for L30-45E

Page 1: ...L SERIES FRAME 3 BASE MOUNTED COMPRESSOR Original User and Service Manual MODELS L30 45E 40 50 60 HP LRS30 45E 30 37 45 kW 13 25 637 Version 02 January 20 2020...

Page 2: ...e the compressors are serviced New and edited publications can be obtained from your local Gardner Denver distributor or service center In any communication concerning the compressor it is essential t...

Page 3: ...ctions will result in economical operation and minimum downtime Boxed text formats are used within this manual to alert users of the following conditions Safety Labels are used within this manual and...

Page 4: ...at the system terminal strip of the frequency converter by measuring this between the DC and DC terminals the exact position can be found in the supplied operating manual of the frequency converter b...

Page 5: ...with open doors or loose access panels Read the operator s manual before proceeding withthis task Opening pressure relief valve xx bar value xx see sticker on compressor Handle package at forklift poi...

Page 6: ...13 25 637 v02 Page 5 Fig 1 Your Gardner Denver distributor Name Address Telephone Fax Contact Spare Parts Service...

Page 7: ...t operating conditions Service If you encounter a fault or require spare parts please contact your Gardner Denver representative Trained expert staff will quickly and properly make repairs with genuin...

Page 8: ...equipment station or installing components which have not been approved by the manufacturer e g separator will result in the loss of the CE mark or other factory certifications As a consequence all l...

Page 9: ...hine 18 5 Design and functioning 19 5 1 Design of the unit 19 5 2 System Schematic 20 5 3 Oil circuit 21 5 4 Air circuit 21 5 5 System control 21 5 5 1 Manner of operation of the suction regulator 23...

Page 10: ...ilter cartridge 39 10 6 Changing the fine oil separator 40 10 7 Change of air intake filter 41 10 8 Pressure relief valve 42 10 9 Connecting terminals in the switch cabinet 43 10 10 Screw connections...

Page 11: ...at only authorized personnel use the machine Define who is responsible for operating the machine and authorize him her to ignore instructions from third parties if these instructions could compromise...

Page 12: ...at this safety device should be used for pressures above 60 PSI The steel wire has a diameter of 0 315 and is firmly clamped to the hose at least every 20 Both ends should be fitted with cable lugs Do...

Page 13: ...it up make sure that nobody can be injured by the machine installation as it starts up Compressed air may contain substances that may damage your health if inhaled The compressed air produced by these...

Page 14: ...tem must carry a clearly visible sign with the following note Attention This installation is operated by remote control and can start up without prior warning As an additional safety measure persons w...

Page 15: ...l for the lifting tackle When heavy loads are being conveyed by means of hoisting gear it is imperative to keep well clear of the load in order to avoid accidents The person giving the instructions mu...

Page 16: ...aintenance Danger Safety measure required Components important to safety wear over time Observe the setting maintenance and inspection work and intervals stipulated in the operating manual including i...

Page 17: ...d or attach a warning sign to the main switch Variable speed only Danger of electric shock from loaded condensers Always first disconnect the system from the power supply and wait another 10 minutes b...

Page 18: ...rotected from the ingress of water steam or detergents for safety and or functional reasons in particular electric motors and switch cabinets After cleaning remove the covers masking completely Modifi...

Page 19: ...d special accessories not supplied by the manufacturer are not approved by Gardner Denver Installing or using such products will adversely affect active and or passive safety The manufacturer accepts...

Page 20: ...13 Minimum Pressure Valve Non Return Valve 14 Air Cooler 15 Fine Oil Separator Extraction 16 Oil Temperature Regulator 17 Cooling Fan 18 Cool Air Inlet Filter 19 Compressed Air Outlet 20 Base Frame 21...

Page 21: ...filter monitor S5 11 Oil filter 12 Oil cooler 13 Throttle 14 Non return valve 15 Minimum pressure and non return valve 16 Compressed air after cooler 18 Final compression pressure sensor B2 19 Control...

Page 22: ...the intake air is cooled via the injected oil The developed air oil mixture flows tangentially into the pressure reservoir oil reservoir 6 After pre separation and subsequent fine separation by the se...

Page 23: ...unning in the offload mode The cooling air ventilator 26 is switched on or off in dependence upon the final compression temperature When the pressure at the network pressure sensor 13 B1 does not fall...

Page 24: ...the actuator The suction regulator valve opens the lower control chamber is bled through the pipe 22 by the solenoid valve 7 Y1 Fig 4 Idling mode As soon as mains pressure has been attained both sole...

Page 25: ...n 4 5 of the user manual Never lift the compressor by or tie onto its enclosure A suitable fork lift which complies with local safety regulations must be used when lifting the compressor The fork leng...

Page 26: ...this heat into the surroundings Proper ventilation has a considerable effect on the service life and the performance of a compressor Once the compressor has been installed the R clips 1 Fig 7 can be...

Page 27: ...red by these screw compressors is as follows L30 2296 cfm L30RS 2296 cfm L37 2755 cfm L37RS 2755 cfm L45 3073 cfm L45RS 3073 cfm If conditions are not favorable we recommend the installation of ventin...

Page 28: ...nnection 2 Thread identification of compressed air connection The compressed air line system is connected at the compressed air supply of the screw compressor 1 Fig 11 For this you should use a flexib...

Page 29: ...switch cabinet and tighten screws Connect the supply line to the connecting terminals as shown in the circuit diagram Fig 13 Only for L30RS L45RS There is a risk of electric shock from charged capaci...

Page 30: ...g the oil level gauge on the pressure reservoir 2 Fig 14 The oil level must lie between the maximum oil level 3 Fig 14 and minimum oil level 4 Fig 14 marks on the oil gauge If required top up oil Use...

Page 31: ...an be found in the compressor controller operating manual Temporarily remove the panel in order to check the direction of rotation See 1 Fig 15a for the prescribed direction of rotation of the drive m...

Page 32: ...ake 2 Cooling air outlet 3 Arrow direction of rotation for compressor direction of rotation may deviate from this representation Fig 15b 1 Drive motor direction with direct drive Temperature start up...

Page 33: ...7 4 Open shut off valves between the screw compressor reservoir and pipe Turn on the main power supply switch After the power supply was switched on the compressor controller will boot to the home sc...

Page 34: ...Y STOP button After shutdown the compressor has a run on time of 30 50 seconds soft stop 8 7 Emergency stop The EMERGENCY STOP button is situated next to the compressor controller It is used to immedi...

Page 35: ...ompressors are to be stored for period exceeding six months additional precautions must be taken Compressors which are to be shut down for a lengthy period must also be protected from corrosion Since...

Page 36: ...hange interval by performing oil analysis In the case of a very dirty atmosphere the cleaning intervals have to be shortened as required For order numbers see the spare parts list WARNING High voltage...

Page 37: ...ually check for leakage on the shaft seal replace as required See the parts lists for the kit part number and for the tool kit part number The tool kit is required to change the oil seal If the oil se...

Page 38: ...perature Check control panel for advisory text messages Inspect Clean if necessary Cooler Fan Replace oil filter element Replace air filter element Oil Sample Replace cool air inlet filter pad Control...

Page 39: ...s 96 months 32000 hours 102 months 34000 hours 108 months 36000 hours 114 months 38000 hours 120 months 40000 hours Air oil under pressure will cause severe personal injury or death Shut down the comp...

Page 40: ...r approximately 2 minutes Check for leaks Shut off the screw compressor Wait at least 5 minutes until the oil has settled i e until the air has bubbled out Check the oil level see Section 7 4 The oil...

Page 41: ...the screw compressor unit run for approx 2 minutes Check for leaks Check the oil level see Section 7 4 If necessary top up the oil Changing times for oil filter cartridges Operating conditions e g co...

Page 42: ...eratures the type of operation and the quality of the intake air e g dust content ratio of gaseous foreign substances such as SO2 and solvent vapors have a strong influence on the filter lifespan air...

Page 43: ...ir filter as follows Pull snap latch outward and remove housing base Detach air filter cartridge while slightly turning it Carefully insert new air filter cartridge in the housing Close air filter wit...

Page 44: ...fective pressure relief valve may result in pressure that is too high breaking open parts of the system and causing serious or fatal injury Never operate a screw compressor system with a defective pre...

Page 45: ...change filter with cool air intake and switch cabinet inlet Fig 24 1 Filter mat cool air intake 2 Mounting bolts 3 Sound proofing element 4 Inlet Filter L30RS L45RS only Perform filter mat change as f...

Page 46: ...side A Fig 26 of the filter pad faces the air inlet side Place the louver grille back onto the filter housing Changing times for the filter mat The operating modes and the quality of the suctioned ai...

Page 47: ...ype first completely drain the old oil from the oil circuit If operating temperatures are constantly above 95 F divide the oil change intervals given in Section 10 3 Maintenance schedule by half The e...

Page 48: ...ns pressure has fallen below the lower switching point Unit stops during the 1 start up phase Suction regulator only closes part way pressure builds up too quickly in the pressure reservoir 1 Make the...

Page 49: ...discharge 2 Check the suction regulator and solenoid valve Oil in the compressed air 1 Fine oil separator is defective 1 Replace the fine oil separator cartridge 2 Oil foams 2 Replace the oil 3 Oil le...

Page 50: ...plan Fig 27 all dimensions in mm A Compressed air connection Canada USA version male pipe thread NPT 1 11 B Cool air intake C Cool air outlet D Feed cable entry E Center of gravity F Control cabinet...

Page 51: ...13 25 637 v02 Page 50 Fig 28 all dimensions in mm Lifting Slots...

Page 52: ...For additional information contact your local representative or visit www contactgd com compressors 2020 Gardner Denver Inc Printed in U S A...

Reviews: