background image

18

 Caution

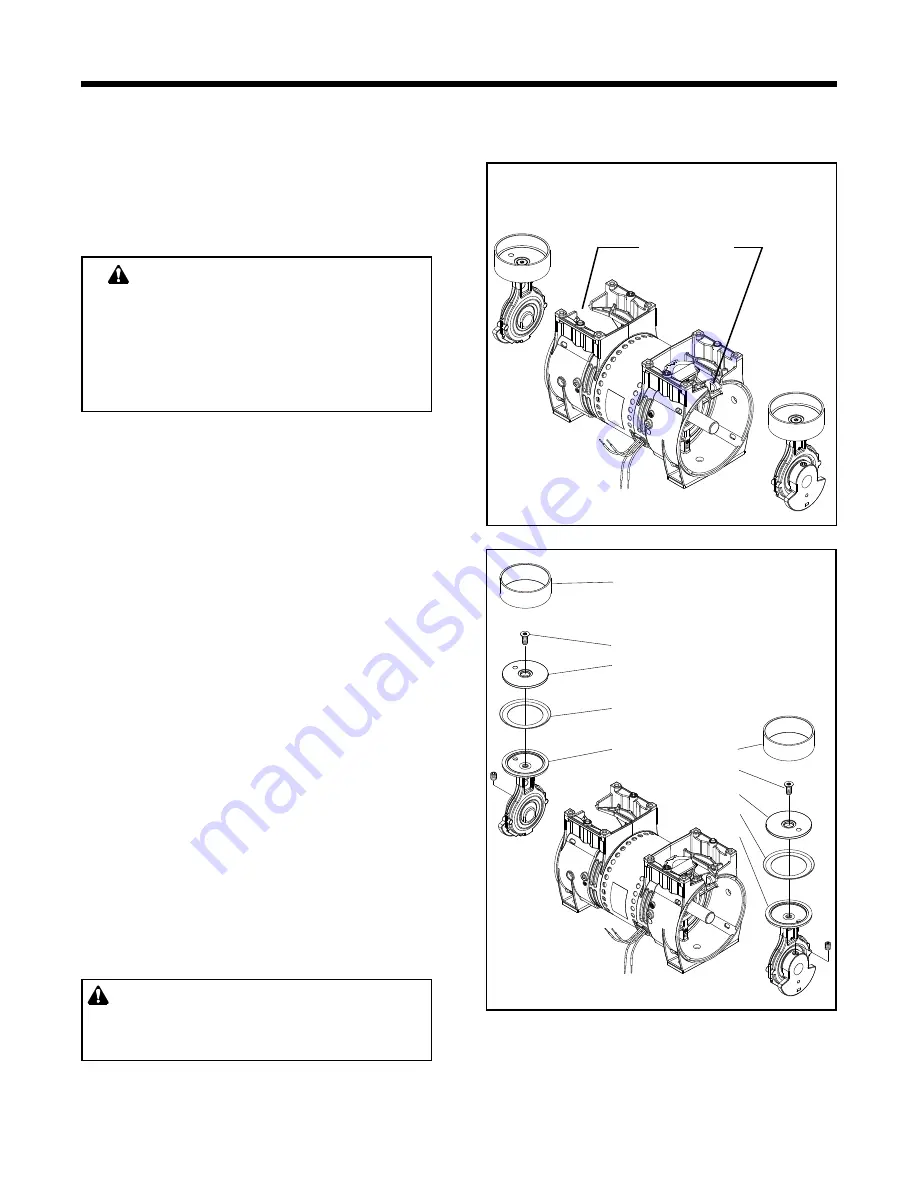
Do not crimp the piston cup (4) 

when you remove the connecting 

rod assembly from the compressor 

housing.  If the cup is crimped, you 

must replace it.

3.  Make sure the connecting rod is at "Top 

Dead Center".  Slide the connecting rod 
assembly straight off the shaft through the 
opening in the housing.

Opening in
Housing

Rebuilding Connecting Rod Assemblies

If you are rebuilding the connecting rod assembly 

using component parts, follow this procedure:


When replacing the piston cup (4), be sure to 

replace the sleeve (1) at the same time. Place 

the con rod shaft in a fixture before attempting 

to remove the retainer screw.  Heat will help 

to dissolve the loctite bond.

1.  Remove the retainer screw (2) from the cup 

retainer.

2.   Remove the retainer (3) from the connecting 

rod.

3.   Remove the cup (4) and discard.

4.  Place the new piston cup (4) on the connecting 

rod.

5.   Place a piston cup retainer (3) on the 


cup/connecting rod making sure the boss of 

the retainer is seated in the pilot of the rod.

6.   Insert the retainer screw (2) into the connecting 

rod (5) and tighten to 95-105 inch-pounds.


Attention

To replace the connecting rod and

bearing assembly turn to page 19.

Note:
Both Connecting Rods shown for orientation, DO 
NOT remove both at once.

1

2
3

4

5

1
2
3
4
5

Summary of Contents for Thomas 2660AT32-492W

Page 1: ...Field Service Manual FOR MODEL NUMBER 2660AT32 492W 2006 Gardner Denver Thomas Inc FSM 0182 04 06...

Page 2: ...2...

Page 3: ...e and Troubleshooting Guide 9 Required Tools and Materials 11 Component Repair 12 Servicing the Valve Assembly 13 Rebuilding the Connecting Rod Assembly 17 Replacing the Connecting Rod and Eccentric A...

Page 4: ...ILAR PRODUCTS AND THEIR COMPONENTS Please Note The model s represented in this manual may have additions and or modi cations made at any time Pictures represent a standard unit series and an actual un...

Page 5: ...e use eye and face protection when servicing this unit CAUTION To avoid personal injury especially to eyes and face never point the exhaust air ow at yourself or other people in the area Unit is capab...

Page 6: ...6 Exploded View and Parts List Exploded View of the Thomas 2660AT32 492W...

Page 7: ...p Retainer 4 626392 1 2 Piston Cup Retainer 5 618114 1 2 Cylinder Sleeve 6 610534 1 Head 7 623143 2 O Ring Head Gasket 8 625175 8 Screw Head 9 621591 2 Valve Plate Assembly 10 617177 1 2 Valve Restrai...

Page 8: ...8 Use this wiring diagram to connect your compressor to the power source Wiring Diagram 2660AT32 492W LINE LINE CAPACITOR BLUE RED BROWN RED...

Page 9: ...lowing service to minimize unexpected downtime for your compressor Replace the connecting rods or piston cups and sleeves Replace the apper valves Replace the head gasket O rings Replace the valve pla...

Page 10: ...r valves x x x Debris in valves Remove debris and check for valve damage x x x Damaged gaskets Replace gaskets x x x Worn Cup Replace connecting rod assembly or cup x x x Loose head screws Tighten hea...

Page 11: ...pper valve screw and pipe plugs Torx T 25 driver for head screws 5 32 Allen wrench attachment for torque wrench for eccentric set screw 1 4 Hex Socket attachment for torque wrench for apper valve scre...

Page 12: ...ad 1 Disconnect the power 2 Disconnect all air lines and remove compressor from the enclosure 3 Remove all screws 1 that fasten the head 2 to the compressor housing 4 Carefully separate the head from...

Page 13: ...d lift off the apper valve 4 2 Remove any debris from the valve plate with a damp lint free cloth Soaps and detergeants should not be used due to the potential for corrosion from soap residue 3 Placet...

Page 14: ...oles in all of the valve components and insert the apper valve screw 5 into the valve plate 8 Make sure the apper valve is centered over the port and that all of the other components line up with the...

Page 15: ...valve 3 1 2 3 Port 1 Port 2 2 Clean any debris with a soft damp cloth Turn the compressor head upside down and place the valve plate on the compressor head and orient it as illustrated Note the positi...

Page 16: ...lve is centered over the Port and that the valve keeper strip lines up with the apper valve Caution Do not overtighten the apper valve screw or it will shear off in the valve plate 7 Tighten the apper...

Page 17: ...r piston cups and sleeves Valve plate gasket O ring s Head gasket O ring s if defective Removing the Connecting Rod Assembly and Eccentric NOTE ONLYREMOVEONECONNECTINGROD ASSEMBLY AT A TIME 1 Carefull...

Page 18: ...ve 1 at the same time Place the con rod shaft in a xture before attempting to remove the retainer screw Heat will help to dissolve the loctite bond 1 Remove the retainer screw 2 from the cup retainer...

Page 19: ...t on shaft Slide connecting rod assembly over shaft through front of housing with eccentric toward end of shaft Push connecting rod assembly tight against housing bearing 2 Rotate eccentric to line up...

Page 20: ...Caution To prevent damage to the compressor never apply any sealant or lubrication to the O rings 1 InsertanewheadgasketO ringintothegroove located on the top of the valve plate 2 Insert the valve pla...

Page 21: ...e sure that the connecting rod sleeves are seated against the compressor housing 4 Observe the orientation of the valve plate assemblies The tabs on the valve plate indicate exhaust side Place them on...

Page 22: ...ger over the port as you turn the fan You should feel a slight suction with each rotation of the fan If you don t feel suction or if you feel or hear a thump as you turn the fan DO NOT CONNECT THE UNI...

Page 23: ...23 NOTES...

Page 24: ...24...

Reviews: