background image

12

GB

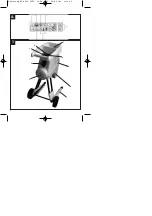
7  Chassis
8  Discharge opening
9  Motor protection switch

5. Proper use

This electric garden refuse shredder is designed only
for shredding organic garden waste. Place biologi-
cally degradable material, e.g. leaves, branches,
dead flowers etc., into the loading funnel inlet. 

Collecting the shredded material

A container can be placed underneath the ejector
opening to catch the shredded material.

6. Before starting up

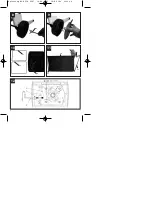
6.1 Assembly (Fig. 2-11)

7. Starting up

7.1 ON/OFF switch (Fig. 1 / item 3)

Press the green knob to switch on the shredder.

Press the red knob to switch it off. 

Important:

The machine has a zero voltage switch.

This prevents the machine restarting unintentionally
after a power failure.

7.2 Switch for selecting the direction of rotation
(Fig. 1 / Item 4)
Important! The switch for selecting the direction
of rotation can only be moved when the shredder
is switched off.

Position “

⇓⇓

The material is automatically drawn in by the blade
and shredded.

Position “

⇑⇑

The blade rotates in the opposite direction to release
jammed material. After moving the selector switch to
the “

⇑⇑

” position, press and hold the green knob of the

ON/OFF switch. The blade will start to rotate in the
opposite direction. As soon as you release the
ON/OFF switch, the shredder will stop automatically. 

Important! Always wait until the shredder has
reached a standstill before you switch it on again.

Large items or pieces of wood will be discharged
both in the cutting and in the release direction after
the blade has been started and reversed several
times.

7.3 Anti-blocking function
Important: 

If the cutter drum jerks to a halt (e.g. due

to branches too thick for it to handle) the direction of
rotation will normally change automatically to reverse
running mode (but the direction selection switch (Fig.
1 / Item 4) remains in forwards running mode).

Turn off the machine and wait until it stops complete-
ly. The machine can now be restarted in forwards
running mode with the green ON button (Fig. 1 / Item
3).

7.3.1 Motor protection (Fig. 1 / Item 9)

An overload (for example if the blade is jammed) will
cause the machine to cut out after a few seconds. To
protect the motor from damage the motor protection
switch stops the power supply automatically. Wait for
at least one minute before you press the reset knob
so that you can restart the machine.

Then press the ON/OFF switch.

If the blade becomes jammed, turn the switch for
selecting the direction of rotation to the left to position

⇑⇑

” before you switch on the shredder again.

7.4 Practical tips 

Read the special and general safety instructions 
(section 1).

Wear work gloves, goggles and ear protection.

Place the material you wish to shred into the 
opening on the right-hand side (the blade rotates 
anti-clockwise).

The material is drawn into the shredder automati-
cally.  CAUTION! Long pieces of material pro-
jecting out of the funnel inlet may whiplash when it 
is drawn in – keep a safe distance between your-
self and the machine.

Judge the quantity of material which you put into 
the funnel inlet so that the funnel does not clog. 

If you want to shred withered, damp material that 
has been lying in the garden for several days, 
alternate between putting in this material and 
branches. This will help to prevent the loading 
funnel becoming clogged with material.

Do not shred soft waste (e.g. kitchen waste) – put 
it straight in the compost box.

Entangled branches and leaves should be 
thoroughly shredded before loading any more 
material.

Do not allow the discharge opening to become 
clogged with shredded material – risk of pile-ups.

Do not cover the ventilation slits.

Do not place heavy material or thick branches into 

Anleitung GLH 250 SPK7  14.06.2005  14:08 Uhr  Seite 12

Summary of Contents for GLH 250

Page 1: ...zioni Biotrituratori Betjeningsvejledning Kompostkv rn Bruksanvisning Kompostkvarn K ytt ohje S hk k ytt inen puutarhasilppuri N vod k obsluze Zahradn drti Navodila za uporabo vrtnega rezalnika Naputa...

Page 2: ...2 1 A 2 4 6 3 8 7 5 1 9 Anleitung GLH 250 SPK7 14 06 2005 14 08 Uhr Seite 2...

Page 3: ...3 5 2 3 4 6 2 4 3 1 10 7 1 5 2 10 4 9 7 8 9 1 1 9 6 9 5 10 5 6 Anleitung GLH 250 SPK7 14 06 2005 14 08 Uhr Seite 3...

Page 4: ...4 11 8 9 10 12 7 8 3 11 11 12 12 11 11 Anleitung GLH 250 SPK7 14 06 2005 14 08 Uhr Seite 4...

Page 5: ...tungen z B Auswurfeinrichtung m ssen verwendet werden Nicht mit den H nden in den Trichter oder Auswurf ffnung fassen Allgemeine Sicherheitshinweise Vor Inbetriebnahme muss das Ger t korrekt zusammeng...

Page 6: ...abzuwarten Vor dem Verlassen des Ger tes ist der Motor stillzusetzen und der Netzstecker zu ziehen Bevor Sie das Ger t an das Stromnetz anschlie en versichern Sie sich dass der F lltrichter gut mit de...

Page 7: ...ichtigt wie der anl uft 7 2 Drehrichtungsumschalter Abb 1 Pos 4 Achtung Nur bei abgeschaltetem H cksler kann der Drehrichtungsumschalter bet tigt werden Stellung Vom Messer wird das Material automatis...

Page 8: ...en Betrieb ist es n tig dass der Abstand zwischen Gegenmesser Pos B und H ckselmesser Pos A ca 0 50 mm betr gt Auf der rechten Seite des Kunststoffgeh uses befin det sich hierzu eine Einstellvorrichtu...

Page 9: ...zu Zeit auf festen Sitz Wenn Sie den H cksler l nger nicht benutzen sch tzen Sie ihn mit umweltfreundlichem l vor Korrosion 10 Ersatzteilbestellung Bei der Ersatzteilbestellung sollten folgende Angabe...

Page 10: ...nlet or discharge opening Additional Safety information The shredder must be assembled correctly before it is put into operation Examine the shredder each time before you use it Do not use the trimmer...

Page 11: ...ation is usually a sign that something is wrong If the connection lead for this machine is damaged it must be replaced by the manufacturer or its after sales service or similarly trained personnel to...

Page 12: ...t the direction selection switch Fig 1 Item 4 remains in forwards running mode Turn off the machine and wait until it stops complete ly The machine can now be restarted in forwards running mode with t...

Page 13: ...on of rotation Material blockage in the funnel Move the switch for selecting the direction of rotation to position and switch on the shredder Pull the material out of the funnel Feed in thick branches...

Page 14: ...circuit le moteur la tr mie de remplissage doit tre compl tement mont e et bien tenir Il est conseill de porter une protection de l ou e Ne mettez pas les mains l int rieur de la tr mie ni dans l orif...

Page 15: ...de la prise de courant Utilisez exclusivement des pi ces de rechange d origine pour l entretien Ne faites ex cuter les r parations que par un sp cialiste lectricien Avant de mettre la machine en servi...

Page 16: ...est automatiquement pris et hach par le couteau Position Le couteau fonctionne dans le sens de rotation inver se et lib re le mat riau coinc Apr s avoir mis l inverseur du sens de rotation en positio...

Page 17: ...uit du contre couteau Pour un ser vice optimal il est n cessaire que l cart entre le contre couteau rep B et le couteau hacher rep A s l ve env 0 50 mm Vous trouverez pour ce faire un dispositif de r...

Page 18: ...r es 10 Commande de pi ces d tach es Il faut indiquer les donn es suivantes en cas de com mande de pi ces de rechange le type de l appareil le num ro d article de l appareil le num ro d identificatio...

Page 19: ...ulsi n No acerque las manos al interior de la tolva ni al orificio de expulsi n Instrucciones generales de seguridad Antes de la puesta en marcha el aparato ha de estar montado correctamente Antes de...

Page 20: ...de aver a Para su mantenimiento utilice nicamente piezas de recambio originales Las reparaciones s lo debe llevarlas a cabo un electricista profesional Si el cable conector de este aparato se deterio...

Page 21: ...4 Atenci n El conmutador inversor del sentido de giro solo se podr accionar con la trituradora desconectada Posici n El material ser captado y triturado de forma autom tica por la cuchilla Posici n La...

Page 22: ...r aparato a tal efec to nicamente en caso de desgaste Para obtener un funcionamiento ptimo asegurar que la distancia entre la contracuchilla pos B y la cuchilla triturado ra pos A sea de aprox 0 50 mm...

Page 23: ...illos de fijaci n del bastidor Si no utiliza la trituradora durante un espacio de tiempo prolongado prot jala de la corrosi n de forma ecol gica 10 Pedido de piezas de repuesto A la hora de pasar pedi...

Page 24: ...ima di avviare o inserire il motore la tramoggia di riempimento deve essere completamente montata e ben fissata Si consiglia di utilizzare delle cuffie antirumore Non inserite le mani nell imbuto o ne...

Page 25: ...ente assicuratevi che la tramoggia di riempimento sia ben collegata alla carcassa del motore Se il trituratore dovesse vibrare eccessivamente spegnere il motore staccare la spina dalla presa di corren...

Page 26: ...ferma automaticamente Attenzione Aspettate sempre che il trituratore si fermi completamente prima di reinserirlo Gli oggetti o i pezzi di legno di grandi dimensioni si possono togliere attivando pi vo...

Page 27: ...ata e posso no cadere piccoli trucioli di metallo dall apertura di scarico Questo non rappresenta un anomalia tutta via si deve eseguire la correzione solo quanto basta altrimenti la controlama si con...

Page 28: ...e quanto segue modello dell apparecchio numero dell articolo dell apparecchio numero d ident dell apparecchio numero del pezzo di ricambio del ricambio ssitat Per i prezzi e le informazioni attuali si...

Page 29: ...oplysninger Inden apparatet tages i brug skal det monteres korrekt Hver gang inden arbejdets p begyndelse skal apparatet kontrolleres Brug ikke apparatet hvis sikkerhedsanordningerne er beskadigede el...

Page 30: ...Brug aldrig reserve og tilbeh rsdele som produ centen ikke har tilt nkt eller anbefalet Tr k netstikket ud inden kontrol reng ring og arbejde p maskinen samt n r den ikke er i brug Hvis tilslutningsle...

Page 31: ...igen med den gr nne t nd knap fig 1 pos 3 7 3 1 Motorbeskyttelsesafbryder fig 1 pos 9 Overbelastes motoren f eks fordi knivene blokerer standser kv rnen efter et par sekunder For at beskytte motoren m...

Page 32: ...materialet ud af trag ten Tykke grene f res i igen s ledes at kniven ikke med det samme griber fat i de samme ind hak Fr sev rket er blokeret S t rotations inverteren i position og t nd for kompostkv...

Page 33: ...ras samman p r tt s tt Kontrollera maskinen optiskt varje g ng innan du anv nder den Anv nd inte maskinen om s ker hetsanordningarna r skadade eller slitna S tt aldrig s kerhetsanordningarna ur kraft...

Page 34: ...Se alltid till att dina h nder och f tter inte r i n rheten av sk ranordningen framf r allt n r du kopplar in motorn Anv nd endast reserv och tillbeh rsdelar som r avsedda f r maskinen eller har reko...

Page 35: ...n du sl r p den igen St rre f rem l eller virkesbitar kan tas ut om s v l finf rdelnings och frig ringsriktningen kopplas in omv xlande 7 3 Anti blockeringsfunktion Varning Om sk rvalsen blockeras pl...

Page 36: ...rs t llningsknappen H ll str mbrytaren intryckt f r att sl p kompostkvarnen efter en kort tid Om blockeringen har tg rdats st ll tillbaka omkopp laren f r rotationsriktningen i l ge Str mavbrott Kontr...

Page 37: ...ation finns p www isc gmbh info 11 Avfallshantering Tillbeh r och f rpackningsmaterial kan l mnas in f r milj v nlig tervinning Plastdelarna har markerats f r att underl tta k llsorteringen Anleitung...

Page 38: ...Ennen joka k ytt tarkista laite silm m r ises ti l k yt konetta jos sen turvallisuusvarusteet ovat vahingoittuneet tai loppuunkuluneet l koskaan poista turvavarusteita K yt konetta ainoastaan sen t ss...

Page 39: ...oimakas t rin on yleens merkki toiminta h iri st Jos t m n laitteen verkkojohto vahingoittuu tulee valmistajan tai h nen huoltopalvelunsa tai vas taavasti ammattitaitoisen henkil n vaihtaa se uuteen j...

Page 40: ...Sitten voit k ynnist laitteen uudelleen vihre ll n pp imell kuva 1 kohta 3 eteenp ink yntiin 7 3 1 Moottorinsuoja kuva 1 kohta 9 Ylikuormitus esim terien kiinnijuuttuminen johtaa parin sekunnin kulutt...

Page 41: ...ytkin asentoon ja k ynnist silppuri Ved materiaali ulos suppilos ta Sy t paksut oksat uudelleen jotta ter ei osu heti jo aiemmin leikattuihin viiltoihin Silppuriter on juuttunut kiinni Kytke kiertosuu...

Page 42: ...hazovac ho otvoru V eobecn bezpe nostn opat en P ed uveden m do provozu mus b t p stroj spr vn smontov n P ed ka d m pou it m proved te vizu ln kontro lu p stroje P stroj nepou vejte pokud jsou bezpe...

Page 43: ...ifiko vanou osobou aby se zabr nilo nebezpe m P ed uveden m stroje do provozu a po jak mko liv n razu p ekontrolujte stroj zda nevykazuje znaky opot eben nebo po kozen a nechejte prov st nutn opravy R...

Page 44: ...ov n 7 3 Protiblokovac funkce Pozor Je li v lec s no i n hle zablokov n nap moc siln mi v tvemi zm n se v norm ln m p pad sm r ot en automaticky na zp tn chod reverza n sp na obr 1 pol 4 p itom z sta...

Page 45: ...kov n odstran no d t reverza n sp na zp t do polohy V padek proudu Zkontrolovat s ov veden z str ku a pojistky Drcen materi l nen vtahov n ezac n b dozadu Zm nit sm r ot en Nahromad n materi lu v n sy...

Page 46: ...so dobavljene skupaj z elektri nim vrtnim rezalni kom n pr izmetalna naprava Rok ne smete vtikati v lijak ali v izpraznjevalno odprtino Splo na varnostna navodila Pred prvim zagonom je napravo potreb...

Page 47: ...a vzdr evanje uporabljajte le originalne nado mestne dele Popravila lahko izvaja le strokovnjak za elektriko e se priklju ni kabel te naprave po koduje ga naj zamenja proizvajalec ali njegova servisna...

Page 48: ...otno smer e stikalo za vklop izklop spustite se no i avtomatsko ustavijo Pozor Preden rezalnik ponovno vklopite je vedno potrebno po akati da se rezalnik ustavi Ve je predmete ali lesene kose lahko ta...

Page 49: ...eri ker se druga e nasprotni no pred asno obrabi 8 Iskanje napak Motor ne deluje Ohi je motorja se je aktiviralo Po akajte 1 minut in napravo ponovno za enite Prekinitev toka Preverite omre no napelja...

Page 50: ...orabe provedite vizualnu provjeru uredjaja Ne upotrebljavajte uredjaj kada su sigurnosne naprave o te ene ili istro ene Nika da ne stavljajte sigurnosne naprave van funkcije Upotrebljavajte uredjaj is...

Page 51: ...sobito kada uklju ujete motor Nikada ne upotrebljavajte rezervne dijelove ili pri bor koje proizvodja nije predvidio ili preporu io Izvadite utika prije provjera i enja ili radova na stroju te dok ga...

Page 52: ...zastop nog aktiviranja stroja uklanjaju u smjeru rezanja kao i u smjeru slobodne vrtnje 7 3 Funkcija protiv blokiranja Pa nja Ako se blokira valjak za rezanje uz trzaj npr zbog debele grane u normalno...

Page 53: ...lju ivanje tako da se nakon kra eg vremena sjeckalica uklju i Ako je blokada uklonjena preklopnik za smjer vrtnje vratite u polo aj Prekid struje Provjerite mre ni kabel utika i osigura Ne uvla i se m...

Page 54: ...i olan koruma tertibat lar n n rne in f rlatma tertibat kullan lmas zorunludur Huni veya f rlarma deli inin i ine elinizi sokmay n Genel g venlik uyar lar Aleti al t rmadan nce aletin par alar do ru e...

Page 55: ...ad n kontrol edin t c de anormal derecede titre me oldu unda motoru kapat n fi i prizden kar n ve derhal ar zan n sebebini aray n t c de anor mal derecede titre me olmas ar za i aretidir Aletin bak m...

Page 56: ...mdayken bas labilir Pozisyonu Malzeme b ak taraf ndan otomatik olarak ekilir ve t l r Pozisyonu B ak ters y nde al r ve s k an malzeme serbest kal r D nme y n alteri pozisyonuna ayarland ktan sonra ye...

Page 57: ...bu i lem i in bir ayar tertibat bulunur Civatay c sa y ne d nd rd n zde tertibat t c b a y n ne hareket eder Civatay yar m tur d nd rd kten sonra kar b a 0 50 mm t c b a na yakla t rm olursunuz Ayarla...

Page 58: ...k par an n yedek par a numaras G ncel fiyatlar ve bilgiler internette www isc gmbh info sayfas nda bulunur 11 Aletin ar t lmas Alet aksesuar ve ambalaj malzemeleri evre dostu bir geri kazan m sistemin...

Page 59: ...a daki uygunluk a kla mas n sunar I dichiara la seguente conformit secondo la direttiva UE e le norme per l articolo attesterer f lgende overensstemmelse i henhold til EU direktiv og standarder for p...

Page 60: ...ces 5 ans La garantie est valable pour l ensemble de la R publique F d rale d Allemagne ou des pays respectifs du partenaire commercial principal en compl ment des prescriptions l gales locales Veuill...

Page 61: ...hnical changes subject to change Sous r serve de modifications Salvo modificaciones t cnicas F rbeh ll f r tekniska f r ndringar Oikeus teknisiin muutoksiin pid tet n Der tages forbehold f r tekniske...

Page 62: ...As an alternative to returning the electrical device the owner is obliged to cooperate in ensuring that the device is properly recycled if ownership is relinquished This can also be done by handing o...

Page 63: ...mfattet heraf er tilbeh rsdele og hj lpemidler som ikke indeholder elektroniske komponenter E S lo para pa ses miembros de la UE No tire herramientas el ctricas en la basura casera Seg n la directiva...

Page 64: ...tteenpoistom r ysten mukaisesti hy dynt en k ytt kelpoiset raaka aineet T m ei koske k yt st poistettaviin laitteisiin kuuluvia lis varusteita tai apulaitteita joissa ei ole s hk osia Pouze pro lensk...

Page 65: ...ar n adesi Yerine Uygulanacak Geri D n m Alternatifi Kullan lm elektrikli alet ve cihaz sahipleri bu e yalar n iade etme yerine alternatif olarak y netmeliklere uygun olarak al an geri d n m merkezler...

Page 66: ...une des deux exigences a ou b L entreprise d lectricit peut imposer des restrictions pour le raccordement du produit I Il prodotto soddisfa i requisiti della norma EN 61000 3 11 ed soggetto a condizio...

Page 67: ...a anv ndas uppfyller ett av ovan n mnda villkor a eller b Energidistributionsbolaget kan utf rda inskr nkningar f r anslutning av denna produkt Produkt spl uje po adavky normy EN 61000 3 11 a podl h p...

Page 68: ...af skriftligt materiale ledsagepapirer indbefattet som omhandler produkter er kun tilladt efter udtrykkelig tilladelse fra ISC GmbH Eftertryck eller annan duplicering av dokumentation och medf ljande...

Reviews: