
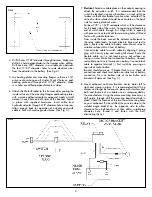
2. Measure the distance on your outboard motor between the
cavitation plate and the upper inside edge of the mounting
clamp. Cut a stick to this length and tape it to the mounting
board with one end flush with the top of the board. (See
Fig. 3)
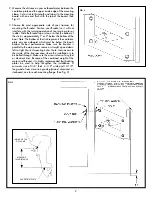
3. Choose the most appropriate side of your transom for
mounting the Bracket. Position your Bracket so it will not
interfere with the turning operation of your main motor or
rudder. Slide the Bracket up or down so that the bottom of
the stick is approximately 1” or 2” below the bottom of the
boat. Note: The bottom of the stick represents the cavitation
plate on your outboard which must be below the boat’s
bottom for best performance. Make sure the bracket is
parallel to the main power source or straight up and down
left to right. Mark 4 mounting holes. Note: Gain access to
the inside of the transom area where the installation is to
be bolted through. Make sure the area is clear of any fuel
or electrical lines. Because of the combined weight of the
motor and Bracket, it is highly recommended that backing
plates be used to help strengthen the installation. A
minimum size of 3/4” thick, 4-1/2” wide and 10-1/2”
long made from a marine grade plywood, aluminum or
starboard, one for each mounting flange. (See Fig. 3)
FIG. 2
FIG. 3
2
INSIDE OF TOP
OF CLAMP
MEASURE
THIS DISTANCE
CAVITATION PLATE


