background image

-


2

0

 -

maintenance. 

2.

Important:

 Never use abrasives or solvents to clean the treadmill. To prevent damage to the

computer, keep liquids away and keep it out of direct sunlight. 

3.

After each workout: 

Wipe off the console and other treadmill surfaces with a clean, water

dampened soft cloth to remove excess perspiration 

4.

Weekly:

 Use of a treadmill mat is recommended for ease of cleaning. Dirt from your shoes

contacts the belt and eventually makes it to underneath the treadmill.


Vacuum the 

underneath treadmill once a week. 

BELT ADJUSTMENT:


Belt adjustment and tension performs two functions: adjustment for tension and centering. The 

running belt has been adjusted properly at the factory. However transportation, uneven flooring or 

other unpredicted reasons could cause the belt to shift off center resulting in the belt rubbing with 

the plastic side rail or end caps and possibly causing damage. To adjust the belt back to it proper 

position please follows the directions below: 

1.

Walking belt has shifted to the left:

First unplug the power cord from the surge protector. Using the hex key provided, turn the left

rear roller adjustment bolt 1/4 turn in the clockwise direction. Plug the power cord back into

the surge protector and run the treadmill at 2.5 mph. You should see the belt start to correct

itself, moving back towards the center. Repeat the above procedure until the walking belt is

centered.  It  may  be  necessary  to  set  walking  belt  tension  once  you  have  completed  this

procedure  if  the  belt  fe

els like it  is  slipping  while  walking.  Refer  below  to  the  “Walking  belt

slipping” instructions.

2.

Walking belt has shifted to the right:

First  unplug  the  power  cord  from  the  surge  protector.  Using  the  hex  key  provided,  turn  the

right rear roller adjustment bolt 1/4 turn in the clockwise direction. Plug the power cord back

into  the  surge  protector  and  run  the  treadmill  at  2.5  mph.  You  should  see  the  belt  start  to

correct itself, moving back towards the center. Repeat the above procedure until the walking

belt is centered. It may be necessary to set walking belt tension once you have completed this
procedure  if  the  belt  feels  like  it  is  slipping  while  walking.  Refer  below  to  the  “Walking  belt
slipping” instructions.

3.

Walking belt is slipping:

First unplug the power cord from the surge protector. Using the hex key provided, turn both the

left and right rear roller adjustment bolts the same distance, usually a 1/4 turn in the clockwise

direction. Plug the power cord back into the surge protector and run the treadmill at 2.5 mph.

You  should  now  walk  on  the  belt  to  determine  if  the  belt  is  still  slipping.  Repeat  the  above

procedure until the walking belt is not slipping. The tension should be just tight enough not to

slip.

WARNING! Do not over tighten rollers! This will cause premature roller bearing failure! 

Summary of Contents for toorx EXPERIENCE

Page 1: ...Ed Rev INSTRUCTION 08 21 GRLDTOORXEXPERI 00...

Page 2: ...5 EXPLODED DRAWING...

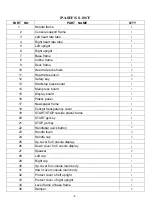
Page 3: ...rd 1 15 Display board 1 16 Plastic panel 1 17 Newspaper frame 1 18 Cockpit transparency cover 1 19 START STOP outside plastic frame 1 20 START gel key 1 21 STOP gel key 1 22 Handlebar quick button 2 2...

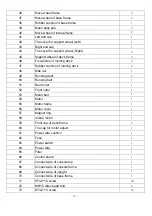
Page 4: ...ng deck 4 48 Side rail 1 49 Running deck 1 50 Running belt 1 51 Rear roller 1 52 Front roller 1 53 Motor belt 1 54 Motor 1 55 Motor frame 1 56 Motor cover 1 57 Magnet ring 1 58 Incline motor 1 59 Fron...

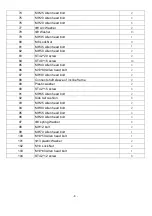
Page 5: ...86 M10 80 Allen head bolt 2 87 M8 30 Allen head bolt 2 88 Connect shaft sleeve of incline frame 2 89 Plastic washer 2 90 ST4 2 15 screw 6 91 M8 65 Allen head bolt 2 92 Side rail cushion 8 93 M8 25 Al...

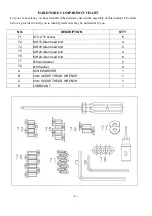
Page 6: ...is provided to help you to identify items that may be unfamiliar to you NO DESCRIPTION Q TY 71 ST4 2 15 screw 8 72 M8 15 Allen head bolt 4 74 M8 25 Allen head bolt 2 75 M8 20 Allen head bolt 4 76 M8 2...

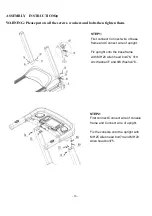
Page 7: ...ct Connect wire of base frame and Connect wire of upright Fix upright onto the base frame with M8 20 Allen head bolt76 8 Arc Washer77 and 8 Washer78 STEP2 First connect Connect wire of console frame a...

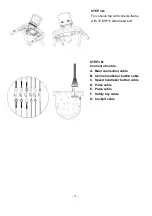
Page 8: ...with console frame with 72 M8 15 Allen head bolt STEP3 B Connect all cable A Main connection cable B Incline handlebar button cable C Speed handlebar button cable D Pulse cable E Pulse cable F Safety...

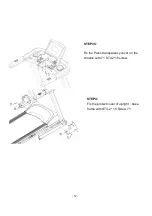
Page 9: ...12 STEP4 Fix the protect cover of upright base frame with ST4 2 15 Screw 71 STEP3 C Fix the Press transparency cover on the console with 71 ST4 2 15 screw...

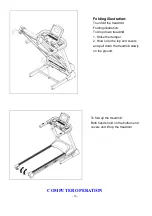
Page 10: ...d the treadmill Folding illustration To drop down treadmill 1 Strike the damper 2 Hold on to the top end covers and pull down the treadmill slowly on the ground To fold up the treadmill Both hands hol...

Page 11: ...wn changes d User mode User mode U1 U4 manual input time speed and lift e HRC There are 4 programs HRC1 HRC2 HRC3 HRC4 HRC you can set the time age weight and display the maximum heart rate of the cur...

Page 12: ...set the lift f Set the target program In standby mode after pressing TARGET the dot matrix window will display TIME by default Press the MODE button to cycle through the time distance calories and st...

Page 13: ...strap and the speed and lift will be adjusted according to the current heart rate compared to the target heart rate Speed change relationship A Change frequency HRC detects heart rate every 30 seconds...

Page 14: ...ach section 5 of the dot matrix window is set press ENTER to enter the next section of setting 2 The second step will flash repeat all 30 steps 3 After setting all the 30 segment programs press ENTER...

Page 15: ...6 5 7 7 10 8 5 0 P 13 spd 2 4 6 8 6 6 5 5 4 4 3 4 6 8 6 6 5 5 4 4 3 4 6 8 6 6 5 5 3 2 inc 5 7 7 5 7 4 6 6 7 8 10 10 3 3 5 5 7 7 8 8 10 8 6 4 6 6 8 8 10 0 P 14 spd 3 4 6 8 10 8 6 6 5 5 4 4 6 8 10 8 6...

Page 16: ...tant Never use abrasives or solvents to clean the treadmill To prevent damage to the computer keep liquids away and keep it out of direct sunlight 2 Inspect and tighten all parts of the treadmill regu...

Page 17: ...moving back towards the center Repeat the above procedure until the walking belt is centered It may be necessary to set walking belt tension once you have completed this procedure if the belt feels li...

Page 18: ...ons below Please use Lube N Walk or a non petroleum based silicone such as Napa 8300 available at most stores TO APPLY LUBRICANT TO THE WALKING BELT 1 Position the walking belt so that the seam is loc...

Page 19: ...GARLANDO SPA Via Regione Piemonte 32 Zona Industriale D1 15068 Pozzolo Formigaro AL Italy www toorx it info toorx it...

Reviews: