For more information, see the appendix (
).
Conducting an FTP Test
Before you can conduct a test to determine your functional
threshold power (FTP), you must have a paired power meter
and heart rate monitor (
).
1
Select
>
My Stats
>
FTP
>
FTP Test
>
Ride
.
2
Select to start the timer.
After you begin your ride, the device displays each step of
the test, the target, and current power data. A message
appears when the test is complete.
3
Select to stop the timer.
4
Select
Save Ride
.
Your FTP appears as a value measured in watts per
kilogram, your power output in watts, and a position on the
color gauge.
Automatically Calculating FTP
Before you can conduct a test to determine your functional
threshold power (FTP), you must have a paired power meter
and heart rate monitor (
).
1
Ride at a steady, high intensity for at least 20 minutes
outdoors.
2
After your ride, select
Save Ride
.
3
Select
>
My Stats
>
FTP
.
Your FTP appears as a value measured in watts per
kilogram, your power output in watts, and a position on the
color gauge.
Using Electronic Shifters
Before you can use compatible electronic shifters, such as
Shimano
®
Di2
™
shifters, you must pair them with your device
(
). You can customize the
optional data fields (
).
The Edge device displays current adjustment values when the
sensor is in adjustment mode.
Situational Awareness
Your Edge device can be used with the Varia Vision
™
device,
Varia
™
smart bike lights, and rearview radar to improve
situational awareness. See the owner's manual for your Varia
device for more information.
NOTE:
You may need to update the Edge software before
pairing Varia devices (
).
Using a Weight Scale
If you have an ANT+ compatible weight scale, the device can
read the data from the weight scale.
1
Select
>
Sensors
>
Add Sensor
>
Weight Scale
.
A message appears when the weight scale is found.
2
Stand on the scale when indicated.
NOTE:
If using a body composition scale, remove shoes and
socks to ensure that all body composition parameters are
read and recorded.
3
Step off the scale when indicated.
TIP:
If an error occurs, step off the scale. Step on when
indicated.
Garmin Index
™
Smart Scale Data
If you have a Garmin Index device, the most recent scale data is
stored in your Garmin Connect account. The next time you
connect the Edge device to your Garmin Connect account, the
weight data is updated in your Edge user profile.
History
History includes time, distance, calories, speed, lap data,
elevation, and optional ANT+ sensor information.
NOTE:
History is not recorded while the timer is stopped or
paused.
When the device memory is full, a message appears. The
device does not automatically delete or overwrite your history.
Upload your history to Garmin Connect periodically to keep track
of all your ride data.
Viewing Your Ride
1
Select
>
History
>
Rides
.
2
Select a ride.
3
Select an option.
Viewing Your Time in Each Training Zone
Before you can view your time in each training zone, you must
pair your device with a compatible heart rate monitor or power
meter, complete an activity, and save the activity.
Viewing your time in each heart rate and power zone can help
you adjust your training intensity. You can adjust your power
zones (
) and your heart rate
zones (
) to match your
goals and abilities. You can customize a data field to display
your time in training zones during your ride (
).
1
Select
>
History
>
Rides
.
2
Select a ride.
3
Select
Time in HR Zone
or
Time in Power Zone
.
Viewing Data Totals
You can view the accumulated data you have saved to the
device, including the number of rides, time, distance, and
calories.
Select
>
History
>
Totals
.
Deleting a Ride
1
Select
>
History
>
Rides
.
2
Select a ride.
3
Select > .
Sending Your Ride to Garmin Connect
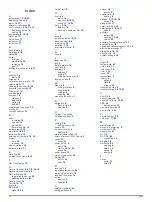
NOTICE
To prevent corrosion, thoroughly dry the USB port, the weather
cap, and the surrounding area before charging or connecting to
a computer.
1
Pull up the weather cap
À
from the USB port
Á
.
2
Plug the small end of the USB cable into the USB port on the
device.
3
Plug the large end of the USB cable into a computer USB
port.
4
.
5
Follow the on-screen instructions.
14
History
Summary of Contents for A03001
Page 1: ...A03001 Owner s Manual July 2016 190 02077 00_0A...
Page 29: ......


