background image

automated text message and email with your name and GPS 

location to your emergency contacts.
A message appears on your device and paired smartphone 

indicating your contacts will be informed after 30 seconds have 

elapsed. If assistance is not needed, you can cancel the 

automated emergency message.
Before you can enable incident detection on your device, you 

must set up emergency contact information in the Garmin 

Connect Mobile app. Your paired smartphone must be equipped 

with a data plan and be in an area of network coverage where 

data is available. Your emergency contacts must be able to 

receive text messages (standard text messaging rates may 

apply).

Setting Up Incident Detection

1

Go to 

www.garmin.com/intosports/apps

, and download the 

Garmin Connect Mobile app to your smartphone.

2

Pair your smartphone with your device (

Pairing Your 

Smartphone

, page 8

).

3

Set up your emergency contacts and rider information in the 

Garmin Connect Mobile app (

Setting Up Rider Information 

and Emergency Contacts

, page 10

).

4

Enable incident detection on your device (

Turning Incident 

Detection On and Off

, page 10

).

5

Enable GPS on your device (

Changing the Satellite Setting

page 16

).

Setting Up Rider Information and Emergency 

Contacts

1

Open the Garmin Connect Mobile app on your smartphone.

2

From the app settings, select 

Incident Detection

.

3

Enter your rider information and your emergency contacts.
Your selected contacts receive a message identifying them 

as emergency contacts for incident detection.

Turning Incident Detection On and Off

Select 

 > 

Settings

 > 

System

 > 

Incident Detection

.

Viewing Your Emergency Contacts

Before you can view your emergency contacts on your device, 

you must set up your rider information and emergency contacts 

in the Garmin Connect Mobile app.

Select 

 > 

Contacts

.

Your emergency contacts' names and phone numbers 

appear.

Cancelling an Automated Message

When an incident is detected by your device, you can cancel the 

automated emergency message on your device or your paired 

smartphone before it is sent to your emergency contacts.

Select 

Cancel

 >   before the end of the 30-second 

countdown.

Sending a Status Update After an Incident

Before you can send a status update to your emergency 

contacts, your device must detect an incident and send an 

automated emergency message to your emergency contacts.
You can send a status update to your emergency contacts 

informing them you are not in need of assistance.

1

Swipe down from the top of the screen to view the 

connections screen.

2

Select 

Incident Detected

 > 

Send I'm Okay

.

A message is sent to all emergency contacts.

ANT+ Sensors

Your device can be used with wireless ANT+ sensors. For more 

information about compatibility and purchasing optional sensors, 

go to 

http://buy.garmin.com

.

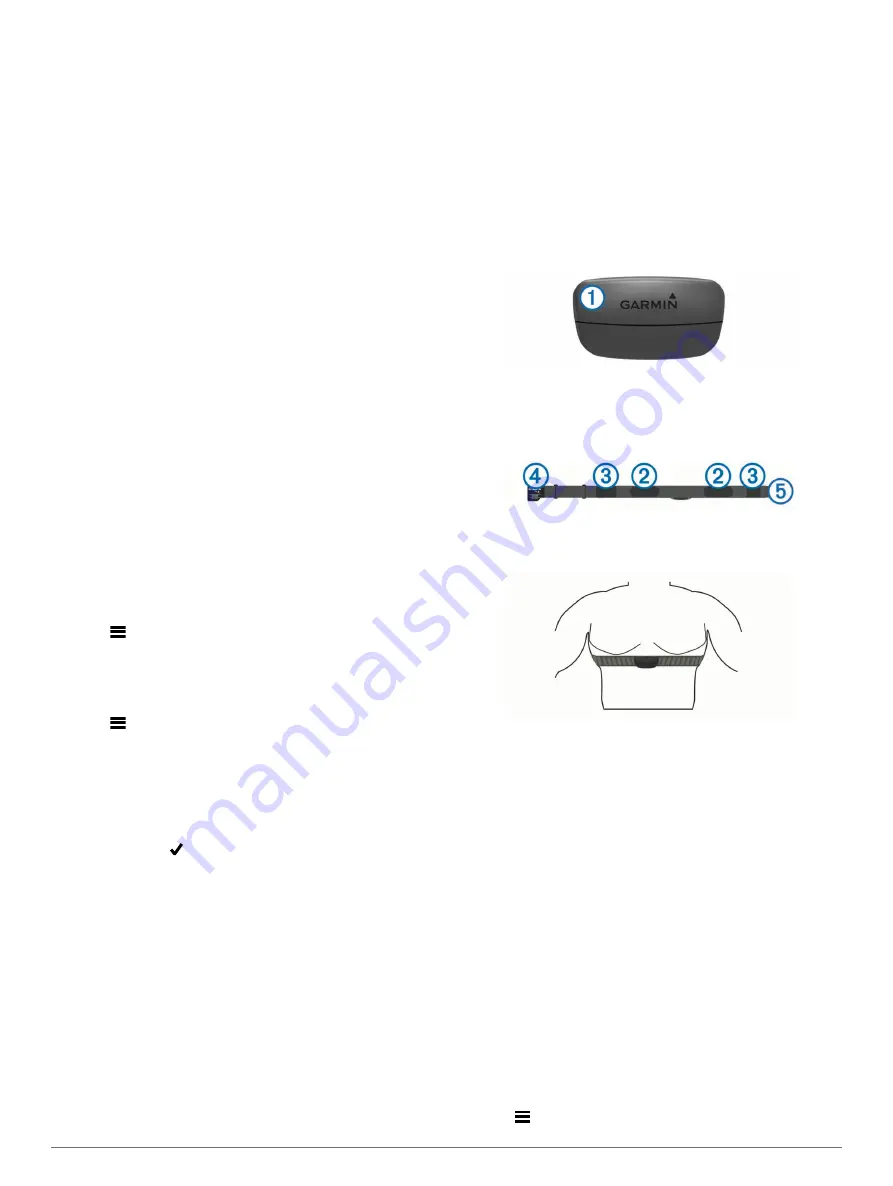
Putting On the Heart Rate Monitor

NOTE: 

If you do not have a heart rate monitor, you can skip this 

task.
You should wear the heart rate monitor directly on your skin, just 

below your sternum. It should be snug enough to stay in place 

during your activity.

1

Snap the heart rate monitor module 

À

 onto the strap.

The Garmin logos on the module and the strap should be 

right-side up.

2

Wet the electrodes 

Á

 and the contact patches 

Â

 on the back 

of the strap to create a strong connection between your chest 

and the transmitter.

3

Wrap the strap around your chest, and connect the strap 

hook 

Ã

 to the loop 

Ä

.

NOTE: 

The care tag should not fold over.

The Garmin logos should be right-side up.

4

Bring the device within 3 m (10 ft.) of the heart rate monitor.

After you put on the heart rate monitor, it is active and sending 

data.

TIP: 

If the heart rate data is erratic or does not appear, see the 

troubleshooting tips (

Tips for Erratic Heart Rate Data

page 12

).

Recovery Advisor

You can use your Garmin device with a heart rate monitor to 

display how much time remains before you are fully recovered 

and ready for the next hard workout.

Recovery time

: The recovery time appears immediately 

following an activity. The time counts down until it is optimal 

for you to attempt another hard workout.

Turning On the Recovery Advisor

Before you can use the recovery advisor feature, you must put 

on the heart rate monitor, and pair it with your device (

Pairing 

Your ANT+ Sensors

, page 12

). If your device was packaged 

with a heart rate monitor, the device and sensor are already 

paired. For the most accurate estimate, complete the user 

profile setup (

Setting Up Your User Profile

, page 16

), and set 

your maximum heart rate (

Setting Your Heart Rate Zones

page 11

).

1

Select 

 > 

My Stats

 > 

Recovery Advisor

 > 

Enable

.

10

ANT+ Sensors

Summary of Contents for A03001

Page 1: ...A03001 Owner s Manual July 2016 190 02077 00_0A...

Page 2: ...n The Bluetooth word mark and logos are owned by the Bluetooth SIG Inc and any use of such marks by Garmin is under license The Cooper Institute as well as any related trademarks are the property of T...

Page 3: ...ping a Course 8 Deleting a Course 8 Course Options 8 Route Settings 8 Selecting an Activity for Route Calculation 8 Map Settings 8 Changing the Map Orientation 8 Bluetooth Connected Features 8 Pairing...

Page 4: ...ff 18 Changing the Device Language 18 Changing the Configuration Settings 18 Time Zones 18 Device Information 18 Specifications 18 Edge Specifications 18 Heart Rate Monitor Specifications 18 Speed Sen...

Page 5: ...ice completely About the Battery WARNING This device contains a lithium ion battery See the Important Safety and Product Information guide in the product box for product warnings and other important i...

Page 6: ...Select to access your segments workouts and other training options Select to access your history training options personal records contacts and settings Select to access your Connect IQ apps widgets...

Page 7: ...Strava membership go to the segments widget in your Garmin Connect account For more information go to www strava com The information in this manual applies to both Garmin Connect segments and Strava s...

Page 8: ...h at least one step 1 Select Add New Step 2 Select Step Type 3 Select an option Select Repeat to repeat a step one or more times For example you can repeat a 5 mile step ten times Select Repeat Until...

Page 9: ...rse to follow a saved course Courses page 7 Select Follow an Activity to follow a saved ride Going for a Ride page 3 Select Follow a Workout to follow a power based workout downloaded from your Garmin...

Page 10: ...to remember landmarks or return to a certain spot you can mark a location 1 Go for a ride 2 Select Navigation Mark Location Saving Locations from the Map 1 Select Navigation Search Select Area A Map...

Page 11: ...e and a map of the route appears TIP You can select to view an elevation plot of the route 7 Select Ride Following a Course From the Web Before you can download a course from Garmin Connect you must h...

Page 12: ...zoom in or out manually Map Detail Sets the level of detail on the map More detail may cause the map to draw slower Guide Text Sets when the turn by turn navigation prompts are shown requires routable...

Page 13: ...menu select LiveTrack GroupTrack 5 Select Visible to All Connections NOTE If you have more than one compatible device you must select a device for the GroupTrack session 6 Select Start LiveTrack 7 On...

Page 14: ...can send a status update to your emergency contacts your device must detect an incident and send an automated emergency message to your emergency contacts You can send a status update to your emergenc...

Page 15: ...heart rate monitor and pair it with your device Pairing Your ANT Sensors page 12 Stress score is the result of a three minute test performed while standing still where the Edge device analyzes heart...

Page 16: ...em to the hooks on the sensor 4 Rotate the crank arm to check for clearance The sensor and bands should not contact any part of your bike or shoe NOTE The LED flashes green for five seconds to indicat...

Page 17: ...rding cycling dynamics uses additional device memory 1 Go for a ride 2 Scroll to the cycling dynamics screen to view your peak power phase total power phase and platform center offset 3 If necessary h...

Page 18: ...nd socks to ensure that all body composition parameters are read and recorded 3 Step off the scale when indicated TIP If an error occurs step off the scale Step on when indicated Garmin Index Smart Sc...

Page 19: ...The device uses smart recording It records key points where you change direction speed or heart rate When a power meter is paired the device records points every second Recording points every second...

Page 20: ...necessary edit the name and color for the profile 4 Select an option Select Data Screens to customize the data screens and data fields Customizing the Data Screens page 16 Select Default Ride Type to...

Page 21: ...the Auto Pause feature to pause the timer automatically when you stop moving or when your speed drops below a specified value This feature is helpful if your ride includes stop lights or other places...

Page 22: ...s Time Zones Each time you turn on the device and acquire satellites or sync with your smartphone the device automatically detects your time zone and the current time of day Device Information Specifi...

Page 23: ...3 Remove the cover and the battery TIP You can use a piece of tape or a magnet to remove the battery from the cover 4 Wait 30 seconds 5 Insert the new battery into the cover observing polarity NOTE D...

Page 24: ...armin devices Product registration Product manuals Software updates Data uploads to Garmin Connect Map chart or course updates Getting More Information Go to www garmin com intosports Go to www garmin...

Page 25: ...assessment of your ability to perform Power The current power output in watts Your device must be connected to a compatible power meter Power FTP The current power output as a percentage of functional...

Page 26: ...reset Trainer Resistance The resistance force applied by an indoor trainer Vertical Speed The rate of ascent or descent over time VS 30s Avg The 30 second moving average of vertical speed Workout Step...

Page 27: ...f the product Title ownership rights and intellectual property rights in and to the Software remain in Garmin and or its third party providers You acknowledge that the Software is the property of Garm...

Page 28: ...locations 6 deleting 7 editing 7 finding with the map 6 locking screen 2 M maps 6 8 finding locations 6 orientation 8 settings 8 updating 20 mounting the device 1 N navigation 6 back to start 6 stoppi...

Page 29: ......

Page 30: ...5 69 33 99 39 02 36 699699 52 001 855 792 7671 0800 427 652 0800 0233937 47 815 69 555 00800 4412 454 44 2380 662 915 35 1214 447 460 386 4 27 92 500 0861 GARMIN 427 646 27 0 11 251 9800 34 93 275 44...

Reviews: