
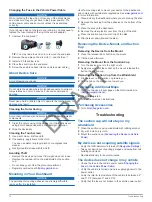


Changing the Fuse in the Vehicle Power Cable
NOTICE
When replacing the fuse, do not lose any of the small pieces
and make sure they are put back in the proper position. The
vehicle power cable does not work unless it is assembled
correctly.
If your device does not charge in your vehicle, you may need to
replace the fuse located at the tip of the vehicle adapter.
1
Unscrew the end piece
À
.
TIP:
You may need to use a coin to remove the end piece.
2
Remove the end piece, the silver tip
Á
, and the fuse
Â
.
3
Install a 2 A fast-blow fuse.
4
Place the silver tip in the end piece.
5
Screw the end piece back into the vehicle power cable
Ã
.
About Device Care
NOTICE
Avoid dropping your device.
NOTICE
Do not store the device where prolonged exposure to extreme
temperatures can occur, because it can cause permanent
damage.
NOTICE
Never use a hard or sharp object to operate the touchscreen, or
damage may result.
Cleaning the Outer Casing
NOTICE
Avoid chemical cleaners and solvents that can damage plastic
components.
1
Clean the outer casing of the device (not the touchscreen)
using a cloth dampened with a mild detergent solution.
2
Wipe the device dry.
Cleaning the Touchscreen
1
Use a soft, clean, lint-free cloth.
2
If necessary, apply liquid to the cloth.
You can use water, isopropyl alcohol, or eyeglass lens
cleaner.
3
Gently wipe the screen with the cloth.
Avoiding Theft
• Remove the device and mount from sight when not in use.
• Remove the residue left on the windshield by the suction
cup.
• Do not keep your unit in the glove compartment.
• Register your device at
Mounting on Your Dashboard
NOTICE
The permanent mounting adhesive is extremely difficult to
remove after it is installed.
Use the mounting disk to mount your device to the dashboard
and comply with certain state regulations. See
for more information.
1
Clean and dry the dashboard where you are placing the disk.
2
Remove the backing from the adhesive on the bottom of the
disk.
3
Place the disk on the dashboard.
4
Remove the clear plastic cover from the top of the disk.
5
Place the suction cup mount on top of the disk.
6
Flip the lever down (toward the disk).
Removing the Device, Mount, and Suction
Cup
Removing the Device from the Mount
1
Press the release tab or button on the mount.
2
Tilt the device forward.
Removing the Mount from the Suction Cup
1
Turn the device mount to the right or left.
2
Apply pressure until the socket on the mount releases the
ball on the suction cup.
Removing the Suction Cup from the Windshield
1
Flip the lever on the suction cup toward you.
2
Pull the tab on the suction cup toward you.
Purchasing Additional Maps
1
Go to your device product page on the Garmin web site
(
).
2
Click the
Maps
tab.
3
Follow the on-screen instructions.
Purchasing Accessories
Troubleshooting
The suction cup will not stay on my
windshield
1
Clean the suction cup and windshield with rubbing alcohol.
2
Dry with a clean, dry cloth.
3
Mount the suction cup (
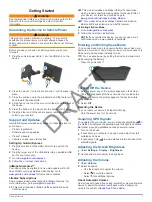
Connecting the Device to Vehicle
My device is not acquiring satellite signals
• Verify the GPS simulator is turned off (
• Take your device out of parking garages and away from tall
buildings and trees.
• Remain stationary for several minutes.
The device does not charge in my vehicle
• Check the fuse in the vehicle power cable (
Fuse in the Vehicle Power Cable
).
• Verify the vehicle is turned on and is supplying power to the
power outlet.
• Verify the interior temperature of the vehicle is between 32°
and 113°F (between 0° and 45°C).
• Verify that the fuse is not broken in the vehicle power outlet.
14
Troubleshooting
DRAFT