Periodic
Maintenance
Apollo GX50/60/65 Installation Manual
45
A
PPENDIX
B
-
P
ERIODIC
M
AINTENANCE
The GX50/60/65 unit is designed to not require any regular general maintenance except as
included in this section.
L
ITHIUM
B
ATTERY
R
EPLACEMENT
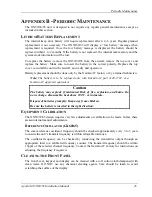
The internal keep alive battery will require replacement after 4 to 6 years. Regular planned
replacement is not necessary. The GX50/60/65 will display a “low battery” message when
replacement is required. Once the low battery message is displayed, the battery should be
replaced within 1 to 2 months. If the battery is not replaced, the internal ram memory and the
system clock information will be lost.
To replace the battery, remove the GX50/60/65 from the aircraft, remove the top cover, and
replace the battery. Make sure to insert the battery in the correct polarity. Replace the top
cover, re-install the unit in the aircraft, and verify unit operation.
Battery replacement should be done only by the Garmin AT factory or by a trained technician.
Note:
The battery is to be replaced only with Garmin AT part #148-1702, or a
Garmin AT approved equivalent.
Caution
The battery may explode if mistreated. Risk of fire, explosion, and burns. Do
not recharge, disassemble, heat above 100
°
C, or incinerate.
Dispose of batteries promptly. Keep away from children.
Be sure the battery is inserted in the right direction.
E
QUIPMENT
C
ALIBRATION
The GX50/60/65 design requires very few adjustments or calibration to be made. In fact, there
are
no
internal manual adjustments.
R
EFERENCE
O
SCILLATOR
(GX60/65)
The comm reference oscillator frequency should be checked approximately every 3 to 5 years
to ensure the unit’s transmit frequency is within allowable tolerance.
The oscillator frequency can be checked by connecting the transmitter output through an
appropriate load to a calibrated frequency counter. The transmit frequency should be within
15ppm of the selected channel frequency. Contact the Garmin AT factory for instructions on
adjusting the frequency if required.
C
LEANING THE
F
RONT
P
ANEL
The front bezel, keypad, and display can be cleaned with a soft cotton cloth dampened with
clean water. DO NOT use any chemical cleaning agents. Care should be taken to avoid
scratching the surface of the display.
Summary of Contents for APOLLO GX60
Page 4: ...NOTES ...
Page 8: ...Table of Contents iv Apollo GX50 60 65 Installation Manual NOTES ...
Page 30: ...Installation 22 Apollo GX50 60 65 Installation Manual Figure 12 RS 232 Serial Connections ...
Page 31: ...Installation Apollo GX50 60 65 Installation Manual 23 Figure 13 GX60 65 Comm Wiring Diagram ...
Page 40: ...Installation 32 Apollo GX50 60 65 Installation Manual NOTES ...
Page 50: ...Limitations 42 Apollo GX50 60 65 Installation Manual NOTES ...
Page 54: ...Periodic Maintenance 46 Apollo GX50 60 65 Installation Manual NOTES ...
Page 82: ...Serial Interface Specifications 74 Apollo GX50 60 65 Installation Manual NOTES ...
Page 84: ...Full Stack Drawing 76 Apollo GX50 60 65 Installation Manual ...
Page 85: ......
Page 86: ......

