
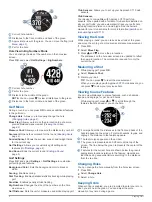


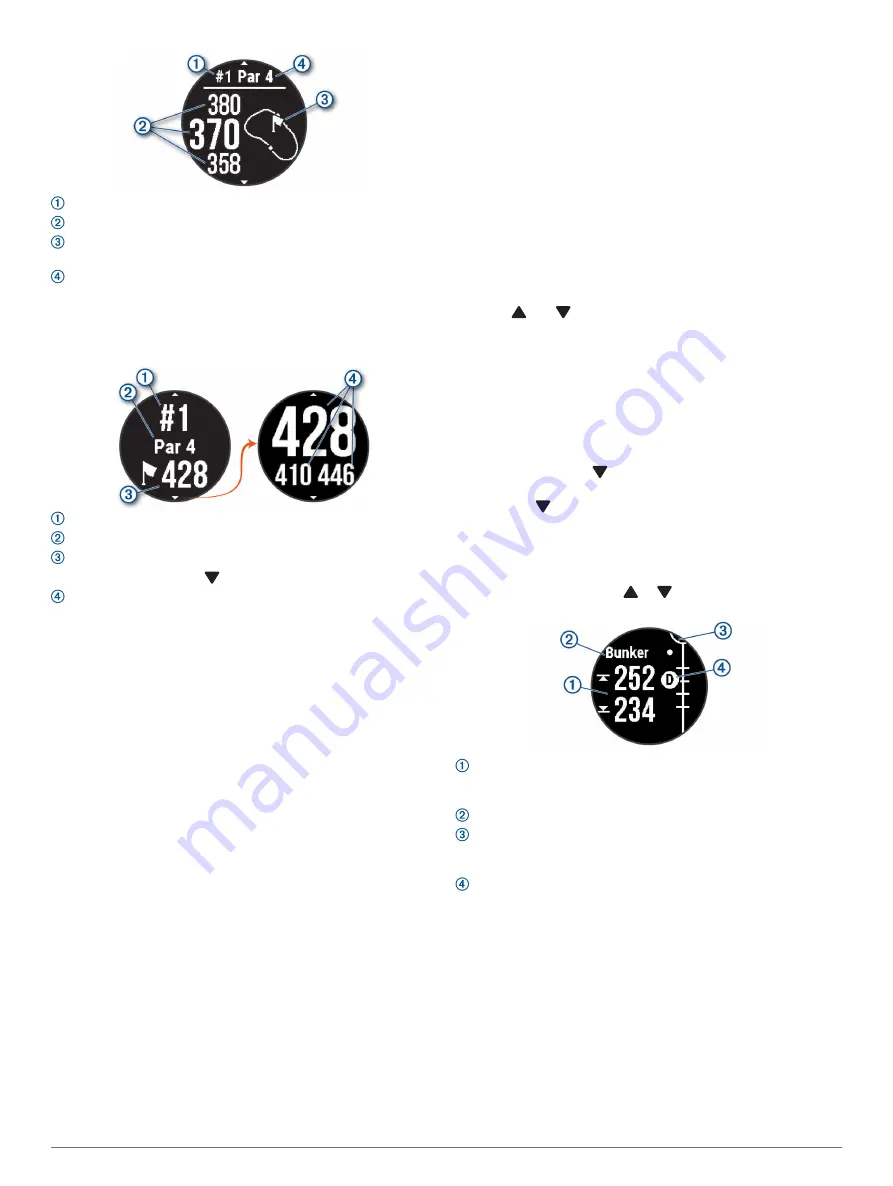
: Current hole number.
: Distances to the front, middle, and back of the green.
: Approximate view of the green. You can move the flag (
).
: Par for the hole.
Hole View in Big Numbers Mode
You can change the size of the numbers on the hole view
screen.
Press
OK
, and select
Golf Settings
>
Big Numbers
.
: Current hole number.
: Par for the hole.
: Distance to the middle of the green.
NOTE:
You can press to view all distances to the green.
: Distances to the front, middle, and back of the green.
Golf Menu
During a round, you can press
OK
to access additional features
in the golf menu.
Change Hole
: Allows you to manually change the hole
(
).
Move Flag
: Allows you to move the pin location to get a more
precise distance measurement (
).
Measure Shot
: Allows you to measure the distance to your ball.
Scorecard
: Opens the scorecard for the round (
).
Sunrise/Sunset
: Shows the sunrise, sunset, and twilight times
for the current day.
Golf Settings
: Allows you to customize golf settings and
features (
).
End Round
: Ends the current round (
).
Golf Settings
Press
OK
, and select
Settings
>
Golf Settings
to customize
golf settings and features.
Background Color
: Sets the background color to black or
white.
Scoring
: Enables scoring.
Stat Tracking
: Enables detailed statistics tracking while playing
golf.
Penalties
: Enables penalty stroke tracking.
Big Numbers
: Changes the size of the numbers on the hole
view screen.
Golf Distance
: Sets the unit of measure used while playing golf.
Club Sensors
: Allows you to set up your Approach CT10 club
sensors.
Club Sensors
Your device is compatible with Approach CT10 golf club
sensors. When paired with a full set of club sensors installed on
all your golf clubs, you can automatically track your golf shots,
including location, distance, and club type. See the owner's
manual for your club sensors for more information (
).
Viewing the Green
While playing a round, you can take a closer look at the green
and move the pin to get a more precise distance measurement.
1
Press
OK
.
2
Select
Move Flag
.
3
Press and to move the pin location.
The distances on the hole view screen are updated to reflect
the new pin location. The pin location is saved for only the
current round.
Measuring a Shot
1
While playing golf, press
OK
.
2
Select
Measure Shot
.
3
Walk to your ball.
TIP:
You can press to reset the measurement.
When you are playing with Approach CT10 club sensors, you
can press to view your previous shots.
Viewing Course Features
You can view distances to course features, such as hazards,
layups, and doglegs, for par 4 and 5 holes.
While playing golf, press or to scroll through the
features that are ahead of you on the hole.
: For large hazards, the distances to the front and back of the
hazard appear on the screen. For small hazards, layups, and
doglegs, the distance to the feature appears.
: The feature type appears on the screen.
: The green is represented as a half circle at the top of the
screen. The line below the green represents the center of the
fairway.
: Features for the current hole are shown below the green in
approximate locations relative to the fairway. Hazards are
identified using sequential letters according to the distance
from the tee box.
Changing Holes
You can change the hole manually from the hole view screen.
1
Press
OK
.
2
Select
Change Hole
.
3
Select a hole.
Keeping Score
When scoring is enabled, you are prompted to enter your score
when you are near the green. You can adjust the score
manually at any time during a game.
2
Playing Golf
Summary of Contents for APPROACH G12
Page 1: ...APPROACH G12 Owner sManual...
Page 4: ......
Page 11: ......
Page 12: ...support garmin com GUID 4CC2A098 94E4 4F1D 930D 73C2B01D064A v1 March 2021...