background image

AQUAMAP™ 10x2/12x2 SERIES

5

22

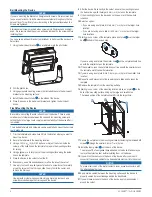
 Place the device into the cutout.

23

 Secure the device to the mounting surface using the included M4 screws 

7

.

24

 Wipe away all excess marine sealant.

25

 Install the trim caps by snapping them in place around the edges of the 

device.

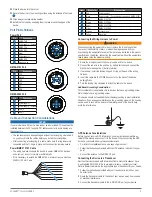
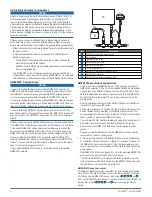
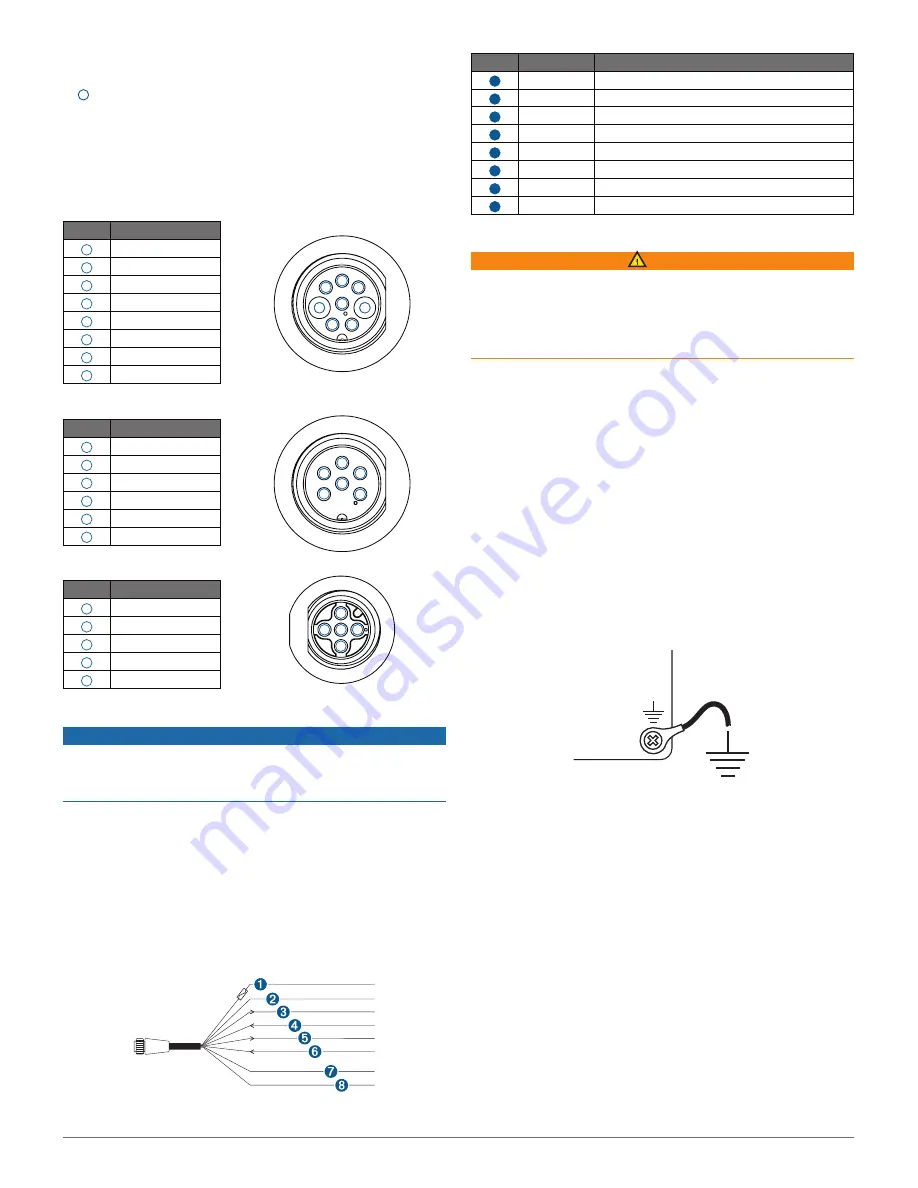
Port Pin Definitions

Power Port

Pin

Description

1

NMEA TXB

2

Power supply - / Ground

3

NMEA TXA

4

NMEA RXA

5

Alarm

6

Power

7

NMEA RXB

8

Accessory on

NMEA 0183 Port

Pin

Description

1

TXA

2

Ground

3

TXB

4

RXA

5

NC

6

RXB

NMEA 2000 Port

Pin

Description

1

NC

2

Power

3

Power supply - / Ground

4

CAN_H

5

CAN_L

Cable and Connection Considerations

NOTICE

If your model has a DVI port, a blue rubber seal is included. This seal must be 

installed between the DVI port and DVI cable connector to avoid damage to 

the connectors.

•  The cables may have been packaged without the locking rings installed. If 

so, you should route the cables before you install the locking rings.

•  After connecting a locking ring to a cable, make sure the ring is securely 

connected and the O-ring is in place so the connection remains secure.

Power/NMEA

®

  0183 Cable

• 

The wiring harness connects the device to power, NMEA 0183 devices, 

and a lamp or a horn for visible or audible alerts.

• 

If it is necessary to extend the NMEA 0183 or alarm wires, you must use 

22 AWG (.33 mm²) wire.

Item

Wire Color

Wire Function

1

Red

Power

2

Black

Power supply - / Ground (power supply and NMEA 0183)

3

Blue

NMEA 0183 TXA

4

Brown

NMEA 0183 RXA

5

Gray

NMEA 0183 TXB

6

Violet

NMEA 0183 RXB

7

Orange

Accessory on

8

Yellow

Alarm low

Connecting the Wiring Harness to Power


WARNING

When connecting the power cable, do not remove the in-line fuse holder. 

To prevent the possibility of injury or product damage caused by fire or 

overheating, the appropriate fuse must be in place as indicated in the product 

specifications. In addition, connecting the power cable without the appropriate 

fuse in place voids the product warranty.

1

  Route the wiring harness to the power source and to the device.

2

  Connect the red wire to the positive (+) battery terminal, and connect the 

black wire to the negative (-) battery terminal.

3

  If necessary, install the locking ring and O-ring on the end of the wiring 

harness.

4

  Insert the cable into the POWER connector on the back of the device, 

pushing firmly.

5

  Turn the locking ring clockwise to attach the cable to the device.

Additional Grounding Consideration

This consideration is applicable only to devices that have a grounding screw.
Not all models have a grounding screw.
This device should not need additional chassis grounding in most installation 

situations. If you experience interference, the grounding screw on the housing 

can be used to connect the device to the water ground of the boat to help 

avoid the interference.

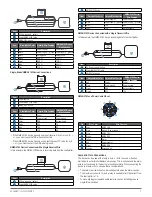
GPS Antenna Considerations

Before you can receive GPS information, you must install a compatible ex

-

ternal GPS antenna and connect it to the device. When connecting the GPS 

antenna, you should observe these considerations.

•  For a list of compatible antenna, see support.garmin.com.
• 

Follow the instructions provided with the GPS antenna to install it on your 

boat.

• 

Connect the antenna to the GPS ANT port.

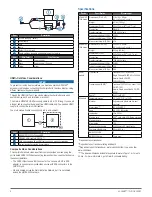
Connecting the Device to a Transducer

Devices that can receive depth information from a Garmin transducer have 

a port labeled 8-PIN XDCR. Go to 

www.garmin.com or contact your local 

Garmin dealer to determine the appropriate type of transducer for your needs.

1

  Follow the instructions provided with your transducer to install it on your 

boat correctly.

2

  Route the transducer cable to the back of your device, away from sources 

of electrical interference.

3

  Connect the transducer cable to the 8-PIN XDCR port on your device.

1

2

3

4

5

6

1

2

3

4

5

1

2

3

4

5

6

7

8

Summary of Contents for AQUAMAP 10x2 Series

Page 1: ...marine charts or devices near the bottom of the screen 9 Create or sign in to your Garmin account 10 Follow the on screen instructions to set up your vessel 11 Select Add The Garmin Express application searches the memory card for the device information 12 Select Add Device to register the device When registration is complete the Garmin Express application searches for additional charts and chart ...

Page 2: ...ew x 4 TFWM 4 0 x 25 N NMEA 2000 screw self tapping 4 x 32 O Garmin sticker P Flush mount template Q Documentation In The Box AQUAMAP 12x2 Series These are the parts you ll find inside the package B C D E F G H I J K L M O N A P Q Item Description A AQUAMAP 12x2 series B Protective cover C NMEA 2000 drop cable 2 m D Power cable 2 m E NMEA 2000 T connector F Bail mount G Bail mount knob x 2 H Nut p...

Page 3: ...ions The temperature range for this device is listed in the product specifications Extended exposure to temperatures exceeding the specified temperature range in storage or operating conditions may cause device failure Extreme temperature induced damage and related conse quences are not covered by the warranty When selecting a mounting location you should observe these consider ations The location...

Page 4: ...ve the trim caps NOTICE Use a plastic pry tool when possible Using a metal pry tool such as a screwdriver can damage the trim caps and the device 8 After the device fits correctly in the cutout ensure the mounting holes on the device line up with the larger 6 mm 1 4 in holes on the template 9 If the mounting holes on the device do not line up mark the new hole locations 10 Select an option If you ...

Page 5: ... fuse must be in place as indicated in the product specifications In addition connecting the power cable without the appropriate fuse in place voids the product warranty 1 Route the wiring harness to the power source and to the device 2 Connect the red wire to the positive battery terminal and connect the black wire to the negative battery terminal 3 If necessary install the locking ring and O rin...

Page 6: ...s from Garmin If you are unfamiliar with NMEA 2000 you should read the NMEA 2000 Network Fundamentals chapter of the Technical Reference for NMEA 2000 Products You can find this document using the Manuals link on the product page for your device at www garmin com The port labeled NMEA 2000 is used to connect the device to a standard NMEA 2000 network Item Description 1 NMEA 2000 compatible Garmin ...

Page 7: ...armin Wire Function NMEA 0183 Device Wire Function 1 Red Power supply Power supply 2 Black Power supply ground Power supply ground 3 Blue TXA RXA 4 Gray TXB Not applicable NMEA 0183 Device Connected with a Single Transmit Wire In this example the NMEA 0183 device is sending data to the chartplotter Item Description 1 DC Power supply battery 2 Power NMEA 0183 cable 3 NMEA 0183 device Item Garmin Wi...

Page 8: ...ed across the NMEA 2000 network Specifications Device Specification Measurement AQUAMAP 10x2 series Dimensions W x H x D 318 x 185 x 69 mm 12 1 2 x 7 5 16 x 2 11 16 in Weight 4 1 lbs 1 85 kg Display size W x H 224 x 125 mm 8 3 4 x 4 15 16 in Display type WSVGA Display resolution 1024 x 600 pixels Max power usage at 10 Vdc 32 4 W Typical current draw at 12 Vdc 1 9 A Max current draw at 12 Vdc 2 7 A...

Page 9: ...gin to destination GPBWC BWC Bearing and distance to waypoint GPGGA GGA Global positioning system fix data GPGLL GLL Geographic position latitude and longitude GPGSA GSA GNSS DOP and active satellites GPGSV GSV GNSS satellites in view GPRMB RMB Recommended minimum navigation information GPRMC RMC Recommended minimum specific GNSS data GPRTE RTE Routes GPVTG VTG Course over ground and ground speed ...

Page 10: ......

Reviews: