Introduction
WARNING
See the
Important Safety and Product Information
guide in the
product box for product warnings and other important
information.
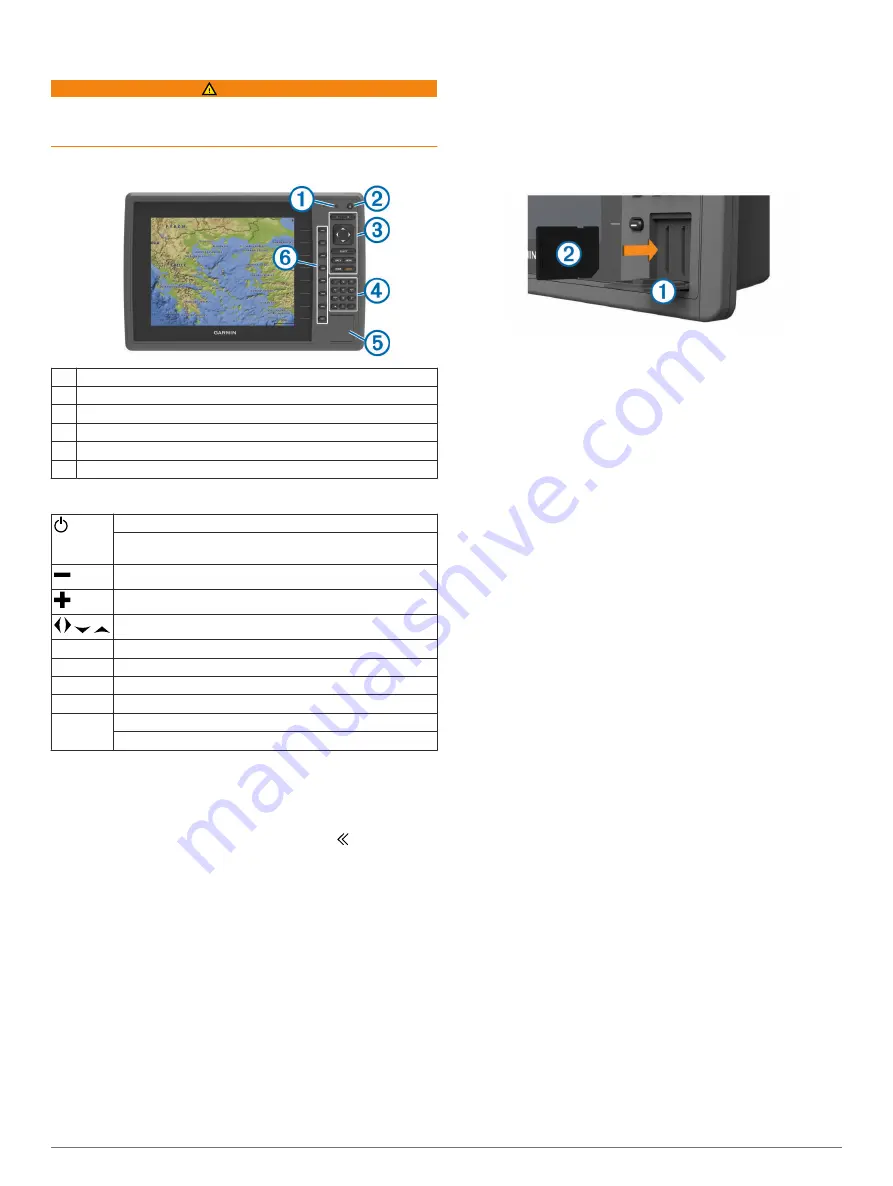
Device Front View
À
Automatic backlight sensor
Á
Power key
Â
Device keys
Ã
Number pad (available on 10 inch models only)
Ä
SD memory card slot
Å
Soft keys
Device Keys
Turns on and off the device when held.
Adjusts the backlight and color mode when quickly pressed
and released.
Zooms out of a chart or view.
Zooms in to a chart or view.
Scrolls, highlights options, and moves the cursor.
SELECT
Acknowledges messages and selects options.
BACK
Returns to the previous screen.
MARK
Saves the present location as a waypoint.
HOME
Returns to the Home screen.
MENU
Opens a menu of options for the page, when applicable.
Closes a menu, when applicable.
Using the Shortcut Key
You can quickly open a menu of commonly used options from
the chart, sonar, and radar pages. The contents of the shortcut
menu very, based on the page you have open.
• On the chart, sonar, and radar pages, select to open the
shortcut menu.
• To show or hide the shortcut key, select
Settings
>
System
>
Shortcut Key
.
Manual Conventions
In this manual, the term “select” is used to describe these
actions.
• Using the arrow keys to highlight a menu item, and then
pressing SELECT.
• Pressing a key, such as SELECT or MENU.
• Pressing a soft key next to the specified item.
When you are instructed to select multiple items in a series,
small arrows appear in the text. For example, "select
MENU
>
Add
," indicates that you need to press the MENU hard key, and
then press the soft key next to the Add option.
The images in this manual are for reference only and may not
match your device exactly.
Inserting Memory Cards
You can use optional memory cards in the chartplotter. Map
cards allow you to view high-resolution satellite imagery and
aerial reference photos of ports, harbors, marinas, and other
points of interest. You can use blank memory cards to record
sonar data and transfer data such as waypoints, routes, and
tracks to another compatible Garmin
®
chartplotter or a computer.
1
Open the access door
À
on the front of the chartplotter.
2
Insert the memory card
Á
with the label facing to the right.
3
Press the card in until it clicks.
4
Close the door.
Loading the New Software on a Memory
Card
The device may contain a software-update memory card. If so,
follow the instructions provided with the card. If a software
update memory card is not included, you must copy the software
update to a memory card.
1
Insert a memory card into the card slot on the computer.
2
www.garmin.com.sg/softwareupdate/onthewater
.
3
Select AQUAMAP 80/100.
4
Select
Download
.
5
Read and agree to the terms.
6
Select
Download
.
7
Select
Run
.
8
Select the drive associated with the memory card, and select
Next
>
Finish
.
Updating the Device Software
Before you can update the software, you must obtain a
software-update memory card or load the latest software onto a
memory card.
1
Turn on the chartplotter.
2
After the home screen appears, insert the memory card into
the card slot.
NOTE:
In order for the software update instructions to
appear, the device must be fully booted before the card is
inserted.
3
Follow the on-screen instructions.
4
Wait several minutes while the software update process
completes.
The device returns to normal operation after the software
update process is complete.
5
Remove the memory card.
NOTE:
If the memory card is removed before the device
restarts fully, the software update is not complete.
Contacting Garmin Product Support
information.
Introduction
1
Summary of Contents for AQUAMAP 80 Series
Page 1: ...AQUAMAP 80 100 Series Owner s Manual November 2016 Printed in Taiwan 190 01657 00_0C...
Page 6: ......
Page 35: ......


